INSTALLING AND OPERATING THE
CANON CR4-45NM DIGITAL CAMERA ADAPTER
Richard J Kinch, Ph.D.
December, 2014
http://www.truetex.com
This document describes how to install and operate the
digital camera adapter for the Canon CR4-45NM.
This adapter allows you to use a standard Canon digital camera
to take high-quality digital retinal photos and to process them
with standard computer hardware and software.
We produce this adapter using your old Polaroid camera
attachment (CR4-PC or CR4-PC DUAL, see Figure 1 below).
You must send this attachment to us for refurbishment and retrofitting
for digital camera use.
The retrofit includes mechanical, optical, and electronic
components. We will also clean, lubricate, align, recushion,
and make minor repairs to your submitted attachment as needed.
ADAPTER COMPONENTS SUPPLIED IN THE KIT
- Main digital-retrofitted DSLR adapter attachment (see Figure 4 below).
- Lens adapter tube for Canon SLR lens (see Figure 2 below) (see required 28mm lens below).
This tube may be attached to the main adapter when shipped, or packed separately.
- Canon body cap for shipping or storing the attachment off the instrument.
This cap is also shipped on the adapter.
Depending on which digital camera type you will be using, your adapter kit provides the
following electronic adapters:
- Remote cord adapter, E3 to N3 (only if you will be using non-Rebel Canon models such as the Canon 70D or 7D).
- 52mm ND8 neutral-density camera filter (only if your CR4-45NM firmware revision does not provide an ISO 400 setting).
COMPONENTS AND TOOLS REQUIRED
The following digital camera components are required to complete the installation, and not
included with the digital adapter. Obtain them separately from a retail camera dealer
or electronics retailer:
- Canon digital SLR camera.
Canon models update frequently, see the current list at http://www.usa.canon.com/.
You may use any Canon Rebel model including those in the following table.
Later models than shown here should also be compatible.
| Model | Features |
|
|
| Canon Rebel T3i |
Still photos, live view, 1080p HD video out and recording; best value for full performance |
| Canon Rebel T4i |
Still photos, live view, 1080p HD video out and recording |
| Canon Rebel T5i (buy now) |
Still photos, live view, 1080p HD video out and recording |
- Canon EF 28mm f/2.8 lens, or
Canon EF 28mm f/1.8 USM lens
(buy now).
Note: the less expensive f/2.8 model has been discontinued by Canon.
See used availability at http://www.keh.com for the f/2.8 model.
- Canon EF 12 II macro extender.
(buy now).
Note: less-expensive aftermarket 12mm EF macro extenders are also compatible.
Upgraded camera models: More expensive Canon models include the mid-range Canon 40D, 50D, 60D, 70D, 7D, and 7D Mark II.
High-end full-frame models such as the Canon 5D Mark II will work but with an 0.6X crop factor.
Photo quality is excellent with any current model,
including the less-expensive Rebel types above,
so choose a more expensive model only if you want to use the digital
camera for conventional photography off the retinal camera instrument.
Familiarize yourself with the digital camera:
If the digital SLR camera is new to you, be sure the learn about the following features which
will be used for retinal photography: On/off switch, mode switch for manual settings, setting manual exposure time,
setting manual lens aperture,
attaching and removing lenses, remote shutter release connector, flash bracket and hot shoe,
viewing photos on the camera, transferring photos to a computer.
If you will be tethering the camera to a computer for live display of photos,
you may wish to connect the camera and computer,
and shoot some ordinary photos in tethered mode, to familiarize yourself with the procedure.
No tools are required to assemble or install the adapter and digital camera.
Optional components you may wish to obtain separately:
- Camera AC adapter (if you do not wish to depend on the rechargeable camera battery).
- Tethering software for attaching a PC to the DSLR via a USB cable, providing instant high-resolution review
of photos as you are shooting. Canon includes such software ("EOS utility") free with their cameras.
DSLR Remote Pro (http://www.breezesys.com/DSLRRemotePro/) is a simpler, very effective application.
- Computer and software for viewing and post-processing digital photos.
You may shoot and review photos using only the camera and its memory card, but a computer
will provide much more detailed views and the ability to edit and enhance your photos.
Windows itself provides support for digital photography, including cataloging and viewing photos, without the need for additional software.
Since the digital adapter works with standard digital cameras,
all the best standard applications for digital photography, such as Adobe Photoshop, are
available for use with your upgraded retinal camera.
Canon SLR cameras include free Canon software applications for photo cataloging and editing.
- HD video display: If your digital camera model provides an HDMI high-definition video-out connection,
you may wish to install an HD video display for photo review during the patient exam.
- A photo printer if you wish to produce paper photo prints, instead of just video display.
INSTALLING THE ADAPTER
- Remove the body cap from the attachment bayonet.
- Push the adapter cable ending in the 8-pin round connector (see Figure 4 below)
onto to the mating receptacle on the CR4-45NM instrument (located below the attachment bayonet), and screw snug.
- Attach the unit mechanically to the retinal instrument in the usual way, by mating the bayonet to the receptacle, and rotating the locking lever.
- Remove the front lens cap from the Canon EF 28mm lens.
- If the Canon CR4-45NM does not provide an ISO 400 setting in the menus (see menu setting below to inspect for availability of this feature on your instrument), then
screw the ND8 filter onto the front of the Canon EF 28mm lens. If your instrument does provide the ISO 400 setting, then omit the ND8 filter.
- Set the the MF/AF switch on the lens to MF (manual focus).
- Adjust the manual focusing ring on the lens so that the range scale on the lens reads all the way on the left end (0.3m, the closest focusing distance).
- Screw the black adapter tube to the front of the lens using the mating filter threads.
The ND8 filter (if used) should now be stacked between the black adapter tube and the Canon EF 28mm lens.
See Figure 2 below.
Take care starting the threads, as the mating parts are plastic.
The threaded connection should be only slightly snug, enough to maintain a rigid assembly, and not so much that it is difficult to remove later.
- Remove the rear lens cap from the 28mm lens.
- Remove the front and rear caps from the Canon EF 12 II macro extender.
- Attach the macro extender to the back of the Canon lens.
- Remove any cap or lens from the Canon digital SLR camera body.
- Attach the 28mm lens with extender and adapter tube to the Canon digital SLR camera body. See Figure 3 below.
- Hold and align the digital camera so that the black adapter tube slides over the silver extension on the back of the digital adapter attachment.
Loosen the white thumbscrew if needed to couple the mating tubes to their complete depths.
See Figure 5 and Figure 6 below.
- Align the tilt of the camera body so it is level with the instrument, and tighten the white thumbscrew.
See Figure 7 below.
- Connect the camera remote cable (2.5mm plug, Canon "E3" type) from the digital adapter to the camera.
The plain cable (ending in a 2.5mm plug) directly fits the Canon Rebel models.
If you are using a higher Canon model (Canon 50D or Canon 7D), connect the optional E3-N3 short adapter cord between
the plain cord and the camera.
- Connect the camera flash sync cable to the hot shoe receptacle (flash bracket) on top of your digital SLR camera body.
To connect, slide the square connector into the rear of the hot shoe receptacle, with the cord pointing to the left.
- In the following steps, understand that the ISO setting of the Canon CR4-45NM instrument versus
the ISO speed setting of the digital camera are two different settings.
The ISO speed setting on the Canon CR4-45NM controls the energy of the flash emitted by the instrument.
The ISO speed setting on the digital camera controls how sensitive the camera is to incoming light.
Since the CR4-45NM is calibrated to 35mm film speeds, while the digital sensor is collecting light
into a sensor about half the area of 35mm film, the CR4-45NM ISO setting should be approximately
twice the number of the digital camera's ISO speed setting. Typically a setting of ISO 400 on the
CR4-45NM and ISO 100 on the digital camera is a good starting point, and then you adjust the digital
camera ISO speed setting to higher numbers if exposure are too dark. These settings also spare your patients
most of the intensely bright flash that was necessary to properly expose Polaroid film, and lengthen the life
of the costly xenon flashtube.
- Set the digital SLR camera as follows:
- Use a fully-charged battery or external AC power supply.
- Insert a memory card, or tether to a PC with USB cable and remote software.
- Power switch: ON
- Mode dial: M (manual)
- Exposure time: 1/20 SEC
- Aperture: F2.8
- ISO speed: ISO 100
- Configure the Canon CR4-45NM for 35mm film (instead of Polaroid) and ISO 400 (instead of the default ISO 100),
using the monitor function buttons just below the CRT monitor, as detailed below.
These settings will lower the flash intensity produced by the CR4-45NM to match the higher sensitivity of the
digital camera and avoid overexposure.
The membrane buttons just below the monitor on the CR4-45NM are called "monitor function buttons".
Let us number these monitor function buttons as BTN1 through BTN4 from left to right.
Push the specific monitor function buttons as follows:
    To configure the Canon CR-45NM for 35mm format instead of Polaroid:

    Observe: P600           ON
             MENU           BLNK

    Push:    BTN1

    Observe: ISO  DATA SPLT P/35

    Push:                   BTN4

    Observe: POLA 35MM

    Push:         BTN2

    Observe: 100            ON
             MENU           BLNK
You have now set the instrument to 35mm film format (no longer Polaroid)
and to ISO 100 speed (no longer Polaroid 600), which is appropriate for
the digital camera, which is much more sensitive than Polaroid film. The ISO 100 setting will still tend to overexpose on the digital camera, so
use the following menu steps to select a higher ISO speed setting
on the CR4-45NM, which is to say, a lower flash energy, if the instrument offers the
following menu options. Note that some firmware revisions of the Canon CR4-45NM offered only ISO 100 settings for
the 35mm film mode, and the following will not be available; in that case you must instead use an ND8 filter on the camera
to lower the photographic intensity.
    To configure the Canon CR4-45NM flash intensity for ISO 400 speed:

    Observe: 100            ON
             MENU           BLNK

    Push:    BTN1

    Observe: ISO  DATA SPLT P/35

    Push:    BTN1

    Observe: 35MM
             ISO 100
             ISO   (-   +)  SET

    Push:    BTN1

    Observe: 35MM
             ISO 200
             ISO   (-   +)  SET

    Push:    BTN1

    Observe: 35MM
             ISO 400
             ISO   (-   +)  SET

    Push:                   BTN4

    Observe: 400            ON
             MENU           BLNK
You have now set the retinal instrument to ISO 400 speed, if available, which is actually appropriate for the digital camera being set itself to ISO 100.
Fortunately, these settings are persistent when the instrument power is turned off, as long as you do not disconnect the adapter,
so you should not have to repeat this button-pushing procedure.
Note: in firmware revisions which provide only ISO 100 for the 35mm camera setting, the setting may be lost when powering off the instrument;
in this case you must follow the menu procedure each time the instrument is turned on.
- Set up and operate the CR4-45NM in the usual way to take a test photo on a test target.
Observe that the digital camera shutter operates and that the instrument flash fires.
View the digital photo to verify that the photo is in focus when the instrument also carefully focused.
The circular field stop of the Canon instrument, with an orientation notch at about the 2 o'clock position, should be
clearly visible and sharply focused.
- Take trial photos of subject eyes. Use careful technique for alignment, centering, and especially
focus.
- Adjust the ISO setting on the digital camera to correct over- or under-exposures.
A lower ISO setting on the digital camera makes the exposure darker, and a higher ISO setting makes it lighter.
Keep the CR4-45NM ISO setting at 400 (if available), and do not alter the digital camera shutter speed or aperture from the
settings suggested above.

Figure 1. The original Polaroid attachment before upgrade.
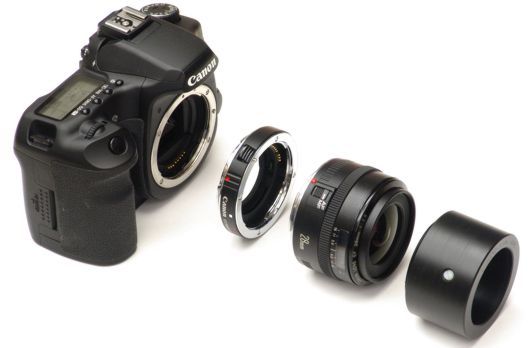
Figure 2. Canon camera, extender, and lens, with black adapter tube.
This shows the Canon model 40D digital SLR body.
(Note: does not show optional ND8 filter.)
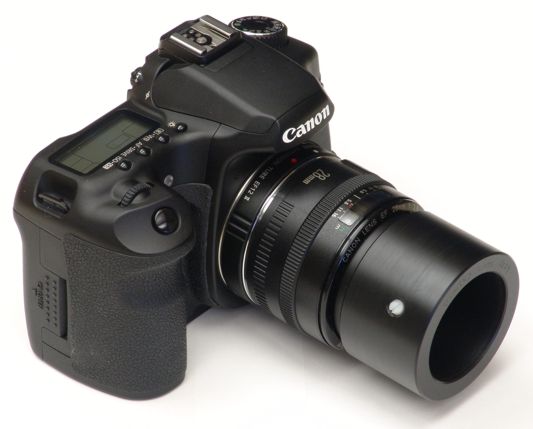
Figure 3. Camera and lens assembled with black adapter tube.
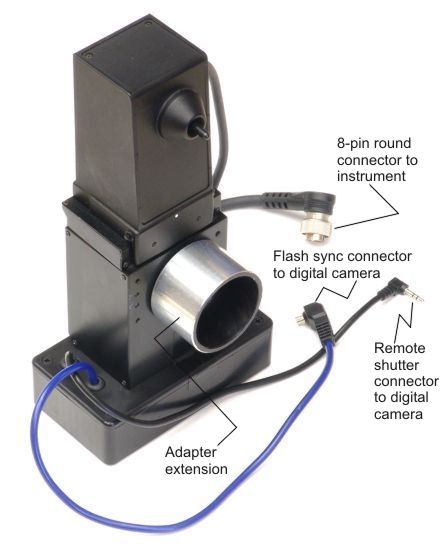
Figure 4. Retrofitted Canon attachment.
Old Polaroid film back has been removed by us and replaced with a digital attachment fitting
and electronic interface circuitry.
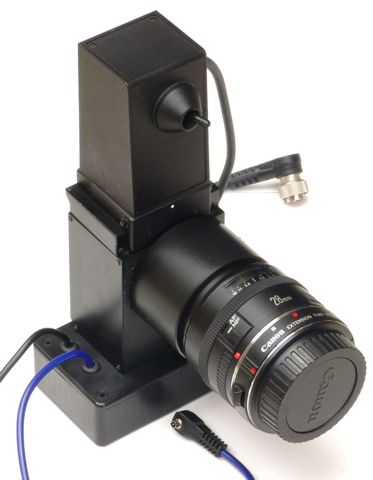
Figure 5. Retrofitted attachment assembled with Canon digital SLR lens.
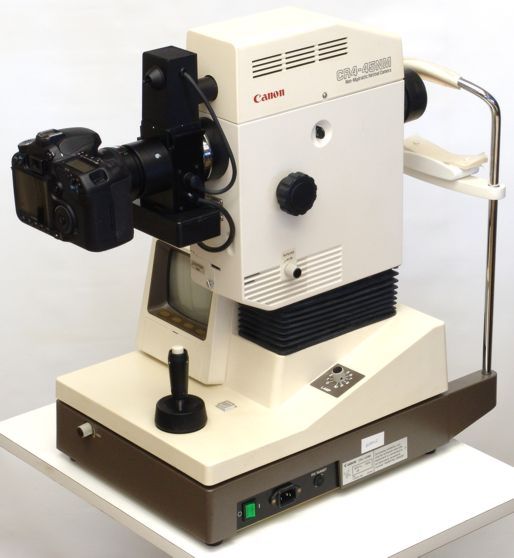
Figure 6. Attachment with digital camera on the instrument.
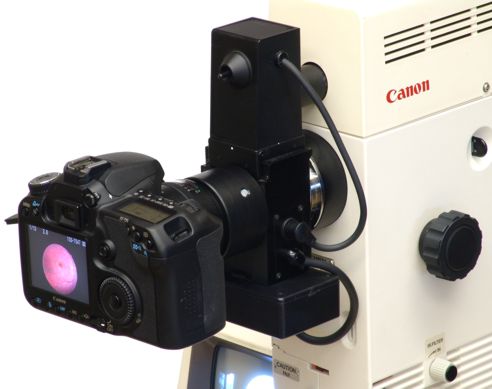
Figure 7. Close up of the complete digital attachment.
Canon 40D digital SLR shown, with flash sync connection on left side of camera.
Current adapters provide a hot shoe connector which attaches to the flash bracket
on top of the camera.
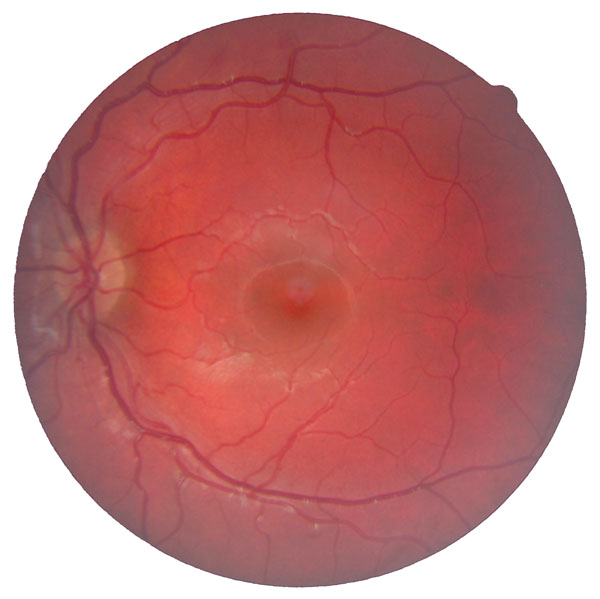
Figure 8. Sample non-mydriatic retinal photo with digital retrofit and Canon DSLR.
See also in full-resolution.
Viewfinding with the digital camera live view:
If your Canon digital SLR models provides a live view capability (such as the Canon Rebel XSi or T1i models), this can be used
for viewfinding on the instrument with the infrared filter out.
(Canon digital camera image sensors all contain an infrared blocking filter which prevents the camera
from seeing the infrared viewfinding illumination.)
Since using a bright and visible exam light for viewfinding defeats the non-mydriatic viewfinding principle of the instrument,
digital live viewing will require that patient eyes be dilated to an adequate pupil diameter for successful photography.
All that is necessary in the adapter is to raise the mirror in the attachment and to fix it in the raised position
using a bit of tape. Then set the digital camera to live view mode as explained in the camera's user manual.
The digital camera can display the live view on the camera's display, or
you can connect the camera via a USB cable to
and computer and software for live PC preview ("tethering") at higher resolution and larger size.