Moving and Hoisting a 2000-Pound Bridgeport Milling Machine
July 2003 -- January 2019.
This essay reviews my project in 2003 of moving a large machine tool,
using a minimum of equipment and personnel, while keeping the risk of
material damage or personal injury low. I've also updated the ideas over
the years to include my further experiences, retrospectives, and musings
on such tasks.
I've enjoyed a lot of correspondence over many years
since then with others who have attempted the valor. That
mix of wisdom and folly is incorporated below.
If you can find and hire a trusted and experienced rigger to do this
for you, then I advise that method. If such heroes are not available,
or you are a proud, adventurous, or intrepid master of the do-it-yourself
spirit, here is what you can plan for.
 After looking at a lot of Bridgeport machines over some months, I finally
found the one I wanted at the right price about an hour's drive away.
I had been studying the rigging and moving tasks by watching others
doing it at machine-shop auctions, reading various Web pages detailing
experiences, and discussions on rec.crafts.metalworking. I had even
bought an ancient electric forklift at the local truck auction, and had
it delivered by a flatbed wrecker, ready to unload my eventual purchase.
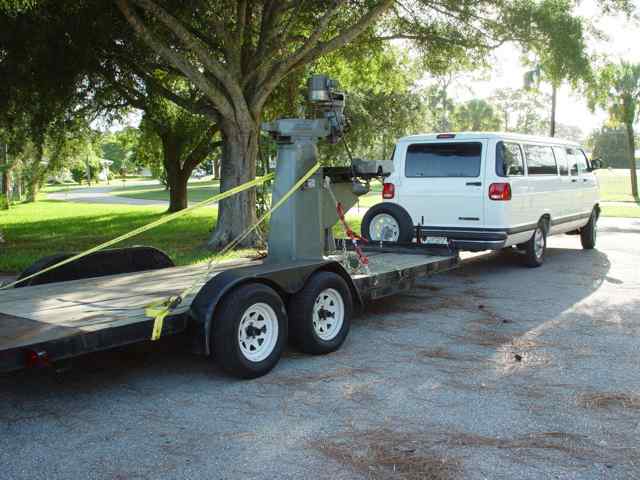
The seller of the machine was able to direct me to an inexpensive rental
trailer (usually used for car hauling) that could handle this concentrated 2000-lb
load, and he also lifted the machine onto the trailer for me using his
forklift at his shop.
After looking at a lot of Bridgeport machines over some months, I finally
found the one I wanted at the right price about an hour's drive away.
I had been studying the rigging and moving tasks by watching others
doing it at machine-shop auctions, reading various Web pages detailing
experiences, and discussions on rec.crafts.metalworking. I had even
bought an ancient electric forklift at the local truck auction, and had
it delivered by a flatbed wrecker, ready to unload my eventual purchase.
The seller of the machine was able to direct me to an inexpensive rental
trailer (usually used for car hauling) that could handle this concentrated 2000-lb
load, and he also lifted the machine onto the trailer for me using his
forklift at his shop.
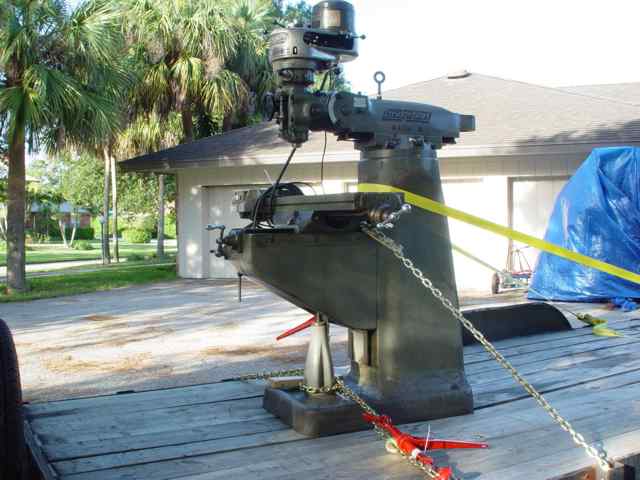
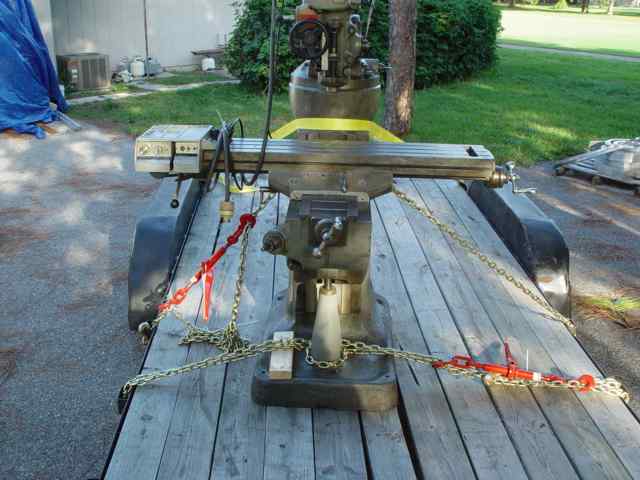
 By inspecting the photos carefully, you can see that I secured the machine to the trailer with
two cargo chains, one across the base, and another across the knee.
I used ratcheting load-binders to tighten the chains.
These are items sold at Harbor Freight.
The tightening was strong enough to start to visibly flex the frame of the trailer.
Scrap lumber and folded corrugated cardboard chocked between the chains and the machine protected the
machine from damage.
By inspecting the photos carefully, you can see that I secured the machine to the trailer with
two cargo chains, one across the base, and another across the knee.
I used ratcheting load-binders to tighten the chains.
These are items sold at Harbor Freight.
The tightening was strong enough to start to visibly flex the frame of the trailer.
Scrap lumber and folded corrugated cardboard chocked between the chains and the machine protected the
machine from damage.
The knee attachment should be considered only a backup, since the gib lock and leadscrew on the knee cannot
be considered strong enough to reliably endure the shock of a lurch in transit.
The primary hold-down should be to the base, which I have done with the chain and load binder.
Another good technique would be to bolt the base to the floor of the trailer, using 1/2" or 5/8"
carriage bolts through the floor planks; of course this might not be suitable for a rented item.
One could also construct a pallet to bolt the base of the machine onto, but this introduces
a new critical component requiring some knowledge and experience to avoid a disastrous failure.
I added a third hold-down, using a ratcheting cargo strap, as a kind of stretchy back-up oriented
to the rear so as to absorb any sudden load-shift from braking.
I would have considered drilling through the trailer planks and bolting down the machine with
5/8" carriage bolts. However, I wasn't sure if the trailer rental people would be happy with
that. Indeed, I later used bolts when hauling another heavy item with this same rental
trailer, since I got the OK of the owner beforehand.
 Here is the forklift holding the machine after lifting if off the trailer.
I don't have a photo demonstrating the
technique of getting the machine off the trailer and on the forklift, so let me describe it.
The first problem is that the forks on the forklift cannot reach the center of the trailer when
approaching from the side.
With prybars and muscles, and some difficulty, I scooted the machine towards the side of the trailer, enough that
the tips of the forklift forks were just able to reach completely under the ram of the machine.
(This scooting would have been easy with the mattock I later made.)
Second, lifting the machine just barely off the trailer bed with the forks, I drove it to the edge
of the trailer; minimizing the lift height above the trailer bed miminizes any risks should the machine somehow slip off the tips of the forks.
Once the machine was at the edge of the trailer, I could get the heaviest part of the forks
and a better cantilever point of the forklift under the machine's ram, and clamp the
ram to the forks with a cargo strap. Then you are ready to lift the load off the trailer, back away
clear of the side of the trailer, and lower the machine to just off the pavement.
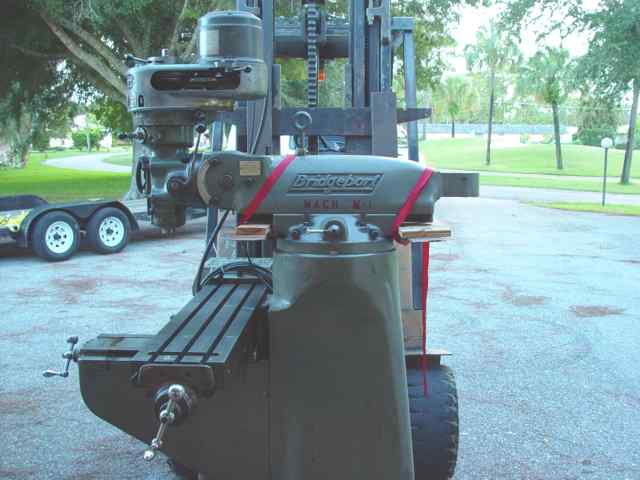 Here's a photo of a good way to lift the machine with forks.
The ram is unlocked, moved back towards the rear, and locked in place.
The forks reach under the flat dovetails of the ram, with wood chocks in place to prevent damage.
A ratcheting cargo strap or other clamp secures the machine to the forks, and helps stabilize the hold.
Here's a photo of a good way to lift the machine with forks.
The ram is unlocked, moved back towards the rear, and locked in place.
The forks reach under the flat dovetails of the ram, with wood chocks in place to prevent damage.
A ratcheting cargo strap or other clamp secures the machine to the forks, and helps stabilize the hold.
To help lower the center of gravity (CG) of the machine, you can lower the knee fully.
You can also invert the head by loosening and rotating it around upside down; this also lowers the total
height of the machine to about 66 inches.
I didn't feel this was necessary when lifting under the ram, at least not with a 10,000-pound
forklift. But for rolling on pipes, as I did later, the lower the CG the better.
You can also gain a single-point lift using the 5/8-11 attachment hole in the top-center of the
ram (shown in this photo with a too-long eyebolt inserted), or with a sling under the ram.
However, by clamping the forks under the ram you have much better two-point stability, and
clamping the flat forks to the flat underside of the ram tends to control any swaying of the load.
I did not use the eyebolt at all; a load-rated hoisting ring would be a better attachment
device, or at least a shorter eyebolt than shown.
Some have claimed that this hole is for lifting the ram alone during assembly, but Bridgeport's
own documentation for the British version shows this is an approved method for lifting the entire machine.
Getting this machine off the trailer and inside the garage door was
quick and easy using the forklift. Sadly, the 8-foot-high forklift
didn't fit under the 7-foot garage door height, so I had to roll the
Bridgeport machine on the concrete garage floor the rest of the way on
3-foot lengths of 1" steel pipe (cut from heavy-wall electrical conduit,
cheaper than plumbing pipe). By cutting and welding some solid pieces
of steel, I made a "mattock" tool (which has its own project page),
which fit under the Bridgeport base
and allowed me to tip the machine up enough to get the pipes in or out
from underneath. While I could only budge the machine on the rollers a
few inches per minute, in less than two hours I had it rolled into the
far corner of the room and precisely in a carefully planned position.
Finding the Space for the Machine
A Bridgeport machine requires a surprising amount of clearance in the surrounding space to operate,
due to the awkward projection of its components and the ways they articulate.
The clearance height for the J-head model is 83-1/2".
Bridgeport's floor plan specifies a 63" front-to-back space for the 12-inch knee model, and
75-1/2" of width for the 42" table. If you have CNC controls or a power feed on the table,
then with some room for a human operator, you're up to about an 8-by-8 foot
floor-space envelope dedicated to the operation of this machine.
Add cabinets for tooling, and perhaps a CNC computer rack, and you're at roughly 100 square feet.
Given the costs of industrial space, housing "Santa Claus" (he who makes stuff you wish for)
is going to impose a true cost on the order of $1000/year, something to consider
if you have only casual business uses or hobby applications in mind.
If you're trying to build a pallet to move a Bridgeport machine, or a
floor layout, here is my drawing of the
Bridgeport base (14 KB PDF file).
Bridgeport's documentation specifies a 5/8" bolt for securing the base to the floor
via the holes in the base, with a height of 4-3/4" from the top of those holes to the floor.
Other Tips
Some other tips that have been suggested for the moving task:
-
Remove the leadscrew handles.
They are easily broken and also make it easier to bend the lead screw.
-
Removing the head altogether will lighten the load by about 300 lbs,
and makes it easier to clear a low doorway.
-
Removing the head, ram adapter, ram, and turret (as an assembly)
by removing the 4 locking bolts on the turret allows you to separate
about 700 lbs from the machine, lifted via a hoisting ring on the ram.
This reduces the remaining column-knee-saddle-table base assembly to
about 1500 lbs. To lift this base assembly will require fabricating
a custom bracket rigging with eyebolt to fasten to top of the column, and
an eyebolt clamped in the table slots, to which two lift points you
can span with a lifting sling to provide a stable lift point over the
center of gravity. This yields a swinging load, however, so it is only
suitable for lifting and dropping the base vertically, not traversing
it horizontally. This would allow the lesser asset of a gantry (wide
enough to span across the trailer or truck bed, high enough to clear
the base and rigging, and rated for 1500 lbs) to
accomplish the off-loading, instead of requiring the luxury of
a forklift.
-
A tilt-bed automotive wrecker is capable of loading/unloading the machine on/off
its platform from/to the ground by skidding with the winch. Tow-truck
services don't typically take on machinery moving, but it is a possible
solution if you can bargain with a cooperative business.
This was my successful strategy with the forklift, getting it delivered
from an auction purchase and taken away by a casual sale, having served
my one-time employment.
Have a comment or question about my moving the Bridgeport mill?
Email me at:
kinch@truetex.com
Richard J. Kinch
Back to Machine Shop page
Back to Home page
Copyright 2004, 2007, 2019 Richard J Kinch