INSTALLING AND OPERATING THE
TOPCON TRC-NW3 REAR PORT
DIGITAL CAMERA UPGRADE KIT
Richard J Kinch
http://www.truetex.com
March, 2010.
This document describes how to install and operate
the digital camera upgrade kit for the rear port of the
Topcon TRC-NW3 series retinal camera.
Identify the upgrade kit contents:
- See Figure 5 below to identify the following:
- Custom digital camera adapter optical assembly with rear cylinder and electronic interface,
which we will have remanufactured from your submitted Topcon PA-NW3 Polaroid attachment.
See Figure 1 and Figure 6 below.
- Custom sleeve to fit the rear cylinder of the adapter.
- Standard photographic ND2 or ND4 neutral-density filter for 58mm lens thread.
- Optional lens turret shim (clear Mylar plastic strip, 7.49 in x 0.375 in x 0.010 in)
- Optional E3-N3 remote connector adapter, if you are using a Canon digital camera model other than a Rebel type.
- These instructions.
Other components you must obtain separately:
- See
Figures 2,
3,
4, and
5
below to identify the following:
- Canon EOS digital SLR camera. Any Canon EF or EF-S lens-mount model is compatible with the Topcon adapter,
including the Digital Rebel series and the 50D and 7D models. Full-frame models such as the
Canon 5D Mark II are compatible, but the retinal image will be smaller due to the larger frame size.
- Canon EF 50mm F/1.4 lens. This is the only stock lens mechanically and optically compatible with the adapter.
- Canon Extension Tube EF25 II. This is the only stock extension compatible with the magnification and spacing requirements of the adapter.
- Memory card(s) for the camera.
- AC power supply for the camera (if you wish not to depend on battery power).
The adapter kit works by design with ordinary, standard Canon retail camera bodies and lenses,
and with the constantly improving standard computer software supporting digital photography.
No special version or modifications of hardware or software are required.
New Canon camera models in the future should also be compatible, as should
advances in Canon and third-party computer software support.
You may process the standard RAW or JPEG images using industry standard software such as Adobe
Photoshop or Corel PhotoPaint.
Optional components you may wish to obtain separately:
- Computer and software for post-processing and viewing digital photos.
- Computer and software for live PC preview as you photograph ("tethering").
Canon includes software for this purpose with their digital SLR cameras, or you may wish
to use a studio photography application such as DSLR Remote Pro
(http://www.breezesys.com/DSLRRemotePro/).
- An enhanced memory card providing wireless networking for instant transfer of photos
to your network storage server as you shoot.
Familiarize yourself with the digital camera and lens:
If the digital SLR camera is new to you, study at least the following features which
will be used for retinal photography: On/off switch, mode switch "M" setting for manual operation, setting manual exposure time,
attaching and removing lenses, remote shutter release connector,
hot shoe, viewing photos on the camera, transferring photos to a computer.
Also read the instruction manual for the Canon 50mm lens to learn about the following
features of the lens: filter mounting thread, focusing ring, focus mode switch, and distance scale.
You must understand these features to apply the manual focus calibration procedure below, which is
mandatory for proper operation of the adapter.
Attach the sleeve, neutral-density filter, and Canon Extension Tube EF25 II to the Canon lens and camera:
The sleeve should be delivered to you with a neutral-density
filter attached.
If not, observe that the sleeve has one end threaded for the attachment of a filter.
Remove the front lens cap from the Canon 50mm lens, and screw on the sleeve and neutral-density filter
to the front of the lens.
Engage and screw the threaded components carefully, as the threads are very fine and easily damaged if
mis-threaded. Tighten the threaded connections firmly but do not overtighten.
Remove the rear lens cap from the Canon lens, and both caps from the Canon Extension Tube EF25 II, and attach the
extension to the rear of the lens.
Finally, attach this sleeve-filter-lens-extension assembly to the digital SLR camera body in the
normal way.
This assembly will now attach to the Topcon adapter.
Attach the digital camera mechanically to the adapter:
Loosen the white thumbscrew on the sleeve so that the sleeve slips over the rear cylinder
of the adapter. Slide the sleeve over the cylinder as far as it will go, rotate the camera body so that
it is horizontal with respect to the instrument attachment, and lock the sleeve onto the adapter
by tightening the thumbscrew. Do not overtighten the thumbscrew, which only requires a moderate
turn to hold the sleeve firmly in place.
Attach the digital camera electronically to the adapter:
Two cables exit the adapter: a hot-shoe connector and an Canon E3 remote plug (2.5mm subminiature type).
Connect the hot-shoe connector to the hot shoe on top of the camera, and the remote plug to the
remote connector on the left side of the digital camera body.
If you have a Canon digital camera other than a Rebel model, use the N3-E3 remote connector adapter
we will have optionally provided to connect the E3 plug to the N3 socket on your camera body.
Your adapter and Canon camera should now be assembled, but before attaching them
to the Topcon instrument, the Canon lens focus must first be calibrated as follows.
Set the Topcon TRC-NW3 flash intensity selector switch to LOW:
Locate the flash intensity selector switch on the Topcon instrument base.
This is 2-position HIGH/LOW switch, found by moving the carriage all the way forward,
exposing the top of the base to the right of the joystick. This is item 33 on page 4 of the original Topcon instruction manual.
(This is not the flash selector switch to the left of the joystick, although they both affect flash intensity.)
Set the flash intensity selector switch to the LOW setting.
Calibrate the focus of the Canon camera to the Topcon instrument:
Focus calibration is a quick and easy, one-time procedure, but it is absolutely critical to the proper
performance of the adapter.
You must set the digital camera lens to a fixed, manual focus on the adapter's circular field stop, which
permits you later to focus the retinal image in the normal way.
If the focus calibration is off, then all digital photos will be out of focus even though the instrument
display indicates a correct focus on the patient eye. Proceed as follows:
-
If you have perhaps already attached
the adapter and camera to the Topcon instrument, remove them
from the Topcon instrument by releasing the bayonet lock lever on the
Topcon rear port.
-
Raise the mirror in the adapter
by turning the mirror-up knob using a coin or screwdriver.
This knob is the slotted silver item on the right of the adapter.
You should see the mirror in the adapter flip up as you turn the knob.
With the mirror flipped up, you should see the digital camera lens entrance through the
passage from the Topcon bayonet fitting.
-
Look into the Canon camera viewfinder turn the Canon viewfinder diopter adjustment wheel so that you see the focusing squares in the
Canon viewfinder clearly (see "dioptric adjustment" topic in the Canon camera Instruction Manual).
-
Push the AF/MF (automatic/manual) focus mode switch on the Canon 50mm lens to the MF (manual focus) position.
Always leave this switch in the MF (manual focus) position when you are using the camera on the Topcon adapter.
-
Look into the Canon viewfinder while you point the open end of the adapter towards a bright, diffuse
light source such as a well-lit white wall. Turn the manual focus ring on the Canon 50mm lens and observe
the adapter's circular field stop come in and out of sharp focus near the closest focus indication (1.5 ft or 0.45 m) on the distance scale on the lens,
which is the extreme close end of the focusing range.
The field stop aperture is the extreme inner edge of the apparent tube passage in the adapter, which
"stops" any image further out from the center.
-
Adjust the focusing ring so the edge of the field stop is
in sharpest possible focus. This is the proper focus calibration when the adapter tube is fully inserted and
locked on the lens sleeve.
-
Semi-permanently lock the focus ring by applying a piece of Scotch tape or a snip of self-adhesive paper label across
the lens body and rubber focusing ring. This keeps the manual focus locked on the calibration you have just set.
-
Check the focus in the viewfinder, now locked with the bit of tape you applied, to make sure that the
field stop aperture is still sharply in focus. If you inadvertently moved the focusing ring while applying
the tape, remove the tape and repeat the focus calibration and tape-locking.
-
Lower the mirror in the adapter
by turning the mirror-up knob again using a coin or screwdriver,
returning the knob to its original position for normal operation.
If you forget this step, the viewfinding image will be blocked from reaching the Topcon video display.
-
The clarity of all subsequent digital retinal photos depend on a proper manual lens focus calibration.
Once the focus calibration is properly set and locked, you should not have to perform the calibration again.
If you find your retinal photos are consistently out of focus, yet you are sure your technique with the
Topcon instrument and its focus are correct, check the Canon lens focus calibration and recalibrate if needed.
-
You may remove the Canon camera and/or lens from the Topcon adapter to use them for ordinary photography,
but you must repeat this manual focus calibration and tape-locking if you remove the tape from the lens
and lose the Topcon focus calibration.
-
It is normal for a bit of sag from the weight of the camera on the Canon lens to move the apparent image
to a slight crop on the bottom of the viewfinder.
-
If the bottom-edge crop is undesirable, you may demagnify the retinal image
so that all of it appears in the digital frame, by sliding the sleeve back up to about 1/2 inch in gap from the
end of the sleeve to the rear of the adapter. You must also then repeat the focus calibration for the new
sleeve adjustment. To set the absolute minimum magnification for the image, first set the lens focus adjustment
to infinity, and then slide the sleeve away from the adapter until the field stop is sharply in focus in the
camera viewfinder. You may choose any magnification by adjusting this sleeve distance, as long as the field
stop aperture remains in the focus range of the lens.
-
You may firm up the attachment of the camera by slipping the clear plastic lens turret shim into the thin gap between the Canon lens turret
and the distance scale. This gap is just below the "CANON LENS EF 50mm 1:1.4" indicia.
The shim will eliminate most of the play between the lens turret and the body of the lens.
Attach the digital camera with adapter to the Topcon instrument:
Attach the adapter to the rear port of the Topcon instrument in the usual way,
as was done with the original Polaroid attachment.
That is, match the bayonet connector and electrical connector to their receptacles,
press them together, and turn the locking lever counterclockwise.
Alternative focus calibration methods:
You may also calibrate the adapter focus by focusing an image in the instrument and then focusing the digital
camera to the same image, as follows. Set up a distant focusing target in the center of the instrument view,
such as a small, bright light across the room or down a hallway.
A distant, luminous, pinpoint test target will greatly simplify the focusing image and improve the accuracy
of the calibration. A lighted ophthalmoscope, transillumination lamp, or penlight are excellent for this purpose.
Focus on this test target with the Topcon video display (use the "+" diopter compensation lens
setting on the instrument to focus on the near-infinity object).
Once the test target is focused using the video display,
raise the mirror in the adapter with the mirror-up knob to see the same image now in the digital camera viewfinder, being
careful not to alter the Topcon focus knob or carriage position. While watching the Canon viewfinder image, focus
the Canon lens in the Canon viewfinder, lock this focus with a sticker on the lens, and lower the mirror.
If your Canon model provides a live view feature, you can focus even more accurately than with the viewfinder,
by using the 10X live view magnification.
If you don't have the live view feature, you can still
take test photos on the digital camera and enlarge them on the digital camera display, to set the
focus accurately by trial and error.
Configure the Canon camera for retinal photography:
- Use a fully-charged battery or external AC power supply.
- Power switch: ON
- Auto power off menu setting: OFF if using external power supply.
- Mode dial: M (manual)
- Exposure time: 1/40 SEC.
A shorter exposure time may miss the Topcon flash. A longer time may smear the image.
- ISO speed: ISO 100 (or ISO 64 or other lower speed, if available on your camera model)
- Aperture: F1.4.
This is the largest aperture setting the lens provides. Setting a smaller aperture (that is, a larger f/number) will yield vignetted images.
- Memory card inserted
- Connect and start the computer and tethering software if so equipped
Configure the Topcon instrument for digital photography:
- Flash intensity selector switch (located below the carriage): to LOW (as instructed above).
- Flash selector switch (located to the left of the joystick): to LOW (or adjusted for proper exposure).
Adjust the instrument for a fixed test subject:
Tape a business card or other flat, high-contrast, detailed subject to the patient headrest to serve as a fixed test target.
A long strip of clear packing tape stuck across the headrest poles at the canthus marks will serve well.
Stick the tape to the operator's side of the poles, and stick the card
slightly to one side, roughly offset to where a patient eye would be position.
Frame and focus a view of this target using
the Topcon video display in the normal fashion, perhaps pulling away from the subject and
using the "+" diopter compensation lens, as for anterior segment views.
Take test subject exposures:
Focus and align on the test subject using the instrument video display in the usual way.
Press the joystick button to trigger an exposure.
At the moment of exposure, listen for the Canon camera mirror flip and shutter mechanisms operating,
along with the Topcon mirror mechanism flipping.
Observe the light of the retinal camera flash on the subject.
Immediately after the exposure, the Canon camera should momentarily display a view of the image on the
rear display.
Review test subject exposures:
If you are using a tethered PC to capture photos, refer to the tethering software user manual for
image review.
If you are using the stand-alone camera to shoot onto the camera's memory card (with no tethered PC),
use the Canon menu buttons to manually review exposures on the camera display.
You may lengthen the automatic review time with the "Review time" menu setting on the digital camera.
Zoom in when reviewing images to verify that the captured image appears sharply in focus when the video viewfinder also appeared in focus.
Note that the full resolution of the digital camera is much finer than the instrument resolution, so
the highest-resolution images will not appear in focus when zoomed in completely.
Take live subject exposures:
It is most convenient to obtain a cooperative colleague or patient for your first live retinal digital image tests.
Collimate and focus on the retina in the usual way with the video display, using the joystick button
to take exposures. Check the images for exposure brightness and adjust the Topcon flash selector to
compensate.
Analyze exposures for optimal exposure:
Viewing the image exposure histogram in the digital camera is the only sure way to
evaluate a proper exposure.
The histogram provides a quantitative analysis of your retinal images for
proper exposure level and degree of contrast.
The goal is to have a histogram spread roughly in the middle third of the
dynamic range.
Observe the green histogram rather than the white, since for a retinal image most of the
diagnostic information is represented in the green portion of the color spectrum.
The position of the hump in the histogram indicates the exposure level, which should
be around the middle of the range, and the width of the hump indicates the contrast
If the histograms indicate an exposure off to one end or the other of the camera's dynamic range,
you may shift the exposure range by switching to a darker or light neutral-density filter on the adapter sleeve.
(With careful assembly, it should not be necessary to recalibrate the focus when switching filters.)
Correcting exposures and improving contrast with digital post-processing:
Simple post-processing of your digital images on a computer will correct any mis-exposures and
improve correct exposures. Retinal images are by nature limited in contrast, and by digitally
stretching the contrast, the visual impression of the photographic is much improved.
Filtering enhancements such as red-free images are available via digital post-processing, even though
the original instrument lacks the physical filters.
Establish your practice routine:
After completing the above, you will have a powerful digital facility for retinal photography.
You must now handle digital data where you used to handle 35mm film slides or Polaroid prints.
It most regards the digital methods are quicker, easier, and cheaper than film, but do require
an initial investment in careful design and training. Your digital system is based on standard digital cameras, and so is
compatible with ordinary software for capturing, post-processing, and cataloging digital photographs.
Your upgraded digital retinal camera should, with occasional maintenance, provide decades of
reliable service.
Further Notes
No-flash test kit::
A test kit is available on loan to diagnose a no-flash condition in your Topcon TRC-NW3.
See the instructions at
http://www.truetex.com/topcon_trc-nw3_diagnosis.htm.
Relative exposure factors for film versus digital cameras::
You should understand the relative exposure intensity of the digital camera versus the
35mm or Polaroid film formerly used.
The normal operation of the adapter requires that you insert a neutral-density filter
on the front of the lens. This is due to the difference in size between film and digital images,
given that the Topcon flash illumination is calibrated to a fixed amount of energy to
expose a 35mm film frame with ISO 100 sensitivity. The Topcon TRC-NW3 provides only a very limited adjustment
to flash energy via the Flash Selector switch (HIGH/M/LOW). While the Canon digital camera provides
a lowest sensitivity setting of ISO 100, the digital sensor size is only about 38 percent (or 1/2.6) the area of
a 35mm film frame. Since the adapter captures all the light energy of the original exposure,
this results in a digital exposure intensity that is 2.6 times brighter than the film exposure.
Inserting a neutral-density filter compensates for this effective difference in intensity.
A standard ND2 neutral-density filter removes 1/2 the intensity, and an ND4 filter 1/4 the intensity.
Thus an ND2 filter yields a 2.6/2 = 1.3 extra exposure factor, while an ND4 filter yields
2.6/4 = 0.65 exposure factor, for the digital sensor relative to 35mm film. You may also set the Topcon flash intensity selector to
HIGH or LOW to slightly adjust these exposure factors. Choose the filter (ND2 versus ND4) to
accommodate the retinal reflex characteristic most frequently encountered; usually the ND2 filter will be
appropriate since you can use the Topcon LOW intensity setting and spare the patient some
of the flash dazzling. The retinal reflex typically yields an exposure histogram of only 25 percent
of the digital dynamic range, so fortunately there is enough room to compensate for over- or under-exposures,
if you are willing to apply digital post-processing.
The instrument is effectively a manual lens:
The Topcon instrument in effect becomes a manual lens for the digital camera.
The Canon lens is set at a fixed focus and acts only as a relay lens.
Camera modes such as aperture priority (Av) and shutter priority (Tv) are
unavailable, since these factors are controlled outside the digital camera.
Using an AC adapter on the Canon camera:
To avoid having to worry about having a charged Canon camera battery, you
may wish to purchase the Canon optional item that powers the camera from
an AC adapter.
Lowering resolution on the camera:
Since the highest resolution images of the camera are finer than the optical resolution
of the instrument, you may wish to set the camera to record lower-resolution images.
This will decrease storage space and improve tethered transfer times.
These settings are found on the camera's "Quality" menu.
Tethering software:
If you want to have live previewing and capture of photos on a computer while shooting
with the Canon camera, consider using "tethering" software.
This type of application uses a "tether" from the camera to the computer via a USB cable.
A simple version is included with the Canon camera software support disc.
DSLR Remote Pro (http://www.breezesys.com/DSLRRemotePro/)
is one popular aftermarket package sold for this application.
Tethering to a computer with a large display is the best way to instantly
review your photos for proper focus and exposure while you still have a chance to retake
a missed shot.
The small display on the camera does not adequately reveal the quality of the image focus.
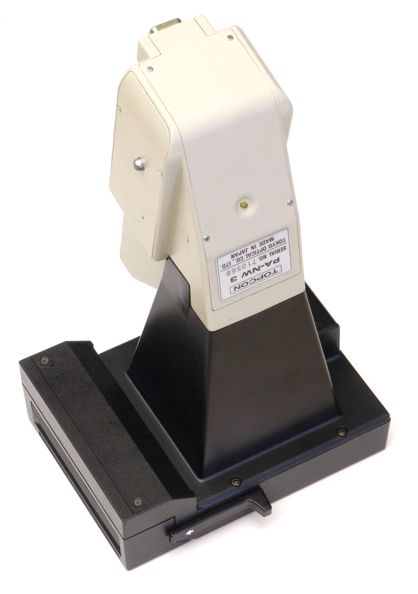
Figure 1. Original Topcon PA-NW3 Polaroid attachment for the Topcon TRC-NW3 retinal camera.
This component is what you send to us on loan for conversion into a digital adapter, and is shown
here before any modifications have been made.
We remanufacture this assembly into a digital adapter by removing the Polaroid film back
components, removing and precisely machining material from the original metal body,
adding precision mechanical components, and installing electronic interface circuitry and wiring.
You add a standard digital camera and lens to complete the assembly.
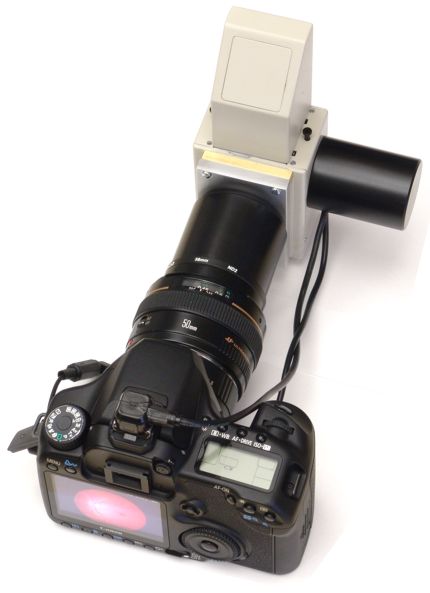
Figure 2. Complete Topcon TRC-NW3 digital adapter with Canon digital SLR camera.
The original PA-NW3 Polaroid attachment has been modified, and mechanical and electronic
components added.
Use of the standard digital camera is economical and provides access to standard software tools
for digital photography.
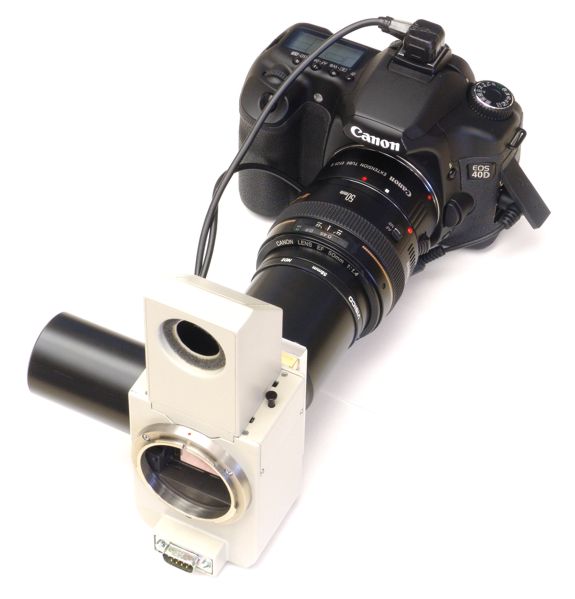
Figure 3. Instrument side of the complete Topcon TRC-NW3 digital adapter with Canon camera.
This fits the original mechanical, optical, and electronic interface to the rear port of the
Topcon TRC-NW3 instrument.
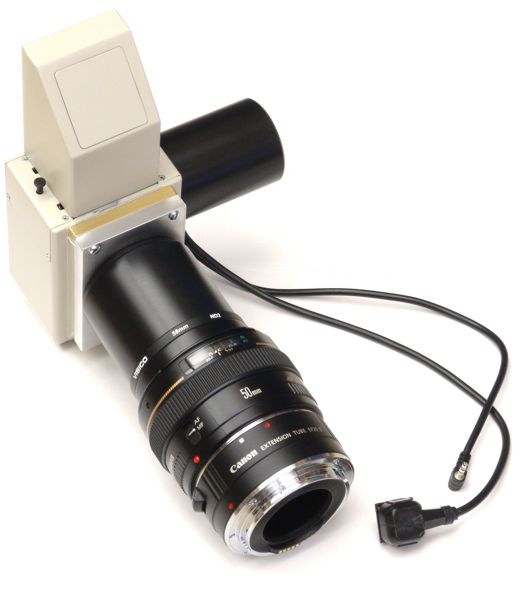
Figure 4. Topcon TRC-NW3 digital adapter with Canon lens, prior to attachment of digital camera body.
The electronic interface consists of a hot-shoe connector for the flash synchronization,
and a shutter-remote connector for operation of the digital camera shutter from the Topcon joystick.
Besides the Canon 50mm lens, a Canon Extension Tube EF25 II is attached after the lens.
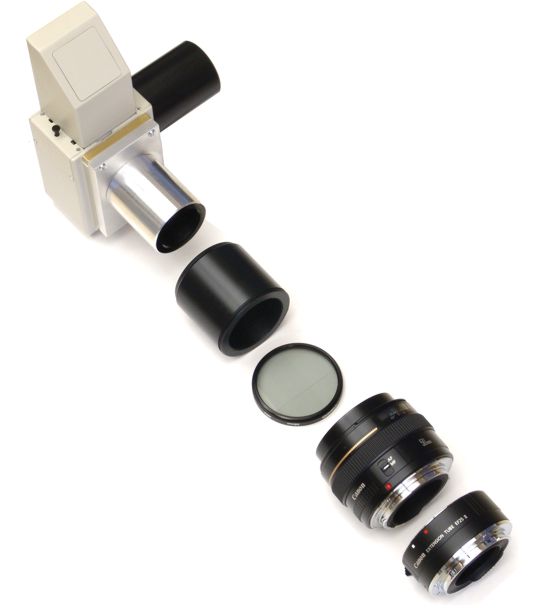
Figure 5. Topcon TRC-NW3 digital adapter components separated.
From left to right: adapter body with rear cylinder, black sleeve, neutral-density filter
(ND2 or ND4), Canon 50mm lens, Canon Extension Tube EF25 II.
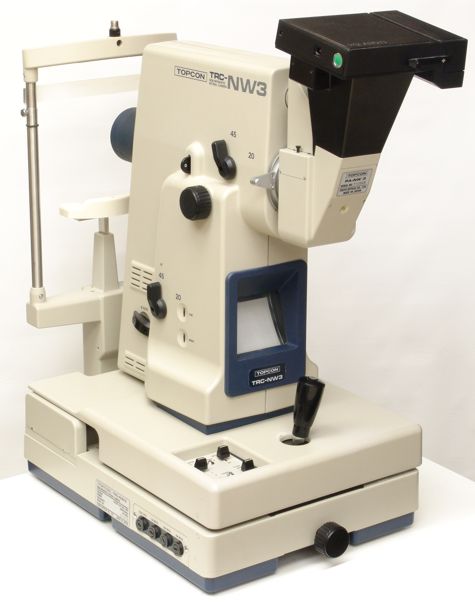
Figure 6. Topcon TRC-NW3 non-mydriatic retinal camera with original PA-NW3 Polaroid attachment.
This is how the instrument would have been used for Polaroid film photography,
before the upgrade to digital photography.
Not shown is an optional film camera body, Topcon model MT-1 or MT-2, which
would have provided photography on 35mm film.
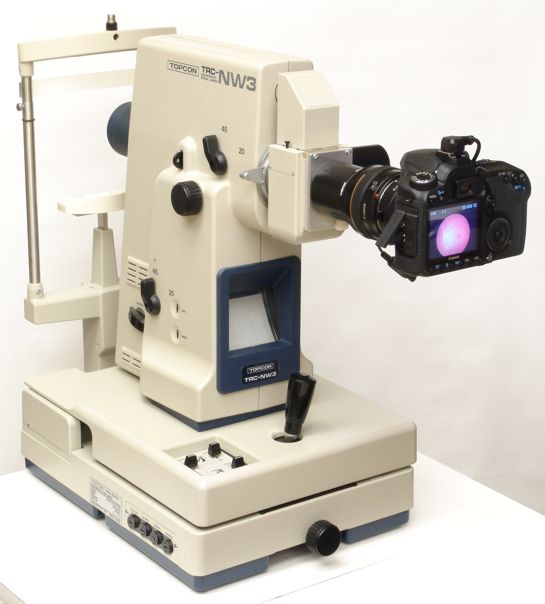
Figure 7. Topcon TRC-NW3 non-mydriatic retinal camera with complete digital upgrade installed.
This is the complete digital instrument.
This stand-alone configuration stores photos on the camera's memory card for later
transfer to a PC or printer.
With an optional HDTV you can instantly review photos on a large, high resolution display.
With an optional PC you can also instantly transfer photos to networkable storage.
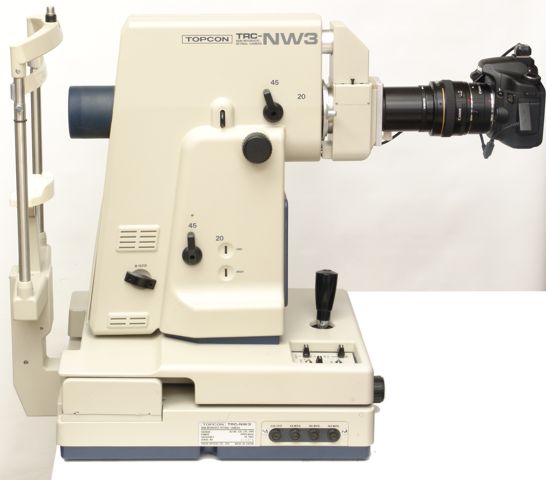
Figure 8. Side view of the digitally upgraded Topcon TRC-NW3.
The adapter tube and digital camera project back from the instrument further than the original film attachments.
Your view of the video display is not obstructed, but take care to situate the
instrument so the projecting apparatus is not liable to be bumped by passing traffic.
A table top which projects all the way underneath the digital camera is suitable.
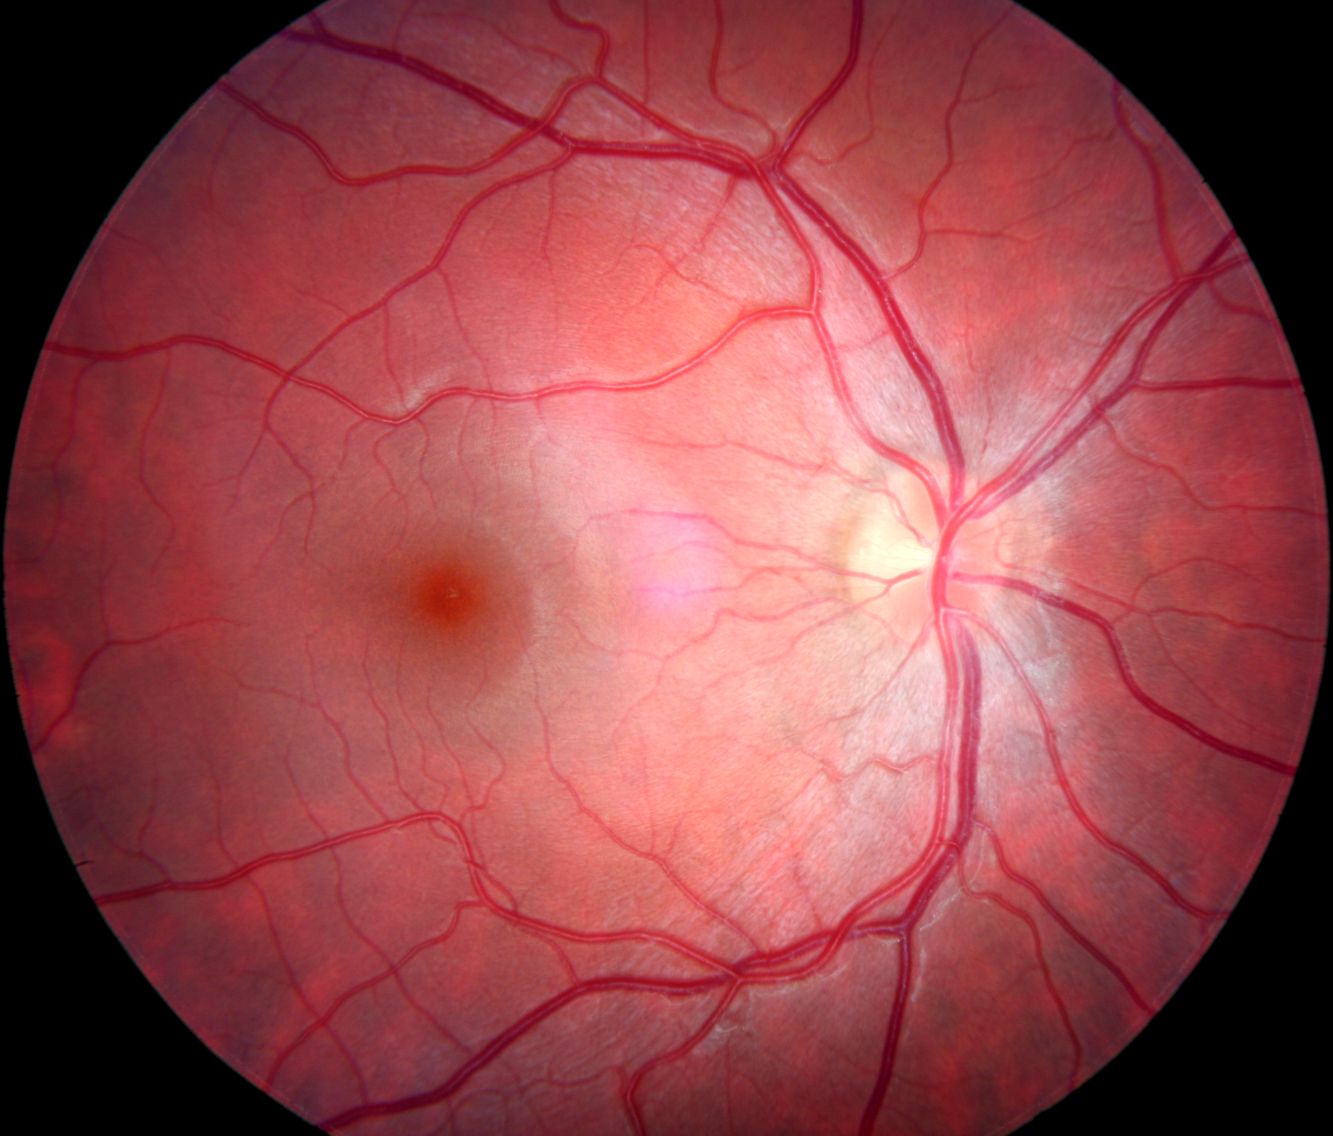
Figure 9. Sample retinal photo from the Topcon TRC-NW3 with digital upgrade.
Click image for higher-resolution view.
The digital camera provides more than enough resolution to capture the full details of the
Topcon optics. This vintage instrument, once upgraded, provides excellent images
that approach the quality of the latest digital instruments.
Digital exposures can be further corrected and contrast-enhanced with digital post-processing,
yielding improved results over anything achieved on Polaroid or 35mm film.
Copyright 2007, 2008, 2009, 2010 Richard J Kinch.