  |
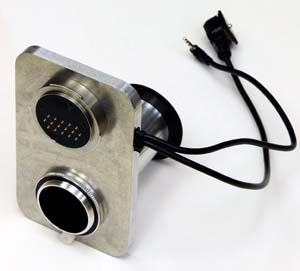
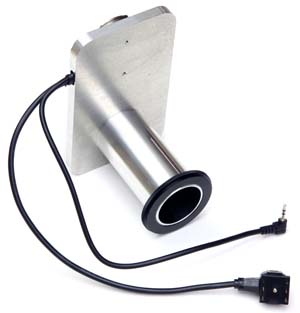
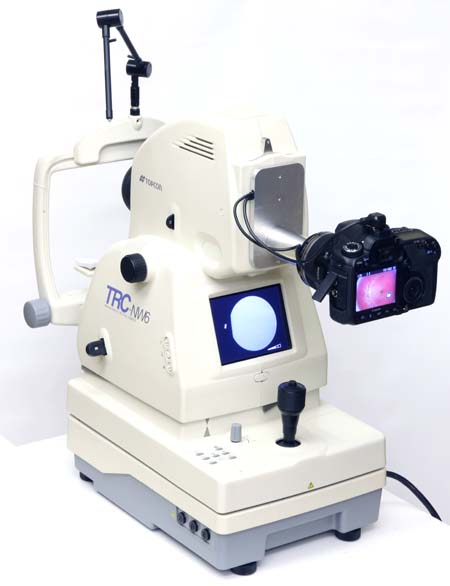
| Figure 1. Adapter front and rear views. |
Updated: December, 2018
Kit contents:
For online pricing and ordering, see http://www.truetex.com/range.htm.
Required camera and lens: The Canon digital SLR camera body and lens may be purchased with the digital upgrade kit at additional cost, or you may obtain them directly from a camera retailer. The adapter works with the standard, unmodified Canon camera body and lens. See Figure 1a below. The specific model Canon lens identified below is a strict requirement; other lenses will not frame or focus properly with this adapter:
| |
| Figure 1. Adapter front and rear views. |
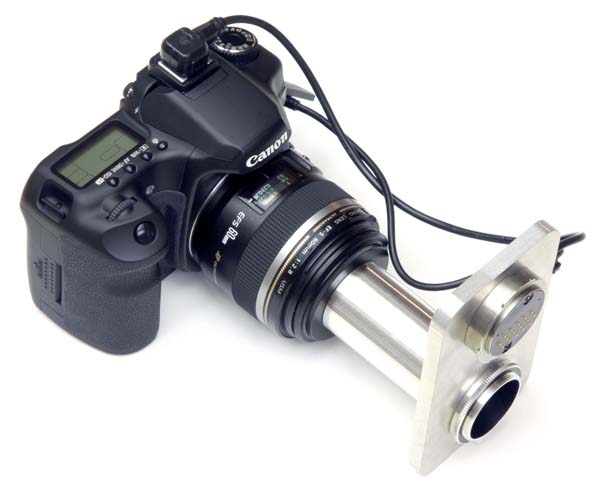 |
| Figure 1a. Adapter with Canon 40D digital SLR camera body and Canon lens. |
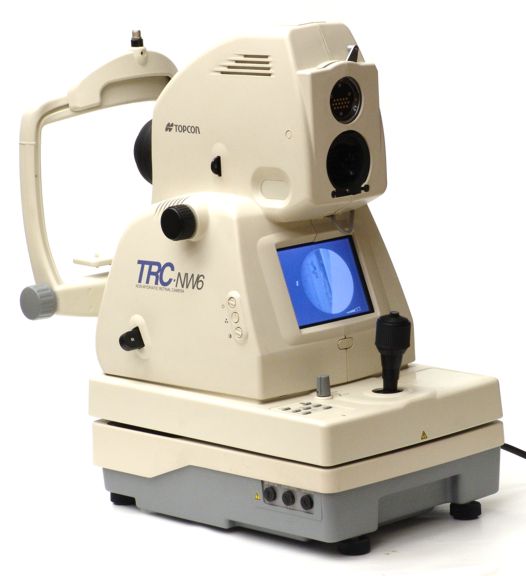 |
| Figure 2. Topcon TRC-NW6 retinal camera, prior to digital upgrade. |
Attaching the digital camera to the adapter:
Attaching the adapted digital camera to the Topcon instrument:
Connecting the adapted digital camera electronically to the Topcon instrument:
Configuring the digital camera for retinal photography:
Testing and confirming correct digital photography operation with a test target:
Calibrating the digital camera lens focus to the Topcon instrumentation optics:
NOTE: Focus calibration is crucial to getting sharply focused photographs.If you do not properly complete this procedure, your digital photos will likely be blurry.
This procedure requires two steps: First, you must focus the Topcon instrument on the test target using the instrument's infrared light and Topcon LCD video display. Second, without changing the focus knob adjustment or moving the test target relative to the instrument, you must view the test target with white light on the digital camera, setting the focus of the digital camera lens on this test target. You must use infrared light for the Topcon focus and white light for the digital camera focus, since these are the types of light used in the respective sensors, and the differing wavelengths focus differently.
Testing and confirming correct digital photography operation with a live subject:
 |
| Figure 3. Assembled adapter and camera mounted and attached to Topcon instrument. |
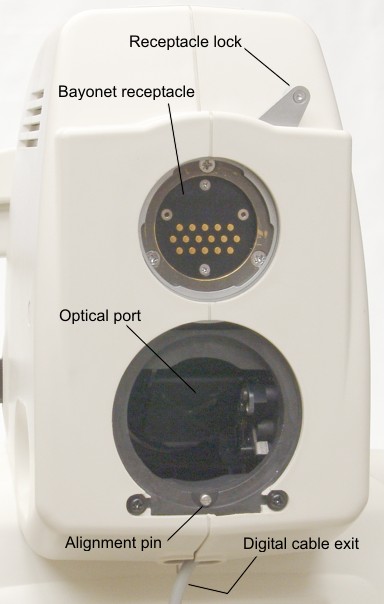 |
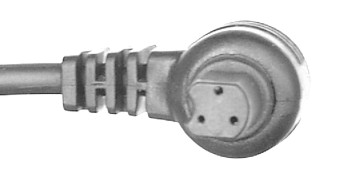
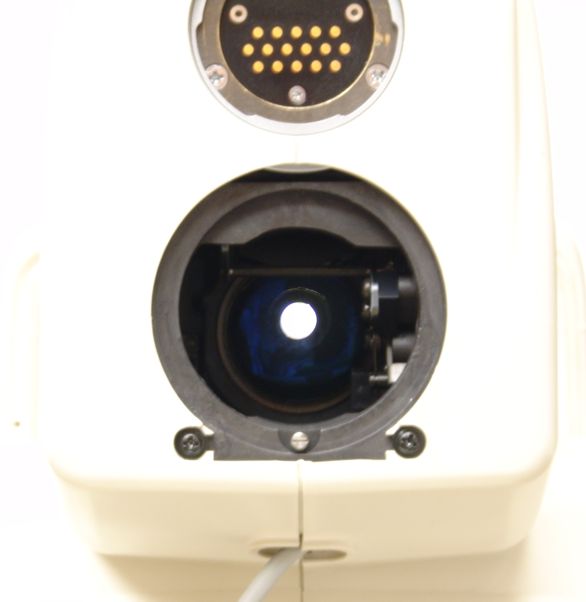
| Figure 4. Rear port of Topcon instrument. |
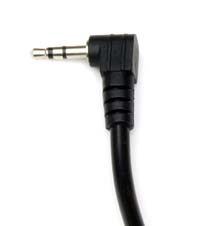 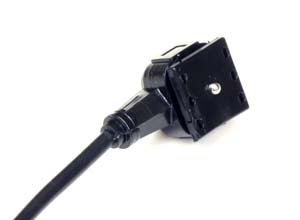 |
| Figure 5. Left: Canon E3 remote shutter connector. Right: hot shoe flash sync connector. |
 |
| Figure 6. Canon N3 remote shutter connector. |
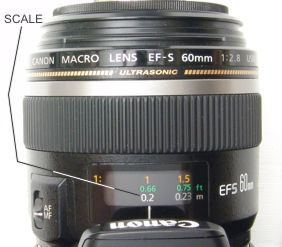 |
| Figure 7. Distance scale on Canon 60mm lens. |
 |
| Figure 8. Locking manual focus with a bit of self-adhesive paper label. |
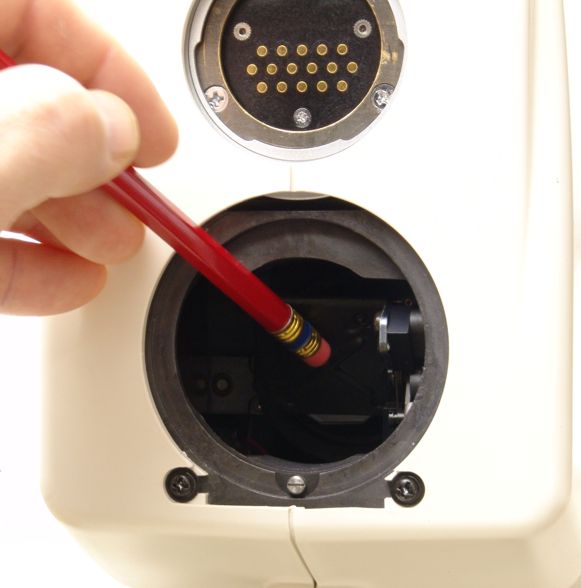 |
| Figure 9. Lifting mirror with handheld probe. |
 |
| Figure 10. View through instrument with mirror lifted for focus calibration. |
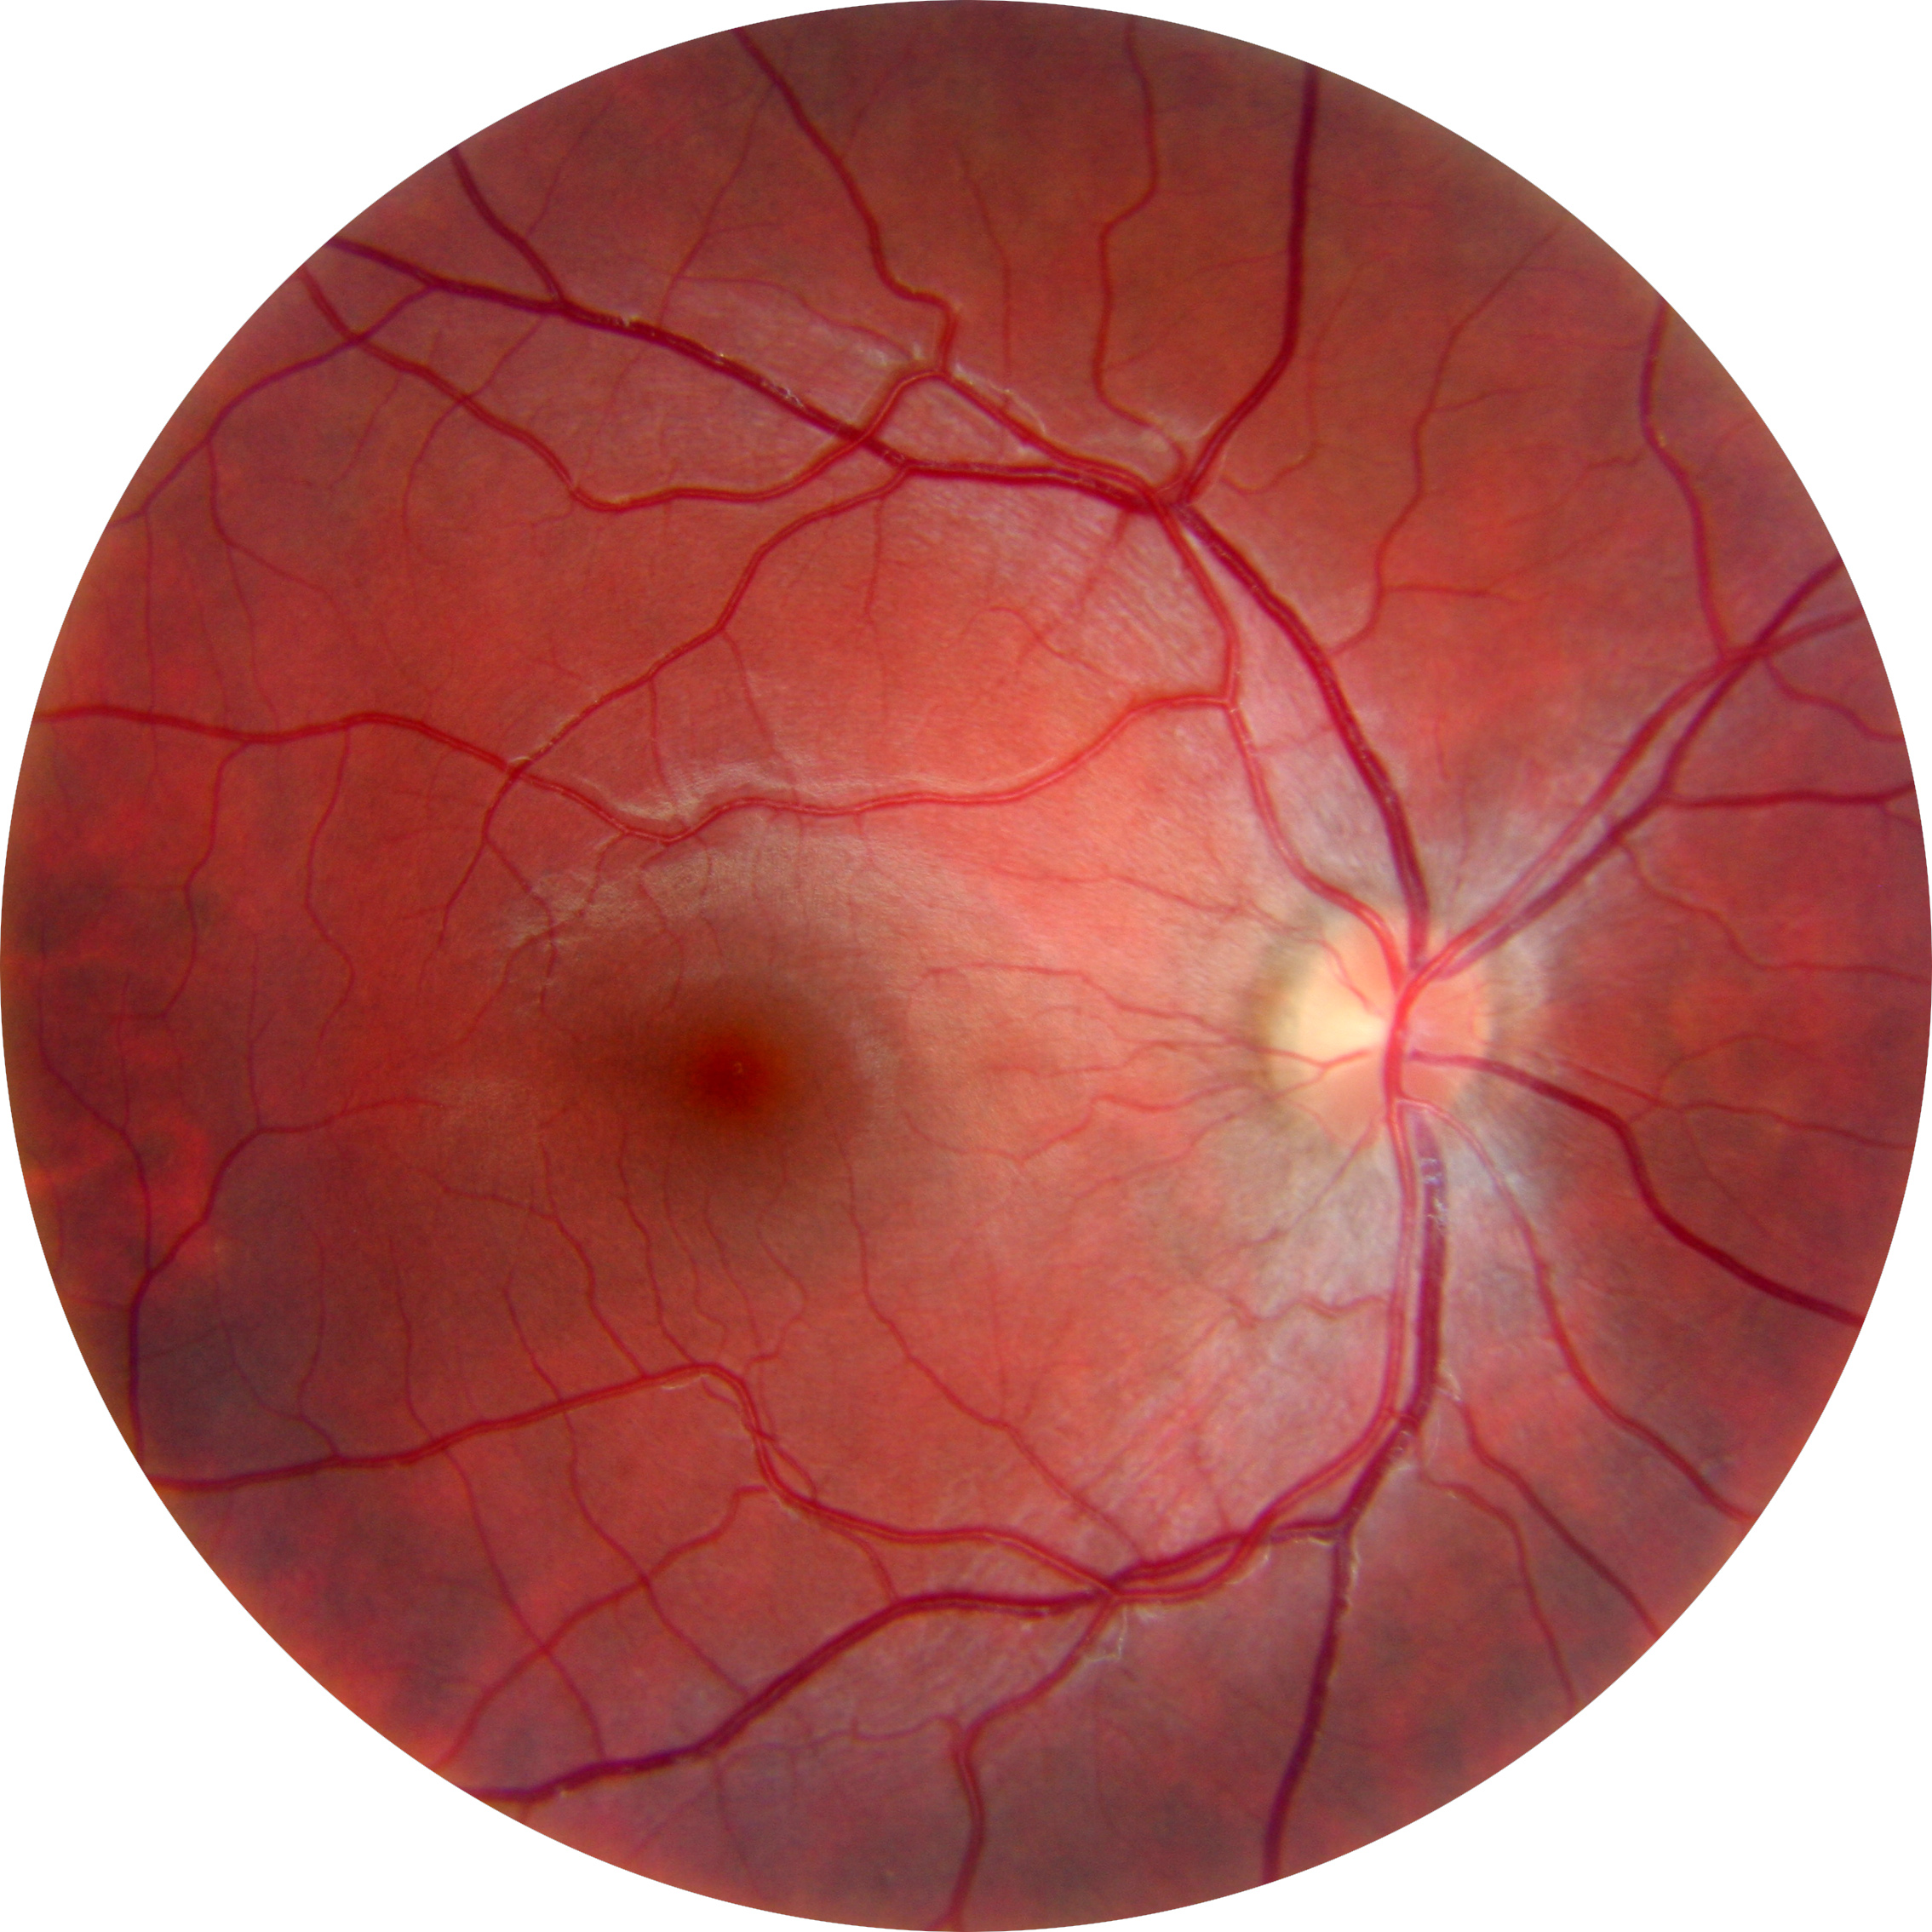 |
| Figure 10. Sample retinal image taken with the digital adapter on a Topcon TRC-NW6 retinal camera. See full-resolution image here. |
Troubleshooting:
| Symptom | Cause | Corrective Action | |
|---|---|---|---|
| No response to pushing joystick button. | Digital camera power is off. | Turn on digital camera. | |
| Digital camera battery (if so equipped) is discharged. | Charge battery.
Use digital camera menus to set "Auto Power Off" to an appropriate value to conserve battery power. |
||
| AC power adapter to camera (if so equipped) is off or disconnected. | Turn on or connect AC power adapter. | ||
| Camera remote shutter connector disconnected. | Reconnect the connector. Use cable ties to dress loose cables and avoid inadvertent disconnections. | ||
| Wrong camera settings. | Check camera for correct mode dial ("M") and shutter speed (1/20 SEC) settings. | ||
| Camera lens AF-MF switch set to AF (autofocus) instead of MF (manual focus). | Set switch to MF, and since the autofocus motor will have disturbed the fixed focus setting, also reapply the parfocality adjustment procedure. | ||
| Flash sync cable plugged into wrong socket on camera | Connect the flash sync cable to the hot shoe adapter on the top of the camera. Do not connect to the built-in flash sync connector provided on some models of the camera body. | ||
| Interpolation PC board or cable disconnected from main PC board inside the instrument | Remove covers as in the installation procedure, and check the connections are properly seated and the cable undamaged. | ||
| Camera exposes a photograph, but the flash does not fire. Photograph is completely dark. |
Flash sync connector not making connection. | Remove and reinsert flash sync connector. Use cable ties to dress loose cables and avoid inadvertent disconnections. | |
| Insufficient wait time for Topcon flash to charge. | The digital camera will shoot a photo even though the Topcon flash is not fully charged. Wait for the "lightning bolt" flash charge indicator to stop blinking on the Topcon LCD before pressing the joystick button. | ||
| Wrong camera setting for exposure time. | Set camera exposure time to 1/20 SEC. Shorter exposure times will miss the flash entirely. | ||
| Camera mode dial not set to "M" (manual) mode. | Set camera mode dial to "M" (manual) mode. (Automatic exposure modes will attempt to make a time exposure, briefly locking up the camera, since no light is normally entering the camera.) When operating the instrument, or working around it, it is possible to accidentally bump the mode dial, inadvertently switching it to an incorrect setting. | ||
| Flash sync cable plugged into wrong socket on camera | Connect the flash sync cable to the hot shoe adapter on the top of the camera. Do not connect to the built-in flash sync connector provided on some models of the camera body. | ||
| Photograph is overexposed. | Camera too sensitive. | Set sensitivity to ISO 100, or lowest setting number available. | |
| Camera mode dial not set to "M" (manual) mode. | Set camera mode dial to "M" (manual) mode. (Automatic exposure modes cannot meter the external flash.) | ||
| Camera configured for reduced flash energy, but normal flash energy setting was used. | Press button on instrument console to lower the flash energy. The Topcon instrument does not retain this lower flash energy setting when the power is switched off, so you must manually apply it by pressing the console button at the start of every session. | ||
| The subject eye blinked or the eye moved, yielding an overexposed and blurred image of anterior features. | Retake the photograph. | ||
| Black photos, although the camera clicked and the instrument flashed. | Wrong exposure time setting. | Set camera mode dial to "M" (manual) mode, and manual exposure time to 1/20 SEC. Shorter exposure times may miss the instrument flash and result in black photos. Longer exposure times may record stray light. | |
| Retinal photographs consistently out of focus. | Improper focusing technique with Topcon LCD display. | Observe proper operational technique and focusing. | |
| You have not performed the parfocal calibration as part of the installation. | Refer to "Calibrate the digital camera lens focus" above to perform the parfocal calibration. Once calibrated, apply a sticker or tape to the lens focus bearing as described above, which will avoid an accidental disturbance. | ||
| Camera lens parfocal adjustment disturbed from its calibrated setting. | Confirm parfocality with test target shot, and reapply parfocalizing procedure if out of parfocality. | ||
| Camera lens AF-MF switch set to AF (autofocus) instead of MF (manual focus). | Set switch to MF, and since the autofocus motor will have disturbed the fixed focus setting, also reapply the parfocality adjustment procedure. | ||
| Unreasonable expectations of digital photographic resolution. | Expect that the digital photographs on an upgraded film instrument will exceed Polaroid quality and approach or somewhat exceed 35mm film quality. Additional digital resolution will be "empty", and even properly focused images will be somewhat "soft" and not resolved down to single-pixel levels. With the higher quality photos, focus calibration and live focusing technique becomes quite critical, as any out-of-focus picture does not deliver the full resolution available in the optical system. | ||
| Consistent dark dust spots or bright lighting flares on every digital photograph. | Dust, fingerprints, or other contamination on the digital camera lens or the Topcon instrumentation optics. |
Avoid touching lens surfaces when handling the instrument. The front lens is easily touched by subjects posing for retinal photography; inspect it frequently. Blow off dust with a can duster. Shoot an out-of-focus test photo of a large white card held about a foot from the front instrument lens to locate and map the state of dust contamination for cleaning. Repeat this test photo shoot to see whether cleaning has removed all dust. Distinguish contaminants on the camera versus the instrument by rotating the camera and seeing if the spots move with the rotation. Distinguish contaminants on the camera lens versus camera sensor by removing the lens and shooting a test photo of a brightly lit white wall. Shine a bright penlight obliquely onto lens surfaces to reveal dust and contamination to direct observation. Seemingly minor fingerprints and other filmy contamination on optical surfaces will cause scattering of light which will degrade images with flares or reduced contrast. Persistent or filmy contaminants will require cleaning with an appropriate solvent and tissue. See manufacturer's documentation for proper cleaning techniques to avoid scratching lens surfaces or damaging antireflection coatings. Reaching internal optical elements of the Topcon instrument requires disassembly by a capable technician. |
|
| Dust on the digital SLR sensor chip. | Activate automatic sensor cleaning via camera menus. Activate manual sensor cleaning via camera menus. Append dust-delete data via camera menus. Use care when switching SLR camera lenses to avoid introducing dust into the camera. When storing the camera off-instrument, keep dust caps in place. Blow dust off lenses and caps just before attaching to camera body. In extreme cases of dust accumulated on the sensor, Canon factory service can perform a sensor cleaning. |
||
| Consistent purple ring ghost image or lens flare in the center of every image. | Filmy deposit or other degradation of antireflective coating on internal Topcon optics. | The flash illumination light passes coaxially through the same objective lenses which form the image.
This would ordinarily cause a lens flare in every photograph, except that the instrument lenses are exquisitely
antireflection-coated to minimize this internal reflection.
This coating can become degraded by a gradual film buildup on the internal surfaces with age,
or as the coating itself slowly loses its quality over the long term.
If due to a film contamination, cleaning may help, but this internal surface must be decontaminated in a
clean-room environment using scrupulous techniques with molecular clarity, which are not generally available in the field.
Disassembling the objective lens in the field with a casual cleaning technique will likely introduce dust
or stray films which will actually worsen the flare.
If due to coating degradation from age, there is no practical fix other than to replace the lenses themselves.
Hence it may be best to accommodate the flare rather than try to remove it casually.
This purple lens flare involves a principle of the original Topcon instrument, and does not involve the digital adaptation, although the
flaw may be more apparent in high-quality digital photos than in the old Polaroid prints.
Digital post-processing can remove much of the flare, since the flare image is essentially superimposed on the desired image, and consists mostly of red and blue colors, not green. Shoot a photo of a black background to get a digital photo containing only the flare image. Then in post-processing, you may subtract this image from a retinal image. Or, in digitally post-processing, you may split the digital image into red-green-blue components, and read just the monochromatic green component. This component is largely free of lens flare. This is similar to the classic red-free retinal imaging technique, which enhances the retinal image contrast, except you will filter the white-light photograph digitally and after-the-fact, instead of photographing with an optically-filtered green light. The purple color of this lens flare is due to the disproportionate effects of antireflective coating inefficiency at the ends of the visible light spectrum, which is to say the red and blue ends, and these two colors in turn combine to produce a purple tint. |
|
| Digital photographs slightly rotated when played back. | Camera tilted on adapter tube. | Check that adapter is firmly threaded into the lens. Loosen the adapter tube front ring, rotate camera to be level on adapter tube, and re-tighten front ring. If loosening is a recurring problem, you may apply a dab of nitrocellulose cement (readily available as black nail polish) to the threaded joint. Do not use cyanoacrylate threadlockers (Loctite, etc.), as these substances emit solvent fumes when curing that can damage optical coatings, and the threadlocking is too strong to permit adjustments or disassembly in the future. | |
| At the edges, photographs are consistently overexposed, of low contrast, out-of-focus, or veiled by glare. | Normal effect of the uncropped field of view of the digital adapter. | The digital camera adapter does not mask the edges of the instrument field of view, and instead images all the way to the indistinct edges of the full optical path. This provides a slightly wider view than the Polaroid or 35mm film cameras, which were sharply masked and which cropped the outer edges of the field. You may apply a circular mask in post-processing your photo with a photo editor on a PC if needed, such as for publication purposes. | |
| Pupil vignetting. | Small subject pupils require precise collimation of the instrument to the eye. Being slightly off-center or too far in or out will cause the brighter iris reflection to overexpose the edges of the photograph. The second pupil will constrict in sympathy once the first eye is flashed; allow a few minutes of recovery time for the subject's second pupil to relax. Recognize that small-pupil photographs, even if successful, will necessarily be of lower resolution and contrast compared to dilated pupil, due to the unavoidably reduced numerical aperture of the optical system. | ||
| Filmy contamination on lens surface(s). | See troubleshooting advice above for inspecting and cleaning lens surfaces. | ||
| Photographs show a yellowish cast or other color distortion not seen in the actual subjects. | Incorrect white balance setting in the digital camera. | Use the digital camera menus to set the manual white balance setting to FLASH, which is the best match to the light produced by the xenon flash tube in the Topcon instrument. Other settings such as AWB (automatic), incandescent, or fluorescent will result in distorted colors to FLASH. | |
| Digital photos are vignetted (that is, dark at the edges, as if looking through a keyhole). | Wrong digital camera mode dial setting or wrong lens aperture setting. | Use the "M" mode of the camera's mode dial, and an f/2.8 manual aperture setting. Narrower aperture settings (higher f/numbers) will cause vignetting. Adjust exposure level using the camera's ISO speed setting, not the aperture or exposure time. | |
| Excessive shutter lag on the digital camera. That is, the instrument flash occurs longer than usual after pressing the joystick button, perhaps slow enough to catch the subject's blink reflex. | When the digital camera is left powered on but idle, the "Auto Power Off" setting shuts the camera power off. The first shot triggered by the joystick will then be delayed while the camera powers back on. | Press the playback button on the camera twice to "wake up" the camera before taking the first shot. You may use an AC adapter to power the camera instead of the battery, and set "Auto Power Off" to a long time, or to "Off". Disabling "Auto Power Off" with battery power is not recommended, as inadvertently leaving the camera on will drain the battery, requiring a lengthy battery charge before further shooting may proceed. |
Copyright 2008, 2009, 2010, 2013, 2018 Richard J Kinch