I've always been fond of the mail-order metalworking flyers and catalogs I receive from MSC, Enco, Grizzly, Harbor Freight, etc. I study all those machines and tooling like I used to read the comic book ads ("learn ventriloquism", X-ray glasses, and that cardboard submarine) when I was a boy. I fill them with yellow stickies, marking all the items I'd like to have. And eventually an order for something or other becomes necessary, and I have to make a grand perusal of all the accumulated wishes. Then a week or so must pass while the boxes of goodies make their transit to my eager hands, when at last the child's joy at receiving new toys is strangely returned to my graying head.
Sometimes these items are things for which I don't have an immediate need, but expect to sometime. When it comes to metalworking, many items just can't be bought locally, and it's worth ordering a supply of the less expensive items. Which is how I came to order a selection of "oil-hardening drill rod" in various diameters.
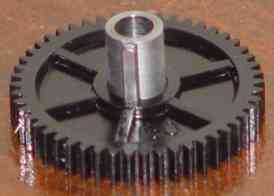
Sure enough, those rods weren't on hand for more than a few weeks when the bushing that is the bearing for the minilathe B-C change gears seized and self-destructed. While this was only a $3.49 part from littlemachineshop.com (see their catalog page), I didn't want to wait weeks for a mail order, and it was out of stock besides.
Measuring the old bushing, I found it to be 8mm ID, 12mm OD, and 16mm long. The 1/2-inch drill rod could easily be turned outside and drilled inside on the lathe to these dimensions to create a new bushing. But the bushing also has a keyway along its axis, which I measured as 3mm wide and 1mm deep. Not having a keyway cutter or broach, I thought this would also be an excellent reason to experiment with making a hardened custom cutting tool. While grinding with a Dremel disc or even hand-filing might have done a passable job of cutting a small keyway, I wanted to see if I could achieve a precisely machined shape from "scratch". This would also be so much more dignified than that agonized scowl that goes with doing anything with a Dremel tool or a hand-file.
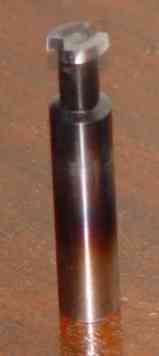
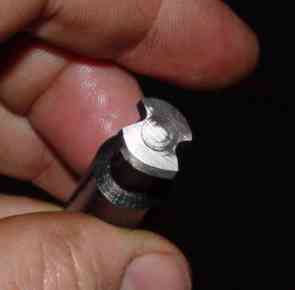
The cutter is a short length of 1/2-inch oil-hardening drill rod. This drill rod is sold and delivered in an annealed state, so it is ready to machine when you receive it, after which you can harden it into a tool that will cut ordinary steel. I cut the cutter piece from the 3-foot long stock through the lathe chuck (turning the 3-foot length slowly to avoid whipping it!) with a 1/16 inch parting tool. I left the shank at 1/2-inch to fit the milling machine collet, but turned down the business end on the lathe into an I-shaped cross-section, leaving a 3mm disk standing out where the cutter teeth would be ground. On the bench grinder, I ground notches for two teeth and ground off the trailing circumference behind these teeth. This grinding I did freehand, and while the cutting edges and relief are fine, you just can't get the teeth to the same height using only hand alignment. So I really made a 1-tooth cutter with a slightly shorter spare tooth. With a precision tool grinder this could have yielded a more perfectly symmetric pair of teeth, or even more teeth, but all I had was a common grinding wheel, and anyway, this tool will likely make only this one cut across a bushing in its life. After finishing these machining steps, I heated the cutter in a propane torch to orange heat and quenched it in a cup of motor oil. Quenching red-hot steel in oil gives you sizzling sounds, fragrant aromas of petroleum, and dazzling orange flames, all of which excites a bond in the male mind to the medieval blacksmiths, our ancient brothers in the crafting of metal to useful ends. Barbarian enemies beware, I shall smite thee with an iron blade!
An important final step after quench-hardening is "tempering", which is a partial annealing of the tool to medium hardness, enough to soften the brittleness of the fully-hardened metal while retaining enough hardness to cut the intended work material. Tempering is accomplished by following a schedule of heating the tool to a controlled, moderate temperature for a certain amount of time. For this oil-hardening tool-steel, the tempering process can be as simple as warming the quenched tool in a 375 deg F oven for an hour (which also illustrates why, unlike high-speed steel alloys, this tool steel must be kept cool during use, lest you further soften the edges). I was too impatient to wait for that hour-long process to try my one-time keyway-cutting tool, so I colleted the bit in the milling machine, taking the chance that I might break the very hard, but very brittle, cutting edge. If this were a sword on which my life would depend in battle against barbarian hordes, then I would have definitely spent some time in the kitchen tempering with my wife's GE self-cleaning oven. But it's just an experiment, so let's get on with it, and try, try again if need be.
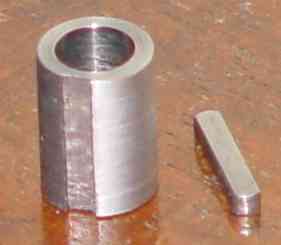
Below is the new bushing, both separated from its key, and inserted in one of the change gears with the key in place. The change gears in the minilathe use an A-B-C-D system, with gears B and C locked together with a key on this bushing.
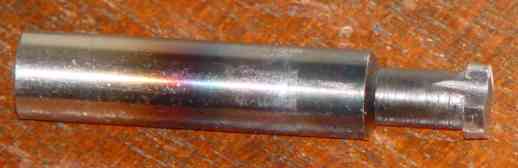
I made the plain bushing from drill rod by turning the 1/2-inch rod down to 12mm OD, drilling the 8mm ID using an "O" letter drill, which is very near 8mm, and cutting to 16mm length with the parting tool.
Next I clamped the bushing, with its axis horizontal along X, in the milling machine vise, with its side just exposed from the jaws. I colleted the new keyway cutter into the spindle, and brought it midway up the bushing. I just touched the bushing with the cutter, backed up the X axis, and added another 1mm depth (0.039 inch) to the cut. I cut the keyway in a single slow pass. The untempered cutter worked well, and my first attempt at a hardened tool was a success. The bushing was in its final shape.
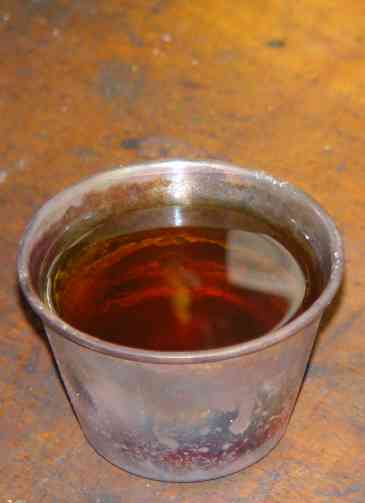
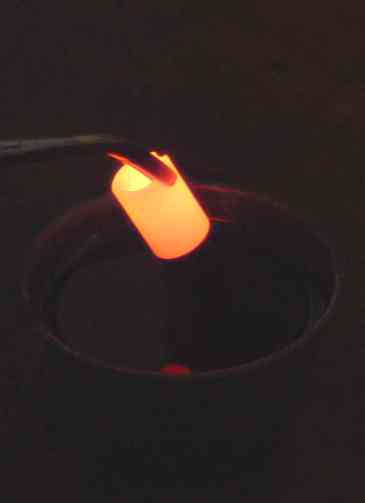
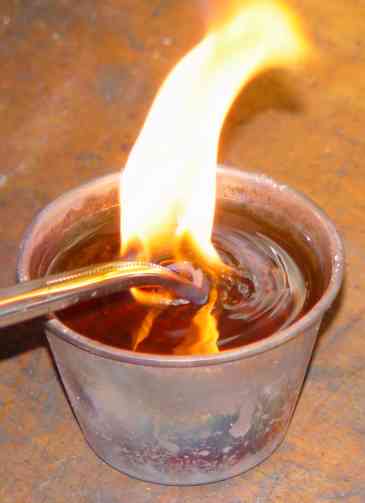
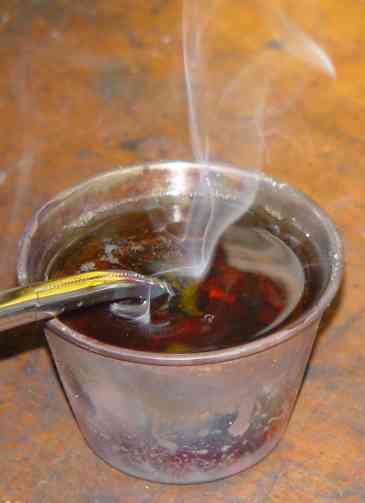
To harden the bushing, I clamped it in a large hemostat tool, and held it in a propane torch flame. At orange heat, I plunged it into a cup of motor oil. After cooling and cleaning, I tested the fit and found it to be perfect. Below are some photos of the process.
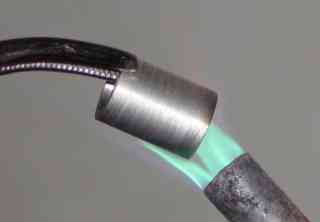


The temperature of the part is enough to both vaporize the oil and ignite the vapor. Larger parts should be processed outdoors with appropriate precautions.
The old bushing was seized mightily onto its little 8mm spindle. After struggling to get it off with pliers, without success, it occured to me that I could just chuck the spindle in the lathe and shave off the old bushing, sparing the spindle. That made it easy, and ironically, the tool in a way repaired itself.
After another year of occasional lessons in grinding cutting tooth profies, and acquiring a proper precision tool grinder instead of just a common wheel grinder, I can see that the 1-tooth hand-ground design was rather crude, and that I would want to attempt a much finer design today. But it does illustrate that for one-time or occasional use, even a crudely improvised tool based on sound principles can produce excellent results.