Moving and Hoisting an 1000-Pound Clausing 8540 Horizontal Milling Machine
September, 2003.
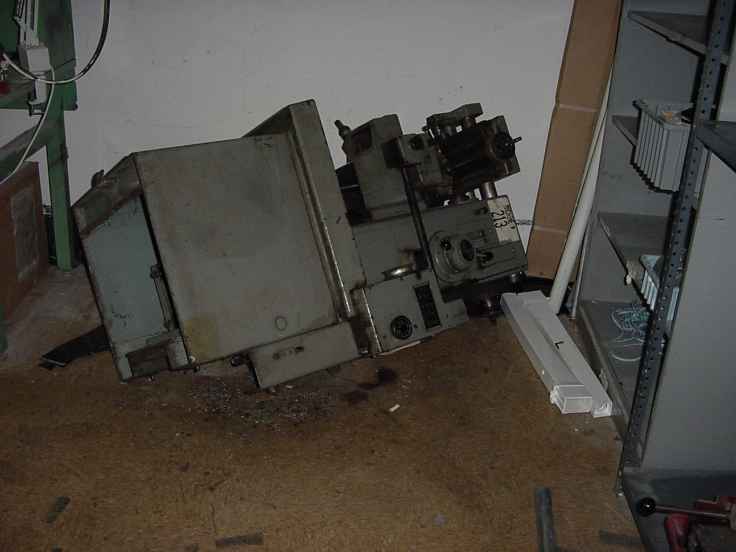 Whoops! Here's where we start the tale, at a DoveBid auction
at a bankrupt manufacturing plant in Deerfield Beach, Florida.
Why is this exquisite 1000-pound machine laying helplessly on its back, bleeding oil onto the floor?
The riggers at the auction wanted $200 just to hoist this thing on my rented flatbed trailer.
Since that was a substantial fraction of what I had just paid for the item,
and having successfully moved much larger machines myself, I decided I could move this on my own.
Hah!
Whoops! Here's where we start the tale, at a DoveBid auction
at a bankrupt manufacturing plant in Deerfield Beach, Florida.
Why is this exquisite 1000-pound machine laying helplessly on its back, bleeding oil onto the floor?
The riggers at the auction wanted $200 just to hoist this thing on my rented flatbed trailer.
Since that was a substantial fraction of what I had just paid for the item,
and having successfully moved much larger machines myself, I decided I could move this on my own.
Hah!
My first attempt was to disassemble the machine into pieces (table, knee, main column casting, base)
that could be safely lifted with less effort and equipment.
But after getting the table mostly off, it was clear that the complexity of the power feed
and other components made diassembly a major task, further complicated by the lack of an
owner's manual.
My second attempt was to jack it up with my Bridgeport-mover mattock onto wood blocks,
high enough to slide a dolly underneath.
Once outdoors, I could winch the dolly up ramps onto the trailer.
What I failed to appreciate was how unbalanced and top-heavy this machine is.
Due to the arrangement of the main column casting, the center of gravity sits hardly forward of the rear of
the 20-inch base footprint.
Jacking with a mattock involves a fair amount of tipping this way and that.
After a few increments, it unexpectedly started to tip.
|
I found myself reacting a little too late, and a little too
close to the wall, to get quite out of the path of 1000 lbs slowly
tipping towards my torso.
|
Of course I was well aware of the 2nd principle of rigging and
machinery-moving: that one does not put one's body where one cannot
get out of the way if the subject machine "starts to go" (see my other
principles, below). But I had been traveling and working early this
day, a 14-hour shift at this point, and I should have known that one's
mental acuity and judgment are not to be trusted with hazardous work in
such moments. I found myself reacting a little too late, and a little
too close to the wall, to get quite out of the path of 1000 lbs slowly
tipping towards my torso.
In a near-miss with serious injury, the sharp end of the table lead
screw (handle removed) raked across my thigh, leaving a 3-inch contusion
that could have easily been a deep laceration, crushed femur, severed femoral artery, or worse.
The wound was mostly to my pride: it is difficult to maintain nonchalance
in front of bystanders, when they hear something this big drop onto
the floor, and there you are, with your pants leg torn into halves and
flapping in the breeze.
This was enough for one day.
I could not stop wondering what it would have been like to have a leg crushed and impaled
under a machine that no one on the scene was equipped to move.
I decided to return, rested and better-equipped, on the morrow.
The next day I equipped myself with a shop crane
(Harbor Freight 35915).
This tool could do all the heavy lifting: placing the mill upright, placing it on my platform truck,
and transferring it from the platform truck to the flatbed trailer.
Meanwhile, the professional riggers
(http://www.aaamachineryriggers.com)
had moved in a forklift, which hadn't been available the day before,
to move some much larger circuit-board assembly machines elsewhere in the plant.
As I began to set up the crane next to the Clausing, they offered to use their forklift to
hoist the Clausing upright.
I don't know if they felt sorry for me, or if they had nothing else to do for a while,
or whether the auctioneer was worried I wouldn't clean up the mess I had made if I was dead.
They attached a sling under the mill overams, with strapping
to clinch it all the way to rear, and lifted the machine with the forklift forks.
Soon the mill was upright and placed neatly on my platform truck.
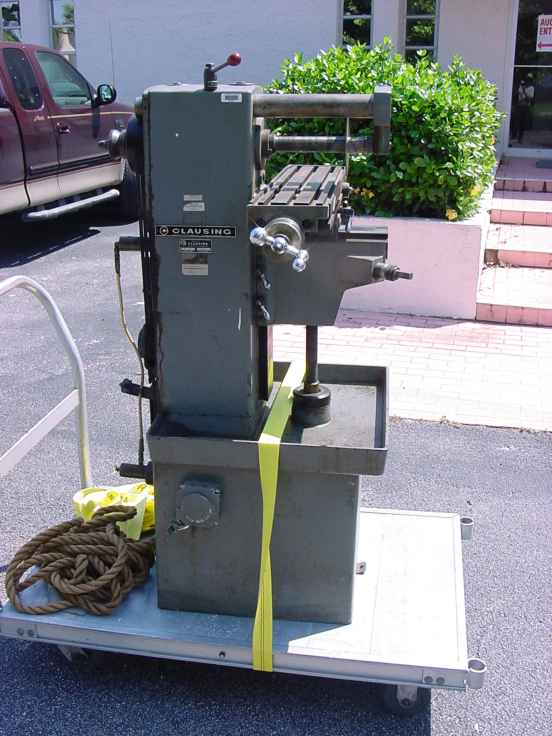 This photo shows the mill strapped onto my platform truck.
This is a sturdy truck, all aluminum, and rated for 1000 lbs, not the cheap kind.
You can see that I have used a ratcheting cargo strap to secure the tool to the truck;
I did not want another surprise tipping incident.
I could easily push the machine across the smooth factory floor.
This photo shows the mill strapped onto my platform truck.
This is a sturdy truck, all aluminum, and rated for 1000 lbs, not the cheap kind.
You can see that I have used a ratcheting cargo strap to secure the tool to the truck;
I did not want another surprise tipping incident.
I could easily push the machine across the smooth factory floor.
|
... The auctioneer was worried I wouldn't clean up the mess I had made if I was dead.
|
Fortunately there was a wheelchair ramp by the front plant entrance to reach the parking lot.
The only other access was up many steps, or off a 4-foot loading dock.
The platform truck was the right thing in this case, as the forklift had no route
to the street level from indoors,
and the engine hoist wheels and overall stability are not suitable for rolling under load.
With a 1000 lb load,
I was apprehensive about rolling the platform truck by hand down the wheelchair ramp.
With the manila rope and recruiting a bystander, I planned to regulate the descent down the ramp by slipping the
rope around a railing post, in case the descending mass was too much to hold by hand.
As I pondered this ramp situation,
the friendly riggers appeared again.
The massive fellow you'll see in the next photo
breezed the works down the ramp like he was pushing an empty shopping cart.
Next I had to hoist the mill off the platform truck and onto the flatbed trailer.
With the new crane, I did not anticipate any difficulties.
But the riggers seemed interested in the crane, and wanted to give it a try themselves.
Who was I to say no?
|
... the big guy weighed 535 lbs himself.
|
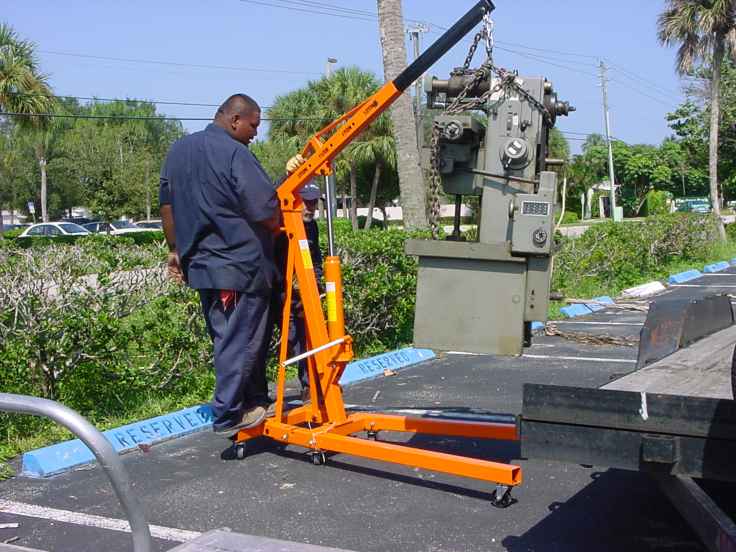
The fellow standing on the end of the crane is one of the professional rigging team.
According to the crew chief (in white cap, look carefully behind the crane), the big guy weighed 535 lbs himself.
Based on the crane measurements, I estimate his height about about 6'6".
With that kind of personnel, most of your problems are solved.
These cranes are a bit risky, because the footprint is not much wider than where the
load's center-of-gravity can swing.
It seems to me that one could improve this stability by simply clamping, say, a
10-foot length of SuperStrut across the legs with C-clamps, and blocking under that
with lumber. This would provide some "outrigger" style protection against tipping.
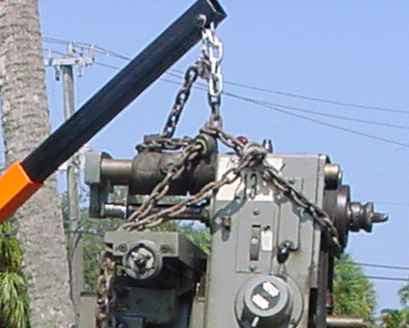 You can see how the mill is being lifted by a soft sling wrapped around the overarm bars at the top of the machine.
The sling is also clinched by chains around and under the rear spindle pulley to keep the sling attachment point in place.
(No lift is applied to these chains, they are just there to secure the location of the sling.
A cargo strap or rope would have also been suitable, but the chain was most handy.
The chain segments over and beneath the table are just loose ends.)
That clinch is critical--you don't
want the sling sliding to the front of those bars when the machine is dangling mid-air.
That nasty center-of-gravity would then drop the machine diagonally, threatening to overload the
crane or tip the whole system off the wheels.
Various scenarios are possible, all bad.
So put a backup cinch around your sling.
You can see how the mill is being lifted by a soft sling wrapped around the overarm bars at the top of the machine.
The sling is also clinched by chains around and under the rear spindle pulley to keep the sling attachment point in place.
(No lift is applied to these chains, they are just there to secure the location of the sling.
A cargo strap or rope would have also been suitable, but the chain was most handy.
The chain segments over and beneath the table are just loose ends.)
That clinch is critical--you don't
want the sling sliding to the front of those bars when the machine is dangling mid-air.
That nasty center-of-gravity would then drop the machine diagonally, threatening to overload the
crane or tip the whole system off the wheels.
Various scenarios are possible, all bad.
So put a backup cinch around your sling.
After having this machine installed, and learning how to operate and
adjust it, I would suggest another hoisting attachment method: Remove
the bearing plate from the front ends of the overarms. Remove the rear
cover (as I have shown in all these photos). Loosen the overarm clamps
on the top of the main column casting, slide the overarms to the rear,
until they project out over the rear spindle pulley (the one with three
belt grooves), and firmly retighten the nuts to lock the arms in place.
Now you can wind a sling under the overarms, both fore and aft of the
main column casting, so that you have a stable lifting attachment directly
over the center of gravity.
|
Once on the flatbed trailer, I secured the mill to the trailer with
a 1/2" carriage bolt up through the trailer floor boards and throught
the floor-mounting hole in the mill base. I also cinched the machine
down with the yellow ratcheting cargo strap. After a slow ride to the
destination, unloading was easy with the forklift available there.
Using the forklift, and the same attachment method to the mill, I
lifted the mill from the flatbed trailer, drove it to the shop door,
and placed it on the platform truck (my forklift is too tall to drive
into my machine shop!). I lacked a proper sling hoist at the time, so
I used 3/4 inch polypropylene rope instead. The shop crane could have
managed the trailer unloading if I did not have the forklift available.
Once the mill was indoors on the platform truck, I rolled it to its final
position. I removed the caster wheels from the ends of the long legs of
the shop crane to allow the legs to slide underneath the platform truck.
I lifted the mill with the crane, and rolled out the empty platform truck.
I lowered the mill until the base just touched the floor, nudged it
by hand until it was in good alignment on target footprint, and gently
lowered it the rest of the way. The crane hydraulics make the lifting
a lowering precise and gentle, but you must be very careful to slowly
open the release valve to avoid a sudden drop.
Others have suggested a "bridging" technique for rolling heavy items
lifted by the shop crane: Rather than trying to roll the crane on its
wheels while carrying a load on the boom hook, place some sturdy lumber
horizontally across the legs of the crane, turning it into an improvised
platform truck. This stabilizes the load on the lowest part of the
crane, rather than having a pendulous load swinging higher. You could
implement this technique with 10-foot SuperStrut outriggers to yield a
moving platform protected against tipping.
After cleaning the gore and shredded pants fibers from the end of the
leadscrew, I was finally able to put the machine into service. I tested
the 3-phase motor with a Mitsubishi Freqrol Z300 variable frequency drive
(VFD), using 240 VAC single-phase power into 2 of the 3 input legs.
Everything ran smoothly, including the quaint hydraulically-actuated
variable-speed main-drive pulleys and all the gearboxes and selectors
for the table feed.
|
Carry a suture kit with morphine ampule ... you can always use it to sew up your pants.
|
Perhaps you're wondering if this classic machine was damaged by the tip
and fall. In a testimony to good old American iron, the happy answer is
"no". Fortunately, the heaviest force of the landing was absorbed by the
rear of the main spindle crushing down on a 3/4" steel pipe (the mattock
handle), which buckled and dimpled such that the spindle was not in the
least affected. The table leadscrew handle did rake the wall, requiring
a slight bend to correct back to normal. I had removed the rear covers
altogether, so they were not even touched. One metal cover-mounting bracket
was bent, requiring a simple bend to correct. In the end, the machine
remained completely in order.
And my leg? That healed without further incident. My pride is still on crutches, which may be for the best.
My new principles of rigging and moving heavy machines:
- Never, ever get underneath. There is no second chance with a mistake. Mistakes happen.
- Never get inside the tipping radius.
If you can react like a frightened gazelle, you may survive.
- When you get inside the tipping radius,
have your cellphone in hand, dial "911", and poise your finger over "SEND".
- Carry a suture kit with morphine ampule. If not for you, you can always use it to sew up your pants.
- Hiring riggers is expensive.
But they do not save you time, effort, and equipment rental,
as much as they save your life and limb.
The model number 8540 is said to indicate a 3-phase motor and power feed option.
Other models of this same horizontal machine are 8541 (single-phase motor with power feed),
8551 (single-phase motor with manual feed), and 8550 (3-phase motor with manual feed).
See also:
Have a comment or question about my moving the Clausing 8540?
Email me at:
kinch@truetex.com
Richard J. Kinch
Back to Machine Shop page
Back to Home page