Email me at:
kinch@truetex.com
Richard J. Kinch
Back to Home page
January 2001--March 2013.
This page describes my project to control the equipment and chemistry of my residential swimming pool using a PC running Linux. This essay describes the goals of the project and the custom designs I used to implement my ideas. I also explain the chemistry of swimming pools, the understanding of which is crucial to success and economy in the long term.
For my essay on how I remodeled the structural aspects of this pool, see my pages at http://www.truetex.com/pool.htm.
The central principle of operation is the ability to switch power on and off from a PC, including loads as large as a 1.5 HP electric motor. Since I already have been running a Linux server 24 hours/day, using that server to operate controls costs me very little additional overhead. While Linux users have adapted PC interface systems like the X10 Firecracker (http://www.x10.com, see also the MisterHouse open-source project written in Perl for Linux which can operate through the X10 CM11a PC serial-port interface) for PC control of household lights and appliances, I determined that I could do a better job building my own interface for less money. The necessary circuits are rather simple electronic designs (since they are hard-wired instead of wireless contraptions), and unlike the X10 components, are designed to handle heavy 240 volt AC loads. The cost is also significantly less than the X10 system, and one is not locked into a single supplier for parts.
Another approach I chose not to use is a versatile gadget like the BASIC Stamp microcontroller, produced by Parallax (http://www.parallaxinc.com) and widely discussed in publications like Nuts & Volts magazine (http://www.nutsvolts.com). A similar device is the DrDAQ serial-interfaced data logger (http://www.drdaq.com). My Version 1 on/off control is just too simple to justify that much complexity. However, the ability of such devices to sense a fluid level (see the application note at ftp://nutsvolts.com/stampaps/st_ap27.pdf) or to convert and transmit probe voltage readings (see the application note at ftp://nutsvolts.com/stampaps/st_ap25.pdf) may find a role in an upgraded design some day.
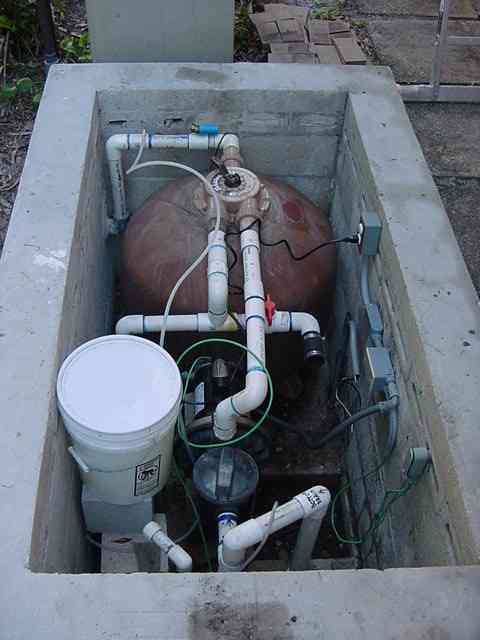
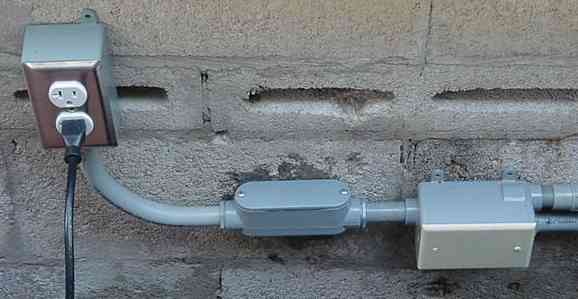
My pool equipment sits in a large concrete pit below ground, which hides the apparatus equipment from the landscape, and baffles the noise created by the electric pump motor. The pit is constructed like a tiny basement, about 4 by 10 feet in area, having a concrete slab floor, concrete block walls, and hinged fiberglass top. The circulation pipes (bottom drain suction line, two skimmer suction lines, main pressure return line, pressure-side cleaner suction and return lines, waste line to storm drain) enter the pit below ground level and connect through manual Jandy valves to the circulation pump. I apply various manual configurations of the valves to perform normal circulation, filter backwashing, filter rinsing, underwater vacuum cleaning, or draining. The circulation pump strains the incoming water and sends it through a high-rate sand filter, where it leaves the pit to pass through a heater adjacent to the pit and thence back to the pool inlets. A sump pump in a small dry well sump pit in the slab provides for drainage if any water enters.
| The pool equipment pit consisting of a concrete slab floor with concrete block walls covering a 4 by 10 foot area. The large brown sphere is the sand filter. The white 5-gallon bucket holds the supply of chlorinating solution. The injection pump is behind the bucket, blocked from this view. The 1.5 HP circulation pump is the black cylinder just to the right of the bucket, where you can also see the clear round lid on the strainer. Electrical connections are on the right wall of the pit. White PVC 1-1/2 inch pipe connects the plumbing. The pipe exiting the filter at the top of the photo shows the 1/4-inch tubing that injects the chlorine solution, and the blue 3/4 inch check-valve vacuum breaker. A fiberglass lid (removed for the photo) normally covers the pit to keep out rain. If this looks a bit disorganized, it is because I plan to re-arrange the injection apparatus with larger chemical tank(s) inside a separate block house that I would build next to this pit. |
|
The Version 1 controls use contactors, which are actuated by low-voltage (24 VAC) signals, and which switch the power to the circulation and chlorine pumps. A "contactor" is just a different name for a large-amperage relay. Contactors, such as are used for house-sized air conditioners, cost only about $12 for a single-pole version, such as the Square D brand "definite purpose" contactor, sold by distributors like Grainger. They are very rugged for outdoor use, and handle 30 or 40 amps at 240 VAC such as would be appropriate for the 1.5 horsepower pool pump.
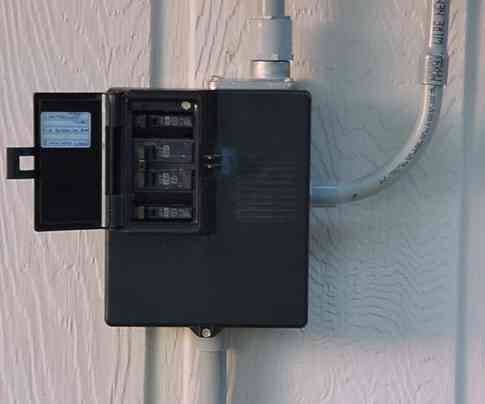
Much of the problem of the old system followed from having electrical controls in this pit. The pit is almost always warm and damp, often has stray chlorine gas present, and also endures the outdoor condensing atmosphere and rain. These conditions serve to rapidly corrode and otherwise destroy electrical devices. I removed all of that and replaced it with PVC conduit and weatherized connectors only, moving the box of controls and circuit breakers to an exterior wall sheltered from sun and rain. The controls would have been better off indoors, but this required more power conductors than were originally installed, and I did not want to run new ones. Electrical code also requires a disconnect at the equipment location outdoors, so an outdoor box is necessary in any design. Since components like contactors and service boxes are ruggedized for sheltered outdoor locations, this was not a significant compromise.
| The load center containing the circuit breakers and contactors. Conduits connect AC line (top), AC load (bottom), and low-voltage signals (bending out the side). PVC box and conduit provides durability in the outdoor environment. |
|
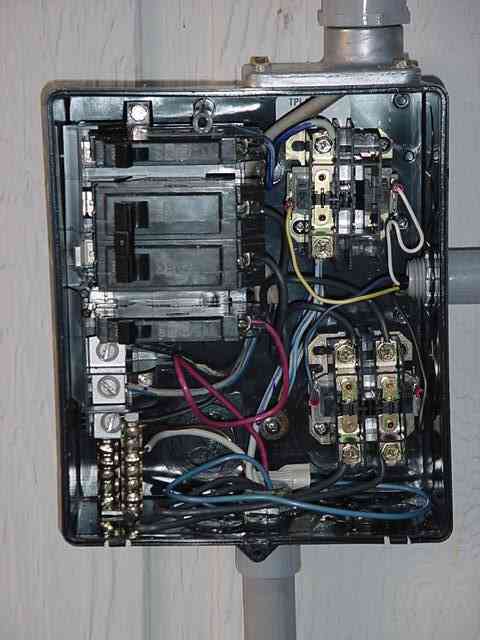
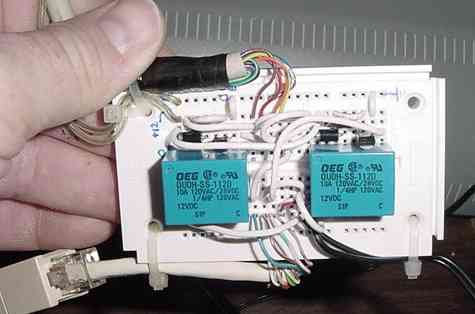
| Interior view of the load center box, showing the conduit entries, circuit breakers, contactors, and wiring. The 240 AC line enters the top via a standard weathertight coupling. Lines for the AC loads exit the bottom conduit. The low-voltage signals enter via the right conduit and connect to the contactors via crimped spade lugs. The cover and hinged door (not shown in this view) are also weathertight. The contactors are on the right side of the box in this view. The contactor on the lower-right is double-pole and operates the two hot lines of the 240 VAC circulation pump. The other contactor on the upper-right is a single-pole switch on the 120 VAC outlet for the chlorine injection pump. Since this box is full, if I decide later to add new wiring for additional control circuits, I plan to replace the bend in the signal conduit with a second box just for contactors. |
|
The low-voltage acutation signal for each contactor runs through one pair of Category 5 UTP LAN cable (very inexpensive these days) running about 150 feet through the attic of the house to the office where the Linux system resides. For building code compliance, the control box on the wall near the equipment pit requires two separate incoming PVC conduits, one for AC line conductors, and another for the low-voltage signaling via the Cat 5 cable. These two conduits enter the top and side of the box respectively. The load conductors exit via a conduit through the bottom of the box; this conduit then runs down the wall and underground into the equipment pit. A tee junction splits the conduit into one side for a circulation pump junction box, and another side for an outlet box which provides one switched outlet for the chlorine pump and an unswitched outlet for the sump pump.
| Outlets for the smaller pumps, and the junction box to the 1.5 HP circulation pump. The tee in the center goes out via buried conduit through the concrete block wall to the control box on a nearby wall. Materials were selected to withstand the warm, humid environment. |
|
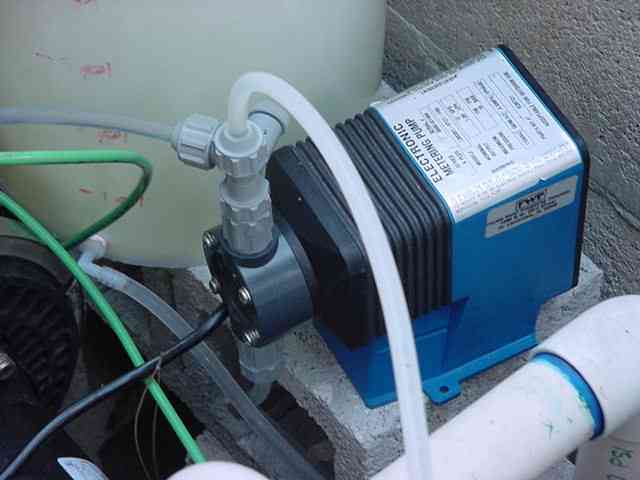
The chlorinator injection pump is made by Pulsafeeder. These are expensive $300 units (such as this unit from Grainger). The small injection pump costs about as much as the large circulation pump! (I have to gloat here and admit that I found the brand-new unit I'm using on eBay and bought it for $25.) Commercial pools use an even more costly $800 version of the Pulsafeeder that provides pulse-rate control through a 20 mA current loop circuit to a stand-alone ORP controller.
This Pulsafeeder sits in the equipment pit next to a 5-gallon bucket containing the liquid chlorinating solution. A short length of 1/4 inch PVC tubing connects the injection pump inlet fitting to the bucket via a nylon fitting (1/4 inch NPT to 1/4 inch ID tubing barb) inserted in a hole drilled and tapped into the side of the bucket just above the bottom edge. This arrangement of tubing and placement of fittings is one of the standard installation schemes specified by the Pulsafeeder instruction manual. There are larger and fancier supply tanks, but it is hard to beat the economy, strength, and durability of these plain polyethylene buckets.
This arrangement of supply and discharge tubing is critical to the reliable operation of the injection pump; the pump must be placed at the bottom level of the supply tank, with a bottom feed, and the injection point must be above the top of the supply tank, with vacuum relief. Other arrangements can cause problems with unwanted siphoning of solution into the circulation line, or the failure of the pump to prime.
| The Pulsafeeder chemical injection pump. This pump draws chlorinating solution from the bucket and injects the solution into the pressure side of the main pool water circulation line. I drilled and tapped an ordinary bucket for the 1/4-inch NPT fitting. The injection pump operates via an electronically actuated linear solenoid which periodically pulses against a diaphragm, which in turn draws solution in or pushes solution out via check valves in the incoming and outgoing lines. Two knobs on the pump provide manual adjustment of pulse rate and volume. I have these set to pulse about every 5 seconds on maximum travel, which over an 8 hour shift feeds about 1 gallon of chlorinating solution. The green wire is the ground wire which bonds all the equipment and pool structure to an equal ground potential to eliminate leakage currents. |
|
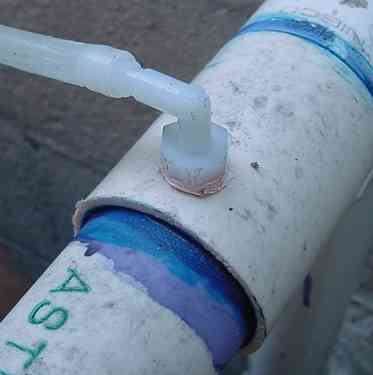
The injection pump outlet connects to the main circulation return line through 1/4 inch ID HDPE tubing, via another nylon fitting acting as an injection fitting, inserted into a drilled and tapped hole in the 1-1/2 inch PVC circulation line.
You'll note that I'm using that drill-and-tap set frequently in this project. Tapping directly into PVC pipe or polyethylene containers is an easy, convenient, and inexpensive way to improvise various fittings. A nylon "bulkhead" or "panel mount" fitting would be appropriate for the bucket, but those fittings aren't available locally (see, for example, sources like Omega Engineering for such parts).
The Pulsafeeder provides two knobs to adjust its operation. One knob is an electronic rate control that adjusts the pulse frequency to between 12 to 120 pulses per minute. The second knob mechanically adjusts the depth of the solenoid's stroke applied to the diaphragm against the pump head, thus adjusting the volume pumped by each stroke. The pumped flow (volume/time) is the product of these two settings. For maximum efficiency, the depth of stroke should be set to 100 percent, and the frequency adjusted to pump the desired flow. Various models of this pump provide a range of capacities.
It would be useful to have some computer control of the rate of chemical feed, even without feedback control. There are more expensive versions of the Pulsafeeder that provide a 20 mA current-loop control of the pulse rate. Controlling that would require a more elaborate PC interface. It would be more economical to use the on-off control from the PC to adjust feed rates through software by applying a duty cycle to the pump. The frequency of the duty cycle would have to fast enough to retain the Pulsafeeder prime against the circulation pressure. The frequent switching of a duty-cycle method would work better with a solid-state relay rather than an electromechanical contactor.
From earlier trials, I had determined that I needed to feed about 250 mL/hour of full-strength hypochlorite solution to maintain the proper chlorination level during daylight hours. The Pulsafeeder's performance cannot be predicted exactly, since it depends on varying factors such as the circulation pressure it is working against, the viscosity of the injected solution, the lengths and types of tubing, etc. To calibrate the pump's stroke and frequency settings for the requisite rate of flow, I timed various settings of the pump using known volumes of plain water loaded into the bucket. I thus determined that the settings for slowest frequency and maximum depth of stroke produced an injected flow of 500 mL/hour, namely twice the desired rate. To compensate, I have been diluting the hypochlorite solution with an equal part of water (thus yielding about 5 to 6 percent ClNaO by weight) in the supply bucket. This dilution conveniently works out to one jug per bucket, which is then topped up with tap water. I'm not sure whether to keep this dilution approach, since it decreases the effective capacity of the supply tank, but it has the advantage that hypochlorite solutions decompose more slowly if diluted.
Full-strength sodium hypochlorite solution sold for swimming pools is nominally 12.5 percent ClNaO by weight, (but labeled as 10 percent to allow for losses in storage). Laundry bleach, by comparison, is a nominally 5.25 percent concentration of the same solution. Since sodium hypochlorite is 48 percent elemental chlorine, and "available chlorine" is a practical term meaning about twice the elemental chlorine weight, the 10 percent solution also contains about 10 percent available chlorine, or about 2 pounds of available chlorine per 2.5 gallon jug. Hauling around 90 percent dead weight to get that elemental chlorine is quite a chore, but chlorine is a nasty element that requires such procedures.
Calcium hypochlorite dihydrate (Ca(OCl)2*2H2O) is the commonly available dry form of pool chlorinator. It is manufactured by combining elemental chlorine (Cl2) with quicklime (CaO).
"Available chlorine" is the equivalent amount of pure Cl2 gas required to produce the oxidant, namely hypochlorous acid (HClO), which sanitizes, versus chloride (Cl-) and hypochlorite ions (OCl-), which don't, in the reactions involved in chlorination of water. Gas chlorine, when dissolved in aqueous solution, first reacts in equilibrium to form Cl2 (aq) + H2O <==> HClO + H+ + Cl- ; that is, only half of each chlorine gas molecule even starts its dissolved life in a useful form. Part of the hypochlorous acid thus formed further undergoes the pH-dependent equilibrium reaction HClO <==> H+ + OCl-, further reducing the useful concentration. The proportion of Cl2 converted to useful hypochlorous acid versus useless hypochlorite ions in this latter equilibrium varies depending on pH, where pH 5.5 produces 99 percent hypochlorous acid, and pH 9.5 produces only 1 percent.
Further confusion of terms is common regarding "free-available chlorine" or just "free chlorine". As a measurement of water conditioning, these terms strictly mean the concentration of hypochlorous acid in water, not of chlorine in any other form. To make the usage more confusing, this measure of hypchlorous acid concentration is expressed in parts per million, but not of hypochlorous acid, rather the amount of "available chlorine" that would be required to produce such a level.
An interesting aside regarding pH dependence is that if you reduce the concentrated hypochlorite solution to pH 6, the equilibria begin to turn to producing chlorine gas instead of hypochlorous acid. At pH 4.5, nothing but gas results. Weaker concentrations require lower pH for the same effects. Frequently one hears warnings about not mixing pool products; this is one example of why, where you get deadly chlorine gas liberated from a mix of hypochlorite solution and acid.
One difficultly with using sodium hypochlorite solution as a chlorine source is that you get an unwanted dose of potent sodium hydroxide (NaOH, lye) alkalinity along with the chlorine. Concentrations of NaOH in commercial bleaches can run as high as 0.5 percent (bleach works as a household cleaner as much or more from the lye than the chlorine, and this is why you don't want to get it on you). This alkalinity baggage requires a compensating dose of hydrogen chloride (in the form of dilute hydrochloric acid) to maintain desirable pH in the pool. The neutralized product is sodium chloride (salt), which slowly builds up in the pool, but not so rapidly as to usually be itself a problem.
Decomposition of the sodium hypochlorite is a storage problem. The hypochlorous acid converts to HCl (hydrogen chloride), Cl- (chloride anions), HClO3, and ClO3-. This is accelerated quickly by higher temperatures, and somewhat less quickly by catalysis of UV light exposure and the kinetics of higher solution concentrations. Thus the stuff keeps longer when kept cool, dark, and dilute. Avoiding decomposition accounts for the laundry bleach formulation of pH > 11 and concentration < 6 percent. For the higher concentration in the pool product, I don't know how quickly decomposition proceeds, although in one case I found that year-old full-strength jugs stored in a dark but warm spot lost most, but not all, of their potency. The full alkalinity is retained while the sanitizing potency degrades, so one has a weaker sanitizer with the same pH neutralization overhead. Decomposition is also catalyzed by trace concentrations of metals such as Co, Ni, and Cu, via 2OCl- --> O2 + 2Cl-, and by acids, but normal storage methods do not involve such situations.
In short, for a swimming pool, the proportion of "available chlorine" in a sodium hypochlorite solution is about twice the proportion of elemental chlorine; one pound of chlorine in a jug of solution is worth two pounds of gas in terms of practical sanitizing effect. See the Kirk-Othmer Encyclopedia of Chemical Technology, "Bleaching Agents" survey monograph.
Kirk-Othmer also has this to say about the manufacture: Sodium hypochlorite is "usually produced as an aqueous solution by chlorination of bases (sodium hydroxide is the most common, but also sodium carbonate) using either chlorine gas or in-situ electrolysis of alkaline salt solutions.
"The final pH of retail solutions is adjusted to above 11 to maximize stability, and the salt is usually not removed."
Hypochlorous acid is reputed to decompose in the presence of moisture into HCl (hydrogen chloride) and O3 (ozone), especially in acidic solutions, which I postulate accounts for the faint "clean chlorine smell" of a properly sanitized pool, a not unpleasant odor of ozone-like cleanliness. Chloramines are reputed to be the "bad chlorine smell" of improperly disinfected pools (and often chlorine bleach applied to household cleaning), being a combination of nitrogen waste and chlorine formed when there too much of the former and not enough of the latter.
Bruce Hamilton reports in sci.chem (1999), "Monochloramine (NH2Cl) is formed in dilute solutions of ammonia and hypochlorite when the pH is from 6-8. Dichloramine (NHCl2) is produced at much more acidic pH. Trichloramine (nitrogen trichloride) forms with acidic pH and a greater excess of hypochlorite. Note that high rates of production require acidic pH, but that lower concentrations are produced as the pH is made alkaline. Trichoramine is volatile, smelly, unstable in sunlight, and decomposes in water, and sometimes is the [bad] "chlorine smell" around indoor swimming pools."
Chlorine in pool water does odd things when re-concentrated, and this can happen unexpectedly, such as when you or your textiles are wet with pool water and then dry by evaporation. The more concentrated chlorine typically comes in contact with skin or hair proteins containing nitrogen, which in turn make bad-smelling chloramines. This accounts for the typical experience where the pool smells fine, but on a drive home from the swim club, things start to get gamey. Gravity and evaporation can combine to really whollop the tips of hair bangs or the edges of swimsuits this way, especially if the pool is over-chlorinated, such as happens when a nervous host is worried about all the guests suddenly appearing in his pool. To avoid this, have swimmers rinse themselves and their swimwear with a tap-water shower, which these days in the US is mildly monochloraminated, not chlorinated. Even better (but rather compulsive) is a slightly acidified distilled water rinse, which will rinse away residual hypochlorous acid or covert it to slight, harmless concentrations of hydrogen chloride and ozone gas.
| The chlorine injection point into the main circulation line. This is another drilled and tapped 1/4-inch NPT hole into the PVC pipe, with a nylon hose barb fitting. |
|
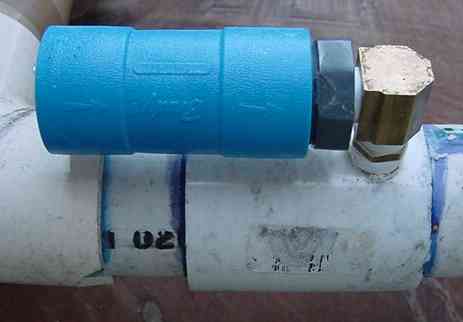
| The Bundy 3/4-inch acetal check valve, installed backwards on the pressure side of the main circulation line to act as a vacuum breaker. This is needed because when the circulation pump shuts off, the water level at the injection points is higher than the surface of the water in the pool, so gravity produces a suction which siphons chemical solution through the injection line. The vacuum breaker admits air to prevent this undesirable action. When water pressure is present, the spring-loaded check valve remains closed. Alternatively, an anti-siphon valve is available for the injection pump lines from the pump manufacturer, but this is a more expensive and trouble-prone method since it is in constant contact with the corrosive chlorine. |
|
Materials for handling chemicals must be carefully chosen, and proper precautions taken to avoid bodily contact. All tubing, pipes, and fittings in contact with concentrated chlorine must be compatible materials like PVC, PE, or nylon. Soft PVC tubing is suitable for the inlet line from the chlorine supply tank; it slowly hardens from exposure to the chlorine, but is otherwise compatible. On the outlet, stiff HDPE discharge tubing is required to avoid losing the pressure of the injection impulses, but has the disadvantage of becoming brittle in sunlight, and therefore must be kept covered. Failure of either side of the injection tubing results in catastrophic leaking of corrosive, concentrated chlorine solution. To eliminate this hazard, I plan to move the injection apparatus to a separate block house built adjacent to the equipment pit.
Spills or splashes when handling gallons of liquid are inevitable. When handling the concentrated chlorine solution, I keep a garden hose ready nearby for emergency rinsing and eyewashing. Spilling it on your skin results quickly in a chemical burn. Eye protection is mandatory, as even a tiny droplet splashed in the eye yields a painful and possibly permanent corneal injury. Even if quickly rinsed, an annoying chlorine odor persists on the skin from contact with sodium hypochlorite, so I keep a spray bottle I've mixed of sodium thiosulfate (hypo, a reducing agent which combines with chlorine and hypochlorous acid to stop their activity, cheaply available as a photographic hobby item) 4 percent w/w solution handy; a quick wash of the hands with it, followed by a rinse with water, neutralizes hypochlorite residue and odor. Wearing good clothes or footwear is not prudent as these are instantly bleached by hypochlorite.
Version 1 does not attempt to automatically monitor chlorine concentration or pH, which are the two most important chemical aspects of a swimming pool. Without a way to track the dynamic chlorine concentration, the open-loop method requires a worst-case dose be applied, leading to some extra expense. While variations in pH drift slowly over days rather than being diurnally dynamic like chlorine, the lack of pH sensing means that adjustments must be made manually by adding acid once or twice a week. The technology required to sense these chemical parameters requires a delicate probe be inserted into the plumbing, with an amplifier and analog-to-digital converter interface to the computer. These probes are rather expensive at about $100/each, require calibration every month or so, and wear out in about a year. Without some less-expensive, improvised alternative, these costs seem to exceed the possible savings in reduced chemical demand or manual dosing. I have considering adding another injection pump feeding diluted hydrochloric acid, or a solenoid valve feeding CO2 gas, either of which could be operated by software which managed doses determined by manual entry of pH readings.
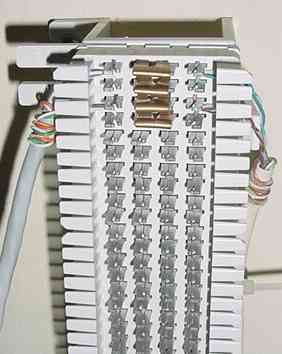
At the office room, I use a 66-type punch-block to terminate various cables that enter the central wiring point for telephone, LAN, and now pool control signals. From the punch-block I use ordinary RJ-45 jacks and Ethernet patch cords to connect to the PC interface circuits on the Linux system.
| The 66-type punch-block for network connections. This is a classic method for dealing with interconnections of lots of cables. One such block handles wiring for my telephone, DSL, Ethernet, and now contactor controls. Copper clips bridge one side of a circuit to another, allowing you to disconnect parts of the system for testing. The open contacts allow ready access for test equipment probes. LEDs could also be permanently connected here to display the on/off states of the system. The Category 5 cable on the left runs through the attic to the contactors, while the cable on the right connects to the protoboard interface. |
|
The PC interface uses the data bits of the PC parallel port to turn a 24 VAC signal on or off as follows: The interface circuit for each bit is a single NPN switching transistor which drives a PCB relay from the PC's +12V supply. The relay contacts in turn switch the output of a 24 VAC wall-wart transformer to the LAN cable pairs running to the remote contactors. Thus software running on Linux can turn the contactors on and off by sending the appropriate bit pattern to the parallel port via a single 8-bit character to /dev/lp1. Parallel ports latch the output bits and thus the bits of a given character, once sent, are maintained at the interface pins. Since now there are only two controlled devices, on bits 0 and 1 of the /dev/lp1 interface, sending characters '@', 'A', 'B', and 'C' provide all possible 2-bit combinations. You'll find more schematics for some simple interface circuits here.
I built the Version 1 hardware interface on a prototyping board from parts available from electronics suppliers such as Digi-Key, Jameco, or even Radio Shack. Beside the interface circuit, the prototype board has cabling to connect to the LAN cable, the PC +12V supply, the 24 VAC transformer, and the PC parallel port.
| The protoboard implementation of the PC interface circuit. Two single-bit channels control the circulation and injection pumps. Each of two data lines from the PC parallel port drive an NPN switching transistor, which in turn actuates a small 12 volt relay. The relay contacts connect the output of a 24 VAC transformer to the signal lines running to the load center contactors. I cut up ready-made cables and stripped the ends to attach to the protoboard via cable ties; there's no point in making more work than necessary. |
|
The process control software consists of several shell scripts which run at timed intervals via the Linux "at" daemon. Security and reliability is enhanced by having these scripts run with user privileges only, by virtue of having a user with ownership of /dev/lp1 and with privileges to run "at" commands via /etc/at.allow.
By setting the Linux time-of-day via ntpdate at boot time, and running the network time protocol (NTP) daemon ntpd in Linux, I maintain strict absolute time accuracy using Internet time servers. While the split-second precision thus achieved is overkill for the pool controls, it is critical that the system have a reliable standard-time clock to maintain predictable synchrony with the governing solar events. This is an advantage over any stand-alone, non-networked controller.
At the lowest level, an overall configuration script named "config" is loaded by each of the other scripts as their first step:
| Shell script: config |
# # PORT is the hardware parallel port interface to the contactors # PORT=/dev/lp1 # # $SHRINK says how long after sunrise to start, and how soon before sunset to stop # $SHRINKMINUS is a bit shorter interval for priming (at start-up) or clearing (at shut-down) chlorine pumping # SHRINKMINUS="89 minutes" SHRINK="90 minutes" # # MAILADVICE is "-m" to have "at" send us mail about activities, # or "" if no mail desired. # MAILADVICE="" # # ONLOG is a file which logs activity from the "on" script. # Set to "" to disable logging. # ONLOG="_onlog" # # Set SQUAWKING to "1" to have standard output messages. # Set to "" to turn them off. # (If on, each invocation of "on" generates mail from "at") # SQUAWKING="" |
Since sunrise and sunset times for a given latitude and longitude are difficult to compute using orbital mechanics, I let the federal government (NOAA, The US National Oceanographic and Atmospheric Administration) do the heavy lifting of the astronomic calculations via their Web site at http://aa.usno.navy.mil/data/docs/RS_OneYear.html. On that Web page, you submit your location as longitude and latitude, and the site generates a custom page for your own private piece of real estate on the planet. (My tax dollars pay for this?) I submitted my pool's terrestrial coordinates, taken with precision of a few feet from topographic maps and the Microsoft Terraserver, and saved the results in a file. The following script uses that table to look up the sunrise or sunset time for today:
| Shell script: daylight |
#!/bin/sh
#
# Looks up sunrise/sunset time for today's date from NOAA Web site table
# generated by http://aa.usno.navy.mil/data/docs/RS_OneYear.html
#
# Use:  daylight sunrise|sunset ...
#
# Pebble Beach Ct:
# Latitude 26 deg 37' 36" N = 26.6267 deg
# Longitude 80 deg 10' 17" W = -80.1714 deg
#
# RJK 11/2001, 4/2002
#
TABLE="solar.w"
#
DAY=`date +%d`
MONTH=`date +%m`
#
#  Look up 1-hour correction for daylight savings time zone
#
case `date +%Z` in
  *DT) DST=1 ;;
  *) DST=0 ;;
  esac
echo DST=$DST
#
for i in $*
do
  case "$i" in
    sunrise) grep "^$DAY" $TABLE | awk "{ printf \"%02d:%s\\n\", substr(\$0,($MONTH-1)*11+5,2)+$DST,substr(\$0,($MONTH-1)*11+7,2) }"; continue ;;
    sunset) grep "^$DAY" $TABLE | awk "{ printf \"%02d:%s\\n\", substr(\$0,($MONTH-1)*11+10,2)+$DST,substr(\$0,($MONTH-1)*11+12,2) }"; continue ;;
    *) echo Unknown arg: $i ; continue ;;
  esac
done
# (month-1)*11 + 5
|
The following script uses command-line arguments to control the parallel port via a more friendly syntax. This works by echoing the ASCII codes '@', 'A', 'B', and 'C', corresponding to the bit patterns 00, 01, 10, and 11, to the parallel port device (/dev/lp1, represented as $PORT by the config script) in Linux.
| Shell script: on |
#!/bin/sh
#
#	Turns pool pumps on/off
#	Logs to $ONLOG file
#
#	Use:	on [none|circ|chlor|both] ...
#
#	Note: all hardware actions should go through this one script
#	Note: args are case-sensitive
#
#	RJK 12/2001
#
. config
if [ $# -ne 1 ]
then
  echo $0: Use: $0 '[none|circ|chlor|both]' 2>&1
  exit 1
fi
for i in $*
do
  case "$i" in
    none)
		echo -e '@\c' > $PORT
		if [ "$SQUAWKING" = "1" ] ; then echo $0: Pumping OFF ; fi
		if [ "$ONLOG" != "" ] ; then echo $0: `date` Pumping OFF >> $ONLOG ; fi
		continue ;;
    circ)
		echo -e 'A\c' > $PORT
		if [ "$SQUAWKING" = "1" ] ; then echo $0: Pumping CIRC ONLY ; fi
		if [ "$ONLOG" != "" ] ; then echo $0: `date` Pumping CIRC ONLY >> $ONLOG ; fi
		continue ;;
    chlor)
		echo -e 'B\c' > $PORT
		if [ "$SQUAWKING" = "1" ] ; then echo $0: Pumping CHLOR ONLY ; fi
		if [ "$ONLOG" != "" ] ; then echo $0: `date` Pumping CHLOR ONLY >> $ONLOG ; fi
		continue ;;
    both)
		echo -e 'C\c' > $PORT
		if [ "$SQUAWKING" = "1" ] ; then echo $0: Pumping BOTH CIRC AND CHLOR ; fi
		if [ "$ONLOG" != "" ] ; then echo $0: `date` Pumping BOTH CIRC AND CHLOR >> $ONLOG ; fi
		continue ;;
    *)
		echo $0: `date` Unknown arg: \"$i\"
		if [ "$ONLOG" != "" ] ; then echo $0: `date` Unknown arg: \"$i\" >> $ONLOG ; fi
		continue ;;
    esac
done
exit 0
|
At any time, one can run the "on" script from the command line to manually control the pool operation or run tests. Such manual activity does not interfere with the scheduled control events.
Finally, a master script using all of the above scripts runs the repeating daily process. The goal is to run circulation and chlorination during the middle part of the day, since the seasonally varying amount of daylight is the dominant factor in the demand for filtering and sanitation. For debugging and confirmation, a log file retains a history of the events (on, off, daily reschedule) as they occur.
The script schedules the pump "on" commands for a short "shrink" time after sunrise, and the "off" commands for a short "shrink" time before sunset, using a "shrink" time from the configuration script; this shrink time represents the portion of daylight during which the sun is too low in the sky to be affecting chlorine chemistry. The script turns on the chlorine injection pump alone for one minute before the circulation pump, to allow the injection pump to prime itself before it has to pump against the circulation pressure (which otherwise would prevent the unprimed injection pump from ever priming itself). At the end of the daily cycle, the script turns off the chlorine pump for a minute before turning off the circulation pump, to allow the last of the injected chlorine to dilute and circulate into the bulk of the pool water; otherwise the concentrated chlorine in the plumbing could accelerate aging of fittings or other components.
The script is recursive in that each day's events end with scheduling of the script itself to repeat tommorow's daily scheduling in a daisy-chain fashion. Once you manually start this script, it runs day after day on its own via the "at" daemon. This continues forever, until you manually delete it from the "at" queue, or until the "at" daemon (or of course the whole system) is shut down.
| Shell script: daily |
#!/bin/sh # # Schedules all daily pool control activity for today, # and repeats itself early tomorrow. # # NOTE: should be started via "at" during the idle part of # the schedule after midnight (i.e., via the last line of # this script). # . config SUNRISE=`daylight sunrise` SUNSET=`daylight sunset` # echo "on chlor" | at $SUNRISE + $SHRINKMINUS $MAILADVICE echo "on both" | at $SUNRISE + $SHRINK $MAILADVICE echo "on circ" | at $SUNSET - $SHRINK $MAILADVICE echo "on none" | at $SUNSET - $SHRINKMINUS $MAILADVICE # at 00:01 tomorrow -f daily # echo $*: `date` ========== >> $ONLOG echo SUNRISE=$SUNRISE SUNSET=$SUNSET SHRINK=$SHRINK SHRINKMINUS=$SHRINKMINUS >> $ONLOG echo atq: >> $ONLOG atq >> $ONLOG echo ========== >> $ONLOG |
Debugging these real-time control scripts was a different experience from other software. Most of us computer programmers are used to dealing merely with abstract data and displays. Having program code make big pumps turn on and water flow was very satisfying.
I prefer to work in the Bourne or Bash shell environment, rather than GUI interfaces, so these shell scripts are all I need to run the pool. It might be fun to integrate them into a Web page and have them viewable from a browser. Then I can monitor and control my pool from those terminals in the airport concourses!
Occasionally I need to turn on the circulation pump for some short period when it is normally off, or turn everything off for repairs when it is normally on. For example, to run the circulation pump for an hour without adding chlorine:
| Shell commands: manually run circulation for 1 hour |
$ ( on circ ; sleep 3600 ; on none ) & |
Or to stop and restart the circulation and chlorination in the middle of the day:
| Shell commands: interrupt daytime functions for repairs |
$ on none [ ... Perform repairs ... ] $ on chlor ; sleep 60 ; on circ |
One mark of a well-designed system is whether it can be easily diagnosed and repaired when it fails. This aspect of my controls became critical in June, 2002 when a lightning strike suddenly froze the circulation pump control in the "on" state.
To diagnose this problem, I was able to probe the electrical states through the protoboard and punch-block while using the scripts to command the circuits to on and off test states. Working back from the contactors towards the computer, I eventually observed that bit 0 of the parallel port interface from the PC was stuck in the "on" state. I confirmed this diagnosis by exchanging the protoboard jumpers for the parallel port bits and observing the corresponding exchange of the location of the problem.
To repair the problem, rather than replace the parallel port interface (which was part of the motherboard, requiring either that the motherboard be replaced or the port disabled on the motherboard and a new plug-in card substituted) I simply moved a protoboard jumper to use the formerly unused bit 2 of the parallel port instead of bit 0, and adjusted the ASCII codes in the software script accordingly. This leaves the bad interface bit unused, but with only 2 bits needed, there are still 5 spare bits left for future repairs, should lightning strike twice.
Lightning strikes are very common in my location in southeast Florida. Given the long wire runs attached to the interface, I should upgrade the parallel port driver circuits to use opto-isolators to protect the PC.
The only genuine motive for using these compounds is to prevent daylight (UV light?) depletion of free chlorine, which they are indeed effective at doing. But the deceit of these compounds is that they inhibit nearly all the sanitizing power of free chlorine. Nothing on the label of these products, and nothing the pool store clerks ever advised me, indicated this serious effect. So while the free chlorine concentration looks good on the dye test results, using the common test-kit method of colorimetric OTO (ortho-tolidine, typically 0.1 percent) dye or even the more professional DPD (N,N-diethyl-p-phenylene-diamine sulfate or oxalate, reacting with chlorine to produce a magenta colored oxidation product called Wurster's dye; these are the so-called #1 tablets testing for free chlorine at neutral pH; #2 tablets measure total chlorine by adding potassium iodide, the iodide reacting with chloramines to form iodine which reacts like chlorine with DPD to produce magenta Wurster's dye) dye, the sad fact is that the cyanuric acid almost completely inhibits that free chlorine from doing its work. Measuring the concentration of free chlorine does not give a true picture of the chemical activity of that chlorine, which depends on other factors in the water. Moreover, OTO dye will give a false reading in the presence of combined chlorine (chloramines), and both OTO and DPD respond to HClO and OCl- as indications of free chlorine, even though it is only the HClO that acts as a sanitizer (thus the cautions about correcting pH before reading these tests, since pH affects the HClO to OCl- equilibrium). ORP is the only practical test that directly measures the true state of chlorine sanitation.
The mechanism of ORP inhibition by cyanuric acid is similar to the way the ORP contribution of free chlorine is inhibited by conversion with ammonia to combined chlorine (chloramines). The cyanuric acid converts free chlorine to chlorimide, which like chloramines has a less potent effect on ORP. Indeed, conversion to chloramine was once touted as a stabilization method similar to the way chlorimide (from cyanuric acid) is promoted today.
The true level of sanitizing power is better measured via the oxidation-reduction potential (ORP, which in pool water measures the chemical power of HClO to oxidize contaminants, including the effects of such factors such as pH and cyanuric acid), not mere concentration, yet this is rarely applied or addressed to residential pools. When measured in a pool using cyanurics, the ORP will be seen to be far below sanitization requirements, even though free chlorine dye tests show the concentration at a recommended 1 to 3 ppm (parts per million).
Reliance on dye tests is another problem area in pool maintenance that compounds the problem of cyanurics. Dye tests carry significant risks of false readings: people vary in their color perceptions or abilities to correctly read what they see, the light used to read the vials is uncertain, reagents grow stale, contaminants in the water affect the color response of the dyes, and the color standards in the test kits are often poorly calibrated or faded. In short, a dye test is usually only trustworthy to detect the presence or absence of sanitizer altogether, and at best only a rough and unreliable measurement of concentration. OTO is so unreliable that it has been obsoleted for scientific and industrial applications; residential pools seem to be the only place where OTO is still used, perhaps because it is cheap and the users are not aware of the poor reliability.
Is the cyanuric problem a big deal? Consider that the minimum ORP for adequate pool sanitation is 650 millivolts, according to various authorities and state standards. What concentration of free chlorine does it take to reach that target? In a pool free of cyanurics and a pH maintained at 7.5, it takes less than 0.2 ppm of free chlorine! If fact, this was the level of free chlorine recommended in public tap water supplies (prior to the EPA ban on the practice). The cyanuric regime requires over ten times that much chlorine concentration to maintain sanitation. Practical maintenance levels of one-half to one-third are suitable (0.5 to 1.0 ppm unstabilized versus 1 to 3 stabilized).
In the underlying chemical theory, ORP is a logarithmic function of free chlorine. This means that the ORP produced by a small chlorine concentration (0.2 ppm) in a balanced, non-cyanurated pool is not increased much by higher levels of chlorine. That is, it doesn't take much chlorine to sanitize a pool, and dosing more chlorine yields a rapidly diminishing return of sanitizing effect. However, chlorinating in excess of the levels needed for sanitizing ORP provides a reserve against depletion from chlorine demand or UV depletion. This is a compromise that will depend on the conditions of the particular pool, such as bathing load and the daylight present.
Eliminating cyanurics does leave you with the problem of UV light effects in an outdoor pool. Daylight depletion of chlorine can be controlled by a steady, automatic hypochlorite feed, if you are simply equipped for that, which preserves the immense sanitizing power of free chlorine. Cyanurics are all in the long run more expensive, more work, less sanitary, less effective, and more prone to depletion crises than hypochlorite solutions alone. How is it that they are presented to do-it-yourselfer's as "mandatory" form of pool maintenance?
The real reasons cyanurics are used:
See the excellent essay by Kent Williams at the Professional Pool Operators of America (http://www.ppoa.org), "Cyanurics--Benefactor or Bomb?" (PDF file). This paper explains and graphs the inhibition of ORP from cyanurics for various free chlorine concentrations.
For an excellent technical paper on chlorine sanitation using ORP measurement versus dye testing, see the essay by Jacques M. Steininger, D.Sc., of Santa Barbara Control Systems, "ORP Control in Pools and Spas" (PDF file). This paper explains and graphs the dependence of ORP on pH and free chlorine concentration.
Hach (manufacturer of many water analysis products) publishes a valuable paper by Daniel L. Harp, "Current Technology of Chlorine Analysis for Water and Wastewater" (PDF file).
See the US Army technical manual, Swimming Pool Operation and Maintenance.
See the 151-page Osmonics Pure Water Handbook (PDF file). This is an excellent introduction to all kinds of water treatment technologies, including but not just for swimming pools.
Ontrak sells relay and digital I/O modules using USB and serial-port interfaces.
phorp.com sells pH and ORP sensors.
Proper sanitation requires raising the ORP to a target level and holding it there. Chlorine concentration per se is irrelevant. Chlorine is there to oxidize things, and the ORP is literally the measure of its oxidizing potential. In a non-cyanuric pool (like mine), maintaining a desirable ORP means maintaining a steady, low concentration of free chlorine. Routine superchlorination ("shocking") is required of cyanurated pools because chlorine in the presence of cyanurics is miserably ineffective at raising the ORP. This chronically low ORP from cyanurics in the water means that even with the recommended 1 to 3 ppm concentrations of free chlorine, your pool still selectively builds up slow-to-oxidize contaminants in the water, such as chloramines and algae, which can only be oxidized through superchlorination. How fast the contaminants build up and therefore how freqently you need to superchlorinate them out depends on the environment and usage of your pool.
The yellow dye (OTO) test kits for chlorine measure the free chlorine and not the ORP, and free chlorine is a near-meaningless indicator of ORP in the presence of cyanurics. Thus the dye test can effectively give you a false-positive reading for chlorine.
You might think that you get the most "bang for the buck" putting in chlorine at night, since you get a high concentration for hours, with no UV light dissipating it. But proper ORP control alone keeps the pool sterile and uncontaminated, and superchlorinating a clean pool is pointless. But using cyanurics virtually guarantees the ORP will be too low, and that you will end up in a messy situation requiring superchlorination to resolve.
Bacteria are killed much more slowly in cyanuric pools (in minutes instead of milliseconds), but microbes are small and dispersed enough that they don't multiply with any such limit on their lifetimes. The tougher problem is contaminants like chloramines and algae. These are not controlled by ORP levels that control microbes; more ORP is required. Chloramines and algae are not infection hazards, but still foul your pool and can accelerate into runaway growth. This is the only reason you can get away with weak, cyanuric-hobbled ORP levels in residential pools at all: Cyanurated water with chlorine may have enough ORP to kill infectious microbes, while still building up non-infective but noxious contaminants.
The only reason people survive swimming in residential pools with ORP crippled by cyanurates is that your family is not a public health threat because they aren't, well, the public. I would not want to put my mouth into water that washed across the intestinal orifices of some stranger with hepatitis B, unless ORP is there in milliscond-kill strength. But you know your own family is not a health hazard that way, so swimming in otherwise clean water without any ORP is OK, as long as you are not squeamish about "cheek wash."
One fail-safe feature I should add is a cycle-rate limiter to the pump control, such as are used to protect air conditioning compressors from cycling too fast after power outages. This could also be inserted at the bit level into the parallel-port interface with something cheap like a 555 timer chip.
But maybe I am showing my age. As a freshman electrical engineering student in 1973, my first course in computer logic used relays in the laboratory. Sometimes I take comfort in having a little piece of the Colossus of Bletchley Park working beside me.
Aqueous sodium chloride is something the human body is designed to live with, even depend on. Not so for cyanurics and cyanide.
But then again nitrile rubber is poly-vinyl-cyanide, and nobody questions using that these days. But the marketing people sure want to call it by the "nitrile" name.
Maybe a better analogy would be cleaning a rough floor with a weak versus a powerful vacuum cleaner. Any vacuum cleaner, even a weak one, will pick up dust and small particles. But to pick up gravel and larger particles you need more power, otherwise larger dirt particles just get sorted out and left behind. Chlorine is like a powerful vacuum, and adding cyanurics is like restricting the vacuum hose. It doesn't matter that you have unlimited time to sweep; big particles won't get picked up no matter how long you try.
The main pool chemicals, namely sodium hypochlorite solution and hydrochloric acid, both lose potency over time, and this potency is not visually obvious to the retail user. One should confirm that the retailer is selling fresh products at the labelled strength. One should also test the products from time to time or whenever there is a reason to suspect lack of potency. On the spot checks I've done, retailers seem to typically be selling products significantly weaker than what is stated on the label. There must also be a temptation to adulterate (water down) these products, since they are expensive and rarely checked.
Testing hydrochloric acid potency: An accurate scale can test hydrochloric acid for potency, since the density is a measure of the strength. Pool acid is typically sold in a strength of 20 degrees Baume. The Baume scale measures specific gravity, which is an easy property to measure in industrial processes. To convert from specific gravity (SG) to degrees Baume (Be) or vice versa, use the formulas SG = 145/(145-Be), and Be = 145-145/SG (this is the so-called "heavy" Baume scale, for solutions denser than water). Thus acid labelled 20 degrees Baume should have a specific gravity of 1.160 or more. This means a gallon jug of acid should weigh 10.0 lbs versus 8.69 lbs for water (including a 0.34 lb tare for a polyethylene jug and cap). Weighing the full jugs for an expected 10 lbs is a convenient rough test of potency, since you don't have to do any measuring or pouring. You should check the tare weight of the empty jugs you are using. And you should have a well-calibrated scale with a precision of at least 0.1 x 10 lbs.
Testing chlorinator potency: Chlorine is harder to measure, since the only convenient metric is the OTO indicator, which has a very narrow range of sensitivity. This requires diluting the hypochlorite solution with distilled water to a range of about 2 or 3 ppm and performing OTO colorimetry on the dilutant. A dilution of about 1 drop (0.025 ml) in 1 liter (1000 ml) (this dilution would be more accurate done in two steps with larger volumes) should yield about 3 ppm on the OTO test if the product is at full potency.
Testing chlorinator alkalinity: Another useful value to measure occasionally is the alkalinity load of a given volume of chlorinator, most practically known as the proportionate volume of acid needed to neutralize that alkalinity. This alkalinity varies with suppliers, since it largely comes from variable amounts of lye added to stabilize the product. You can estimate this poolside by titrating a measured, highly-diluted chlorinator solution with measured, highly-diluted acid, using the ordinary phenol red pH indicator as a pH neutrality test. This is faster than using the pool-store acid-demand test kit since you don't have to wait for the whole pool to mix a chlorine dose and a series of acid doses. For example, you might use the pool test kit test tubes to measure a two-step dilution, say about 1 ml of chlorinator into 1 gallon of water, and then 1 ml of that solution into a 5-gallon bucket of water. Then make up the first-stage dilution of the acid in the same proportion (1 ml in 1 gallon), and count how many drops of that dilution neutralizes the 5-gallon bucket. Divide the number of drops by 40 to get the neutralizing proportion by volume of acid to chlorinator. A typical count would be 5 drops.
You can combine the tests for chlorinator potency and alkalinity by designing your tests for the same dilutant.
If you want to use pool water for the gallons needed for dilution, you'll have to wait for a moment when you have zero chlorine and ideal pH established. You obviously can't measure chlorine or alkalinity in a sample by diluting the sample with pool water (or tap water) that is itself chlorinated or alkaline.
In June 2007, I dispensed with all the injected solution apparatus described above, and installed a Hayward Goldline Controls Aquarite (AQ-RITE) electronic chlorine generator. To decide this, I performed an analysis known in engineering economics as the "make or buy" calculation: whether it is cheaper to make your own chlorine with an expensive up-front investment in equipment, versus buying it one jug at a time from a pool store.
If you can make your own chlorine at an equal or lower price than buying hypochlorite, then you can get rid of the big chore of hauling and dosing chlorine by hand. Can we even save money doing so, like the salt chlorinator brochures boast? Will this claim stand up to hard-nosed engineering scrutiny of the true costs?
The up-front costs of a salt chlorinator consist of the unit itself and its installation, plus the initial dose of salt for the pool. The Aquarite model I chose varied in delivered price from $645 (discounted on eBay) to $1278 (retail pool store). I installed the unit myself in about 4 hours, with another 4 hours for start-up and performance tuning. I would estimate this electrical and plumbing work to cost about $400 in time and materials, if hired out.
My 26,000-gallon pool theoretically required 693 pounds of salt to create the target 3200 ppm salinity. Bags of salt locally varied in price from $5.20 (Sam's Club) to $8.52 (retail pool store) per 40-pound bag (all prices including local sales tax). The initial dose of salt thus costs from $90 to $148 depending on the store. I hauled mine from Sam's Club. The sales clerk insisted on moving my neat pile of 20 bags of Morton Pool Salt (800 pounds, mind you) off the flatbed hand truck I pushed up to the checkout lane onto a sloppy pile on another truck with a bad wheel. She may have been concerned I was a clever shoplifter, hiding a big LCD TV inside that mountain of salt, like Pharoah's mummy locked inside the Great Pyramid. From there I had to push that miserable load like an ant pushing a brick, all the way to my vehicle at the end of the parking lot. Once I hoisted these into the back of my van and drove home, I recruited my kids to carry them over to the pool, setting the bags evenly around the edge. Then I would cut a bag open with scissors, pour about half the bag into a dry bucket, and fling that bucket's contents with a mighty "HUNHH!" across the pool surface with as much spread as possible, progressing around the perimeter to evenly disperse the undissolved grains along the bottom. It got to be like a golf stroke, making a fling that would throw a well-spread, horizontal sheet of flying salt nearly across the pool. Then I set the trusty Polaris 180 pool monkey to work, minus the collection bag, which would speed around the pool bottom, sucking up the salt and jetting it up into the water where it would finish dissolving. All told I only spilled a few ounces of salt onto the pool deck, making for about 99.96 percent efficiency. The rest of the flavorful granules got whisked in.
(Note to anyone facing the same task: I made the mistake of assuming my old pool water had no salt in it, when in fact it had a significant existing salt concentration from years of sodium hypochlorite chlorination. I overshot the target salinity of 3200 ppm, and instead got 4700 ppm, which cost me some extra time and money to dilute out with city water. The Hayward manual isn't clear that you should install the unit and turn it on before adding all the salt, to see if you have a significant initial salt concentration to consider and compensate for. This is complicated because you want to hurry up and get things going, but it takes all day for salt to dissolve and disperse evenly in a big pool. And the manual isn't clear that your unit isn't going to be damaged by powering on to test the low salt concentration of the undosed pool.)
The up-front capital investment for the unit, installation, and initial salt dose is thus from $735 to $1826, depending on your do-it-yourself skills and shopping acumen. This investment will have to be amortized into the lifetime of the equipment using some assumptions about lifetime and depreciation rates. Below we'll assume a 5-year, straight-line depreciation.
Now let's calculate the variable costs of operation per unit of chlorine delivered. Hayward's documentation on the Aquarite claims that the unit "produces 1.45 pounds of pure chlorine" per day. Just what they define by the ambiguous term "pure chlorine", they don't say. They make several such casual statements in their documentation for this very technical product, which as an engineer I find annoying; no doubt some marketing genius made them dumb-down the precise language. It seems likely they mean the chlorinating equivalent of 1.45 pounds of gas chlorine, which as we've seen elsewhere on this page, is the "available chlorine" figure which actually doubles the weight compared to the elemental weights in hypochlorites or cyanurated chlorine. In short, the most economical competing chlorinator is the 2.5 gallon jug of sodium hypochlorite sold at the local pool store for $4.05/jug which yields about 2 pounds of "available chlorine". To this price we must add about $1.25 for make-up acid to neutralize the alkalinity of the jug product and its sodium hydroxide stabilizer, for a total cost of $5.30. So the buy-it chlorine is $2.65 per pound, to which we want to compare the make-it cost per pound. (Let me add that I am suspicious about the pool store's claim for potency of their chlorinating solution, since my laboratory found that their jugs of pool acid were watered down by about 20 percent of what's claimed on the label, and sometimes the jugs of chlorinator don't seem to work very well. So they may be selling something that is significantly more expensive than the label would indicate. I contacted the weights and measures authority for the State of Florida, who gave my report about product dilution some serious consideration, but in the end they decided not to pursue it.)
Likewise, we should confirm by some kind of measurement how much chlorine the Aquarite generator actually puts out, and the power consumption of the unit, rather than just taking Hayward's claim as truth. After the unit was installed and running, I metered the power consumption at 1.2 amps at 240 volts, or 288 watts, significantly more than Hayward's claim of 1.0 amps or 240 watts. The other thing we have to assume is that Hayward's claim for 1.45 pounds of daily chlorine output must be based on running the thing flat-out at 100 percent capacity for 24 hours. Residential electric power here in SE Florida mid-2007 is running about $0.124/KWH (actual bills I receive, not the phony "average bills" the utility publicizes). To run the Aquarite at 100 percent for 24 hours is thus 288 watts times 24 hours, or 6.91 KWH, whichs costs $0.86. So the power costs only about $0.59 per pound, but we haven't added in the amortization. Later we're going to assume 8 hours per day generating chlorine at 100 percent, which per year will cost $105 to generate 176 pounds of chlorine. I confirmed the basic performance of the unit when new by setting it to 100 percent capacity and running for 8 hours (after dark to avoid sunlight losses), which should have generated 0.48 pounds of chlorine into my 26,000-gallon pool, for a concentration of 0.48/26,000 x 1/8.34 gallons/pound = 2.2 ppm, which an OTO colorimetric test approximately confirmed.
Let's consider make-up salt as an amortized cost, since rainwater tends to dilute the salt out of the pool, requiring more salt to be added. My location on the planet (indeed, you can even see my pretty blue pool here on Google Maps, by zooming all the way in on the satellite view, not quite where the Google arrow points but just east of the S-bend of the road, where they must have caught me on a good day when the pool was in shape) gets about 50 inches of rain per year, which is about 20,000 gallons over the area of my pool. If that all went to diluting salt due to overflow, then the annual salt cost would be $72 to $118. I would estimate the annual cost to be perhaps 1/3 of that, or $24 to $39. That is, you have to heave in a bag of salt every few months, which is consistent with what other pool owners report as their experience. (After 10 months of usage, I found that I lost an average of about 100 ppm per month, which for my size pool is about 20 lbs of salt. Thus my actual usage during that period was about $3/month of make-up salt, or about the upper limit of that initial estimate.)
To amortize, we must make some assumptions about how much per day the unit will run, since the object is not to run at 100 percent capacity, but to merely meet the pool's chlorine demand for sanitation. My current strategy is to run from about 4 p.m. to midnight daily, which avoids producing chlorine merely to lose it quickly from daylight. Enough ORP to sterilize the pool and kill algae is achieved after a few hours, and the pump runs during this time to complete about one turnover of the pool volume. This keeps the pool looking good without having to run it half the day or add expensive algaecides. On those occasions when there is a big bathing load or other need for midday sterilization, we run the unit continuously. I am still a refusenik when it comes to cyanuric "stabilizer", even though every salt chlorinator manufacturer follows the herd on this issue.
The amortization of the original installation costs requires that we assume some lifetime for the equipment. The salt chlorinator consists of two subsystems, one being the digital controller and power supply, and the second being the titanium-ruthenium-oxide electrolytic-catalytic cell with temperature and flow sensors.
The cell lifetime is said to be five years, but during that time the capacity gradually degrades due to the loss of the catalytic oxide coating as the cell ages. While this aging gradually diminishes the maximum rate of chlorine production, I would expect that aging does not adversely affect the power efficiency in terms of watts consumed per mass of chlorine produced. So the cell lifetime question really amounts to how long can you run a new cell before the cell's aging capacity diminishes below the pool's need for chlorine. In short, how many years before the pool is turning green again although you're running the chlorinator flat out? The economics are further complicated by the ability to compensate for diminished cell capacity by running the chlorinator longer during the day, which also requires the circulation pump (and its power costs) be kept running. It is not unlike a car tire, which may have some expected lifetime, but which become progressively less safe on wet roads as the tread diminishes; such things tend to have less than the optimistic lifetime the manufacturer claims.
So one must guess about cell life, because these salt chlorinators using the ruthenium oxide coating are a relatively new technology, and this is the first such unit I have owned. The gradual capacity decline is what I hear from others who have owned them longer. So let's just be optimistic and believe the manufacturer that I will be generating chlorine for five years with the original cell. The manufacturer explicity makes no guarantee about performance after the first year, and pro-rates any replacements for a five-year expected lifetime.
The controller on the wall purportedly has a longer lifetime, and the manufacturer will sell you a plug-in replacement cell so you can renew your system for less than a whole new system. I am not so optimistic about the controller life, though, because I know what the outdoor climate does to electronics, and the Aquarite is an oddly built steel enclosure with no heat sinking on a 300 watt transformer. I measured the internal temperature at 180 degrees on a normal day, so I do not expect this controller to live a lot longer than the 5-year cell.
If we assume a 5-year lifetime with straight-line depreciation and 6 percent money, then our capital cost of $735 to $1826 yields an annual depreciation of $174 to $433. To this we add the $24 to $39 for make-up salt and the $105 per year for electric power. So our total annual cost is $303 to $577 for 176 pounds of chlorine, or from $1.72 to $3.28 per pound of chlorine generated. Note that the capital costs (purchase and installation) are greater than the consumables (electricity and salt), perhaps much greater if you're not as much of a do-it-yourself'er or careful shopper as I am. The marginal cost of making extra chlorine is a bit better, since we don't have to include the controller amortization or make-up salt, just the electric power and cell depreciation, amounting to about $1.20 per pound of chlorine. Remember, we're comparing these prices against an estimated $2.65 per pound of chlorine via chemicals.
The make-or-buy decision about chlorine thus comes down to several simple factors: (1) If you can avoid retail prices and do the installation yourself, you can make chlorine cheaper than you can buy it (although by no means as cheap in true costs as the salt chlorinator manufacturers claim), and reap a significant further savings in manual hauling and dosing of pool store chlorine, and (2) Even if you hire out all the installation and maintenance, you'll pay twice as much or more than doing it yourself, and the generated chlorine will be as much as 50 percent more expensive than hauling jugs of hypochlorite, you'll be buying a significant convenience for a reasonable price.
To conclude, the salt chlorinator approach is economical for both the do-it-yourself'er and the hire-it-out-for-convenience pool owner, although for different reasons and different degrees.
I've not included some factors that may or may not be critical to the economics of a given situation: There is a performance risk to buying any piece of sophisticated equipment like this, should you have problems with it. There is a risk of choosing the wrong unit or the wrong manufacturer, and you're entering into a 5-year committment. Significant to me is the fact that Hayward derates the chlorinator unit from its alleged residential capacity (40,000 gallon pool) to 25 percent (10,000 gallon pool) for commercial or public pools in Florida. My economic calculations do not include Inflation in the price of consumables, or variations in the time value of money. A fair comparison to buying pool-store chlorine should account for the not insignificant chore of hauling and dosing the nasty stuff manually and frequently. Since this hauling of inventory is not something one always can keep up with, you occasionally have a neglected pool that costs you still more chlorine to clean up, and which costs you something in just being ugly to look at; the reliable supply from the salt chlorinator avoids this supply-chain risk. Buying and storing supplies of salt is a chore, but at least salt is not perishable like the hypochlorite solution, so salt can be stockpiled for years. I've made my comparison to buying a type of chlorine (2.5 gallon jugs of 10 percent sodium hypochlorite) which is relatively cheap in my Florida market compared to elsewhere in the world. Finally, there are murmurs of salt in pools causing corrosion of metal fixtures and deterioration of natural stone masonry work, and this risk of structural damage should be considered in the costs of running a salt-chlorinated pool; I'll know more about this in a few years after some experience with the salt water on my natural marble coping and stainless steel fixtures.
I considered some other salt chlorinator units than Hayward's, such as the Pentair IntelliChlor, the Pool Pilot, and the Zodiac LM3. The decision for Hayward came down to it having a simpler controller that was less expensive and more rugged; with my computerized controls, I didn't need a more expensive controller that did timing.
2008 update: After less than a year of operation, the Hayward Goldline system self-destructed! The electrolysis cell involves a seal where the electrical connections pass through the wall of the plastic cell enclosure. This seal consists of what appears to be epoxy cement filling the wiring passage where the "dry" parts of the system separates from the "wet" parts. This epoxy seal failed, leaking water very slowly onto the outside of the cell and onto the entry wiring. Since this point in the pool circulation is where the chlorine is being generated, the leaking fluid is highly corrosive. The copper conductors inside the wiring insulation were destroyed, causing the cell to fail. Although promising a 5-year cell warranty, Hayward refused to replace the cell for me when I contacted their factory service. They would not accept a return of the cell for their inspection and replacement. Hayward insisted I have an "authorized service center" look at it, which turned out to be a guy working out of a truck an hour away, who wanted nothing to do with a system he hadn't sold and being operated by a do-it-yourselfer. So the Hayward Goldline warranty turned out to be worthless in my case. I am back to manually dosing hypochlorite.
2009 update: The salt corroded my stainless pool ladder! After about a year of maintaining salt at about 3200 ppm in my pool for electrolytic chlorination, I found that the stainless steel ladder, which had lasted for 30 years looking shiny and new, was now stained brown and roughened at the waterline and below. This must have been the effect of immersion in the salinity.
I can't imagine how bad this salty water must be for a reinforced concrete pool shell. Plaster and concrete are watertight, yet still porous, so the salt solution must permeate into every bit of the concrete shell, including around the steel reinforcement bars. I expect that in some number of years, we will find all these pools shells cracking , shifting, and leaking, as their steel reinforcement turns into a honeycomb of rusty tunnels where rebar used to be. Instead of lasting for centuries, these beautiful pools will be destroyed and requiring expensive demolition in a matter of decades. In counting the true cost of salt chlorination, you should consider the likelihood that the entire infrastructure investment will eventually depreciate to negative value from corrosion of the reinforced concrete shell into a massive demolition project.
While I had the wiring for the controls and motors opened up, I took the opportunity to measure the power being consumed by the circulation pump and Polaris booster pump. The data plate on the 1.5 HP circulation pump specifies a nominal 8 amps at 240 VAC, and my clamp-on AC current meter confirmed that. So this pump is drawing 1920 watts, and so running costs about $0.24/hour at my rate of $0.124 per KWH of electric power. At an average 12 hours/day, I am paying $90/month just to circulate and filter the pool!
The 3/4 HP booster pump that powers the Polaris 180 cleaner is wired for 120 VAC, and added about 14 amps to one leg of the 240 VAC supply, for a load of 1.68 KW, and a running cost of $0.21/hour. This requires some further examination, because that is far too much power consumed for a pump of that nominal size. The cleaner need only run for two hours daily, which is a good thing at that hourly cost, which comes to about $13/month for the pool vacuum. I think of this as paying a lot per pound of leaves and such I "harvest" out of the collection bag on the Polaris.
Circulation pump sizing is the kind of necessarily imperfect decision (like voting for political offices) which reduces many complex factors down to one of a few choices. Pumps for residential size pools come in typical sizes of 3/4, 1, and 1.5 HP. The usual rule-of-thumb for sizing the pump is to provide enough flow to pump the volume of the pool at least once (one "change" of the water) during a day. Another rule of thumb is to circulate during daylight, in which case the average duty cycle would be about 12 hours/day, which for my pool would require a pump delivering 36 gallons/minute. Because smaller pumps are more efficient at delivery (the slower flow causes less resistance loss in the piping and filtering), it is usually less costly to install a pump smaller than the one-change-in-12-hours rule-of-thumb, and increase the duty cycle. The addition of a salt chlorinator further influences the choice of pump size, since the chlorinator requires circulation to operate, meaning that the circulation duty cycle limits the chlorine output to less than what the chlorinator can produce in a full duty-cycle of 24 hours/day. A smaller circulation pump, and consequently longer duty cycle, means that more chlorine can be economically produced each day. While one can run an oversized circulation pump longer than necessary to support extra chlorination during the day, this is a very expensive way to generate chlorine, since the multi-kilowatt pump costs a lot more to run than the 288-watt chlorine generator. In short, the chlorinator must be sized to require no more than the daily time of the circulation pump's normal duty cycle to deliver a day's dose of chlorine. If more chlorine generating time is needed to keep up, then things become very costly, some $100s or even $1000s per year, spent performing an unneeded circulation. This is a "dirty little secret" of salt chlorination, that it can easily waste significant money if the components are not sized correctly for the pool's demands for circulation, filtration, and chlorine generation, as well as being sized to match each other. Few technicians or installers appreciate this pitfall, and the chlorinator manufacturers don't document it since it might frighten people convinced by the "pennies per pound" claims for making chlorine.
Repeat: Bigger is not better when it comes to pool pumps. They are power hogs and may quietly cost you a hidden fortune on your electric bills.
Some of the enhancements I have implemented or which I have considered as future possibilities:
During the slower months of winter in Florida, I use 32 gallons of pool water to charge this tank, and mix in 6 pounds of calcium hypochlorite powder, instead of using the liquid sodium hypochlorite. The powder is more compact to move and store, and has a much longer shelf life, compared to the liquid. During the hot and sunny months of summer, when much more chlorine is needed, I charge the tank with 7.5 gallons of 12.5 percent sodium hypochlorite, plus about 25 gallons of pool water to make 32 gallons. These relatively weak solutions, diluted in the large tank, don't lose their chlorinating potentcy quickly like the full-strength products, and don't produce any significant amount of chlorine fumes. The tank lid is loose fitting and no other venting is needed. Once charged, this system provides the luxury of some weeks of chlorinating capacity without further attention.
The calcium hypochlorite does build up some fluffy sediment at the bottom that has to be flushed out every 6 months or so (this is the purpose of the 2nd bulkhead fitting on the tank, a 1-1/2 inch PVC drain). Thus the bulkhead take-off leading to the injection pump intake, is positioned up a few inches from the bottom, to decant. The pump and tank take-off have to be low to avoid vapor-locking the suction side of the pump, but the injection point high to avoid gravity feeding when unpowered.
Both the calcium hypochlorite and sodium hypochlorite slowly build up a calcification in the restriction of the injector fitting. This has to be disassembled and cleaned in acid about every 6 months. This is a complication if your injection pump doesn't meter consistently against various back-pressures, because a given setting of pulse rate and volume will yield a feed rate that slowly declines over months of time.
Calcium hypochlorite injected this way doesn't cloud the water. The 1-1/2 inch PVC circulation lines are plumbed to rise up past the top of the tank and back down, providing a high injection point to avoid gravity feeding when the pumps are off. The highest segment of this feed loop also contains the vacuum breaker improvised from a vacuum breaker as shown above. I also have a tee with a garden hose valve there and a short pigtail hose to use to fill the tank with pool water. I use a drywall mud mixing paddle in a portable drill to mix. The solution in the tank settles clear in about 1/2 hour after mixing. It is adding dissolved calcium, however, slowly to the pool. In a plaster pool this is a good thing for the Langelier balance.