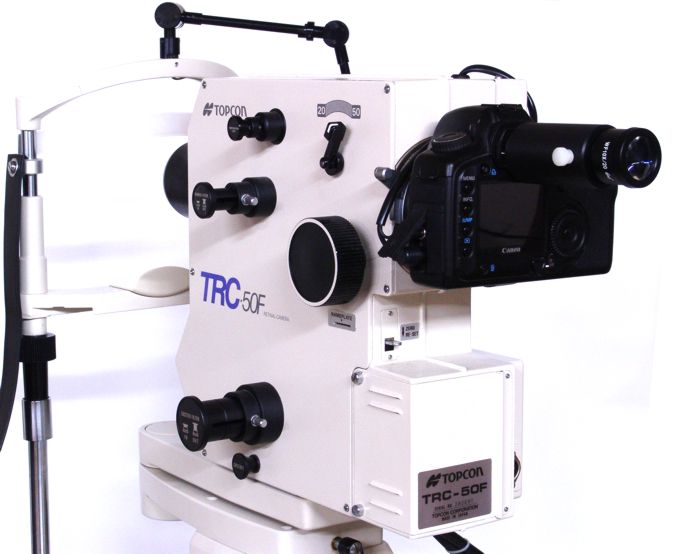
Figure 1. Topcon TRC-50F. Right side of the adapted instrument.
Electronic interface cables run from the Canon digital SLR camera
down to the round Polaroid connector receptacle on the bottom of the Topcon upper unit.
Richard J Kinch
http://www.truetex.com
April, 2015.
This document describes how to install and operate the digital camera upgrade kit for the rear port of the Topcon TRC-50F and TRC-50FT retinal cameras.
The Topcon TRC-50F versus TRC-50FT models differ only in that the TRC-50FT provides an additional tilt axis. The optics and camera attachments are otherwise the same, as are the digital camera adapter.
Identify the upgrade kit contents:
Other components you must obtain separately:
The Canon models 5D and 5D Mark II are also suitable but no longer sold new by Canon. You may find used units available at reputable used camera dealers such as keh.com and adorama.com.Other Canon models such as the Digital Rebel series, 60D, and 7D will not fit on the Topcon instrument due to mechanical interference with the built-in flash. The smaller sensors will also crop out most of the Topcon image. The Canon Rebel models are also incompatible with the shutter-remote connector on the interface cable.
Optional components you may wish to obtain separately:
Familiarize yourself with the digital camera and lens: If the digital SLR camera is new to you, study at least the following features which will be used for retinal photography: On/off switch, mode switch "M" setting for manual operation, setting manual exposure time, setting digital ISO sensitivity, attaching and removing lenses, remote shutter release connector, hot shoe, viewing photos on the camera, transferring photos to a computer.
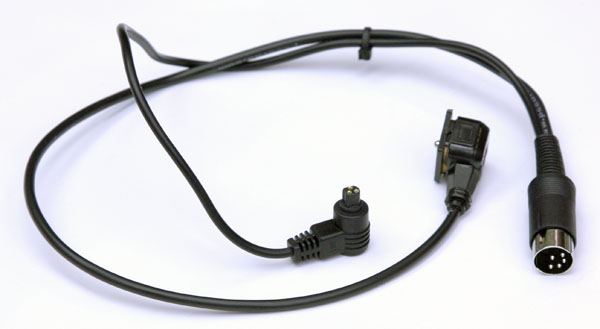
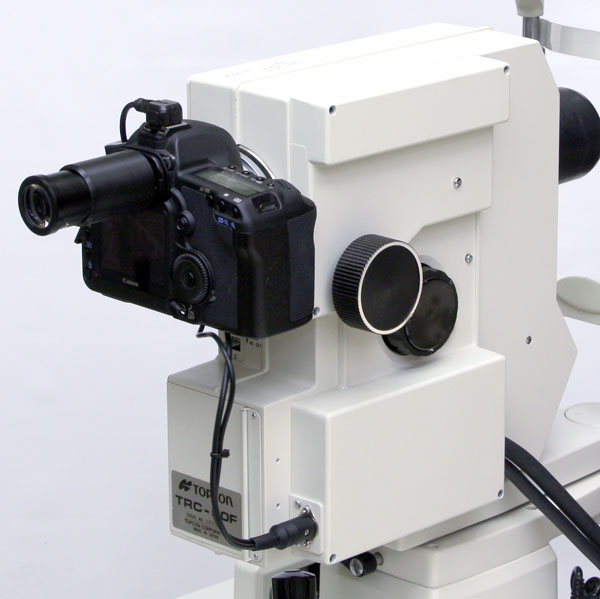
Understand the new cabling components: One end of the digital camera interface cable connects to the Topcon connector at the lower right of the Topcon TRC-50F, where the Polaroid attachment formerly would have been connected. See Figure 1 above, and Figure 4 below. This cable then splits into two cables for the Canon camera: a shutter remote cable and a PC flash-sync cable.
This cable requires no disassembly of, or modification to, the Topcon system. An earlier version (2010 and prior) of this adapter kit required drilling a hole in the Topcon cover, through which a cable would feed to connect to the internal wiring of the Topcon unit. This method has been superseded by the current plug-in cable presently supplied.
Connect the new cable to the Topcon connector:
Attach the digital camera with adapter to the Topcon instrument:
Attach the viewfinder magnifier-inverter-offsetter to the Canon camera:
Configure the Canon camera for retinal photography:
Configure the Topcon instrument for digital photography:
Adjust the instrument for a fixed test subject: Tape a business card or other flat, high-contrast, detailed subject to the patient headrest to serve as a fixed test target. A long strip of clear packing tape stuck across the headrest poles at the canthus marks will serve well. Stick the tape to the operator's side of the poles, and stick the card slightly to one side, roughly offset to where a patient eye would be positioned. Frame and focus a view of this target using the Topcon viewfinder in the normal fashion, perhaps pulling away from the subject and using the "+" diopter compensation lens, as for anterior segment views.
Take test subject exposures: Focus and align on the test subject using the viewfinder in the usual way. Press the joystick button to trigger an exposure. At the moment of exposure, listen for the Canon camera mirror flip and shutter mechanisms operating. Observe the light of the retinal camera flash on the subject. Immediately after the exposure, the Canon camera should momentarily display a view of the image on the camera display.
Review test subject exposures: If you are using a tethered PC to capture photos, refer to the tethering software user manual for image review. If you are using the stand-alone camera to shoot onto the camera's memory card (with no tethered PC), use the Canon menu buttons to manually review exposures on the camera display. You may lengthen the automatic review time with the "Review time" menu setting on the digital camera. Zoom in when reviewing images to verify that the captured image appears sharply in focus when the video viewfinder also appeared in focus. Note that the full resolution of the digital camera is much finer than the instrument resolution, so the highest-resolution images will not appear in focus when zoomed in completely.
Take live subject exposures: It is most convenient to obtain a cooperative colleague or patient for your first live retinal digital image tests. Collimate and focus on the retina in the usual way with the video display, using the joystick button to take exposures. Check the images for exposure brightness and adjust the Topcon flash energy to compensate.
Due to the 60:40 beamsplitter and ground-glass screen in the Canon digital camera viewfinder, the view will be less bright than in the original unsplit glass viewfinder of the Topcon MT-1 or MT-2 35mm film camera. You may have to use a slightly brighter exam light level to view the retina than was used with the original Topcon viewfinder.
Analyze exposures for optimal exposure: Viewing the image exposure histogram in the digital camera is the only sure way to evaluate a proper exposure. The histogram provides a quantitative analysis of your retinal images for proper exposure level and degree of contrast. The goal is to have a histogram spread roughly in the middle third of the dynamic range. For color retinal photography, observe the green histogram rather than the white, since for a retinal image most of the diagnostic information is represented in the green portion of the color spectrum. The position of the hump in the histogram indicates the exposure level, which should be around the middle of the range, and the width of the hump indicates the contrast. If the histograms indicate an exposure off to one end or the other of the camera's dynamic range, you may shift the exposure range by switching to a darker or light neutral-density filter on the adapter sleeve. (With careful assembly, it should not be necessary to recalibrate the focus when switching filters.)
Adjusting exposures with flash energy and ISO sensitivity: The ability to change ISO settings was not available with 35mm film, but digital cameras make this instant choice available as a method for improving procedures. Like ordinary flash photography, retinal photography provides control over the exposure as a product of the flash intensity and the digital camera sensitivity. If exposures are too dark, you may lighten them by increasing the flash energy on the Topcon power supply, or you may increase the digital camera's ISO sensitivity setting, or both.
The net exposure is determined by the arithmetic product of these two numerical factors, so you may trade them off to maintain an equal exposure. For example, you might double the ISO setting and halve the energy, to obtain approximately the same exposure; such as an ISO 100 setting with 36 watt-seconds flash equaling ISO 200 with 18 watt-seconds. The arithmetical product 100 * 36 = 3600 equals 200 * 18 = 3600 in either case. The trade-off is limited by image noise increasing with higher ISO settings and less flash energy, versus image quality increasing with lower ISO settings and more flash energy. With retinal scenes in color, the most useful images are typically obtained with ISO settings from 100 to 400. For fluorescein angiography, ISO settings of 1600 or 2400 in the digital camera allow lower (gentler) flash energies than were typically available with 35mm film.
Correcting exposures and improving contrast with digital post-processing: Simple post-processing of your digital images on a computer will correct many mis-exposures and improve correct exposures. Retinal images are by nature limited in contrast, and by digitally stretching the contrast, the visual impression of the photographic is much improved. Filtering enhancements such as red-free images are available via digital post-processing, even though the original instrument lacks the physical filters.
Establish your practice routine: After completing the above, you will have a powerful digital facility for retinal photography. You must now handle digital data where you used to handle 35mm film slides or Polaroid prints. It most regards the digital methods are quicker, easier, and cheaper than film, but do require an initial investment in careful design and training. Your digital system is based on standard digital cameras, and so is compatible with ordinary software for capturing, post-processing, and cataloging digital photographs. Your upgraded digital retinal camera should, with occasional maintenance, provide decades of reliable service.
The instrument is effectively a manual lens: The Topcon instrument in effect becomes a manual lens for the digital camera. Camera modes such as aperture priority (Av) and shutter priority (Tv) are unavailable, since these factors are controlled outside the digital camera.
Using an AC adapter on the Canon camera: To avoid having to worry about having a charged Canon camera battery, you may wish to purchase the Canon optional item that powers the camera from an AC adapter.
Lowering resolution on the camera: Since the highest resolution images of the camera are finer than the optical resolution of the instrument, you may wish to set the camera to record lower-resolution images. This will decrease storage space and improve tethered transfer times. These settings are found on the camera's "Quality" menu.
Tethering software: If you want to have live previewing and capture of photos on a computer while shooting with the Canon camera, consider using "tethering" software. This type of application uses a "tether" from the camera to the computer via a USB cable. A simple version is included with the Canon camera software support disc. DSLR Remote Pro (http://www.breezesys.com/DSLRRemotePro/) is one popular aftermarket package sold for this application. Tethering to a computer with a large display is the best way to instantly review your photos for proper focus and exposure while you still have a chance to retake a missed shot. The small display on the camera does not adequately reveal the quality of the image focus.Live view: The Canon 5D Mark II camera provides a live view capability, which you can connect directly to an HDTV via the HDMI connector on the camera. Using this feature does not require a computer.