
From tap water to seltzer in about a minute, at next to no cost.
Why doesn't everybody have this?
Updated as of November, 2015.
I wrote the first edition in 2002.
|
You have arrived at
"One particularly useful Web site" -- New York Times |
Carbonating tap water to make seltzer is easy, fast, and absurdly inexpensive with my improvised apparatus. All that is required is to place CO2 (carbon dioxide) gas in agitated contact with chilled water for a few seconds. In this essay, I'll show you how it is done with easy-to-find parts and common PET (polyethylene terephthalate, sometimes called PETE) soda bottles. I'll also explain the kinetic chemistry of why it works so well. And in the second half of this essay, I'll explain how I progressed from this improvised apparatus to installing a complete soda fountain in my home.
The essential ingredient is a supply of CO2 under pressure. CO2 is sold commercially in steel tanks of various sizes. It is actually a very inexpensive material, considering the special handling it requires. In my area you can refill a 20-pound tank for about $18, which will make many hundreds of gallons of carbonated beverages. Larger tanks are even cheaper per pound. Many soft-drink or beer distributors will swap your empty CO2 tank for a full tank at even lower cost, since they expect to make their profit on the other products that just use CO2 for propulsion. You shouldn't have to invest more than $75 to own such a swappable tank with a current inspection, and many dealers even prefer to just charge you a smaller refundable deposit to borrow one.
A "20-pound tank" is so called not because it weighs 20 lbs, but because it contains 20 lbs of CO2 in gas-over-liquid form (aka liquid-under-own-vapor). The empty steel tank and valve weight about 30 lbs (the "tare weight"), so the total filled weight is a hefty 50 lbs or so. I prefer this size tank because it is the largest that is still possible for me to carry by hand, and its 30-inch height also just fits under the counter in the kitchen. Tanks smaller than the 20-pound size do cost a bit less, and they're easier to lug around, but you will have to refill more often at a slightly greater cost per unit of CO2. On the other hand, the giant 50-pound tank weighs about 160 lbs when full, making it more of a piece of heavy equipment than a gadget.
The actual weight of my 20 lb tank on one occasion was 30.4 lbs (13.8 kg) empty and 46.3 lbs (21.0 kg) full. Apparently the "20 lbs" of payload is either a nominal figure, or I wasn't getting a complete fill from the supplier. The regulator adds about 3 lbs, if you're trying to weigh a connected tank. Tanks also vary slightly in size and weight depending on their construction.
The tank alone is not enough to supply the gas. One must attach a regulator to reduce the gas pressure inside the tank to a controlled, usable, low pressure.
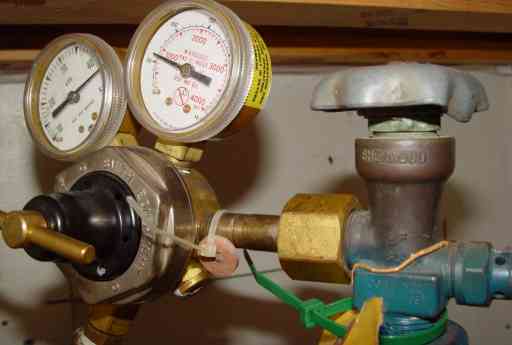 |
| This is the top of the CO2 tank and regulator, underneath the kitchen counter in a corner of a cabinet. The low-pressure outlet hose (exiting the bottom of the regulator at the bottom left) runs along the back of the cabinet, then through a hole behind the refrigerator, and then up to the wall where the shutoff is mounted. The knob at the top right is for the tank valve. The lever at the extreme left adjust the outlet pressure of the regulator. The left gauge reads the outlet (low) pressure, and the right gauge the tank (high) pressure. The high pressure gauge monitors the contents of the tank, while the low pressure gauge monitors the delivery of low-pressure gas. The least expensive regulators have no gauges. |
Twenty pounds of CO2 carbonates a lot of water. We consume several liters per day in our household, and one tank lasts us for several years! The 20 pounds of CO2 in my full tank yields over 1000 liters of carbonated water at an extremely fizzy 4 volumes. Since my techniques produce an extra-biting-fizzy result (the water is both chilled and pressurized while the gas is dissolved), and the gas in the head space of the bottle at the end of the process is vented, the yield can be somewhat less. But the process is so cheap that I haven't bothered to precisely measure it! CO2 expense is no more than a few cents per 2- or 3-liter bottle.
Another source of gas is CO2 fire extinguishers, which are made typically from a 20 lb tank, except painted red and fitted with an extinguisher squeeze-valve and horn. On several occasions I have bought these extinguishers at plant-closing auctions for $1 each, and adapted the high-side of my regulator to connect to the extinguisher valve. When empty, the gas dealer can then remove the squeeze-valve and extinguisher horn and install a standard twist valve top on the tank. Tanks should also be inspected internally and subjected to a hydrostatic pressure test after some years, so if you are not swapping tanks to refill, you should make sure your dealer is inspecting the tanks on the right schedule.
| Physical Properties of CO2 Relevant to Carbonation | ||||||||||||||||||||||||||||
| Density |
| |||||||||||||||||||||||||||
| Solubility in water | 1.79 (vol/vol) at 32 deg F, 1 atm | |||||||||||||||||||||||||||
| Henry's law constant (Inverted to express molar solubility) |
0.117 mol/liter-atm at 32 deg F = 1.72 volumes/atm =? 0.034 mol/kg-bar (NIST) | |||||||||||||||||||||||||||
| Latent heat of sublimation |
246 BTU/lb (dry ice to vapor at -78.5 deg C) = 571 kJ/kg = 0.159 KWH/kg | |||||||||||||||||||||||||||
| Typical heat to vaporize and superheat tanked liquid CO2 to warm gas |
135 BTU/lb (liquid to vapor at 70 deg F) = 313 kJ/kg = 0.0685 KWH/kg | |||||||||||||||||||||||||||
| Molecular weight | 44.010 g/mol | |||||||||||||||||||||||||||
| Sublimation temperature at 1 atm | -78.5 deg C = -109.3 deg F | |||||||||||||||||||||||||||
| Commercial/industrial names and codes |
CAS 124-38-9 UN1013 (gas) UN2187 (refrigerated liquid) UN1845 (solid) Carbonic anhydride Dry Ice Dricold (UK) | |||||||||||||||||||||||||||
The slightest leak, especially ahead of the regulator where the high pressure exists, will bleed your entire CO2 supply in a matter of days, or less. CO2 tanks and regulators use a unique flat nipple fitting (CGA 320, 0.825-14NGO-RH-EXT, flat nipple) and washer to connect to each other, instead of the usual inert-gas nipple (CGA 580, 0.965-14NGO-RH-INT, such as for argon, nitrogen, or helium). The flat nipple squeezes against the mating tank outlet, being compressed by a large captive nut, with a fiber or plastic washer in between the flat faces. You must firmly attach the regulator nut with a new washer to assure a leak-free fit. Each time the tank is filled, the supplier should give you a new washer for the regulator connection. I find it so difficult to find high-pressure leaks that I have taken to disconnecting the low-pressure side and dunking the entire tank and regulator together into my swimming pool to look for bubbles. The ordinary soap-bubble method works fine to find leaks on the low-pressure side.
I actually have two of these 20-pound tanks. This assures a continuous supply; when one tank empties, I can have it out to be filled while using the other.
I use an adjustable regulator that I have set to deliver about 45 or 50 psi. CO2 regulators are available for about $50 from soft-drink distributors, welding gas suppliers, or homebrew hobby suppliers (see, for example, the page at http://www.kegworks.com). There are "special" regulators made just for CO2, and fixed-pressure CO2 regulators, but these seem to be less rugged than good-quality inert-gas regulators, which are also suitable at the low flow rates needed for carbonation (although an inert-gas regulator will need to have its nipple switched for a CO2 fitting).
I connect the CO2 gas delivered by the regulator to 1/4 inch (ID) flexible, braided polyethylene tubing, which is rated for suitable working pressure. Unbraided 1/4 inch vinyl tubing will burst at low pressures, especially if it gets warm. I learned this the hard way one day when I had the supply line running behind the stove; suddenly there was a bang and hissing of gas. The working pressure of the unbraided tubing was reduced by the heat to the point where it burst under only 50 psi. After that experience I switched to braided tubing and made sure that it did not run close to any sources of heat. But I still use unbraided tubing for the final section to the bottle, as shown in the photos below, since it is flexible and under low pressure for short times.
The gas delivery tubing runs from a kitchen cabinet holding the tank and regulator to a wall-mounted ball-valve for shutoff, and a low-pressure gauge for monitoring. While not strictly necessary, without a separate shutoff, you have to use the regulator or tank valve to stop the flow, which is very inconvenient and somewhat wasteful of gas.
 |
|
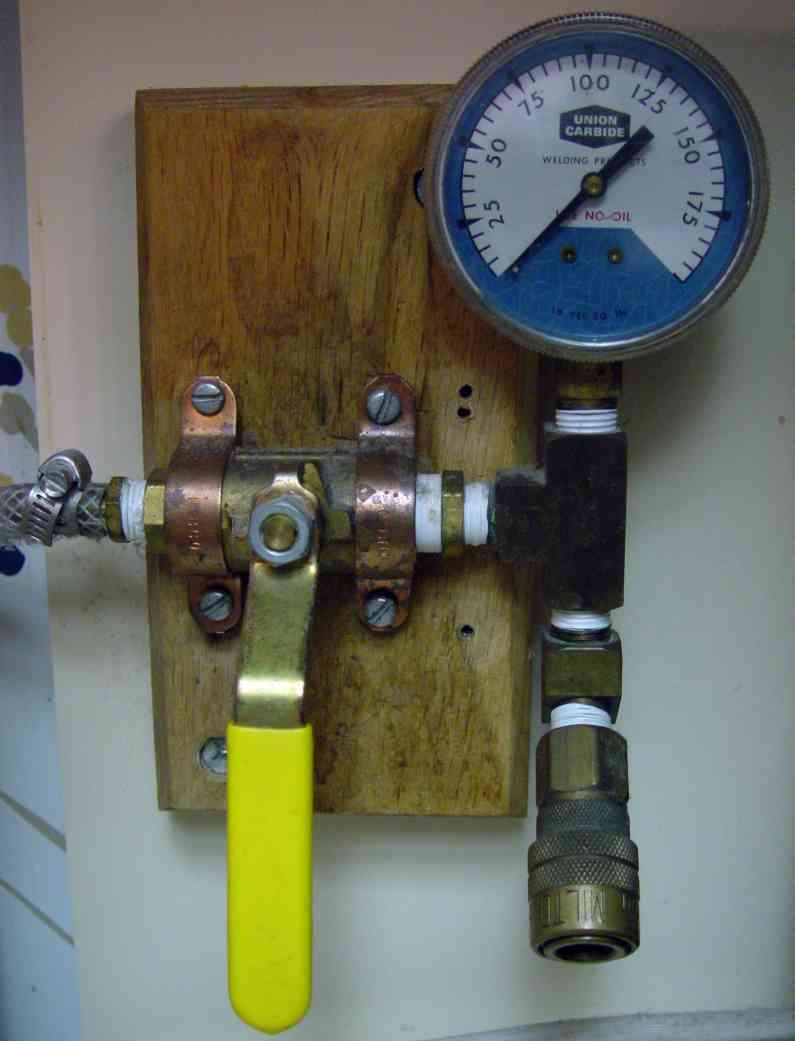
The shutoff and gauge.
The shutoff provides control over the carbonation process, while the gauge provides
measurement.
The ball valve requires only a quick 1/4 turn of the handle for full on or off.
The tee and gauge are optional, but help in monitoring the carbonation process and
impressing house-guests.
The female quick-connect allows easy selection of final hose and cap.
All fittings are 1/4 inch brass NPT, except the ball valve which is 3/8 inch (only because
1/4 inch ball valves are hard to find, but when I made this in the 1980s we didn't have the
Web to help locate such things).
Teflon tape in the threads prevents leaks.
Copper pipe straps across the ball valve shoulders hold the whole assembly firmly against the
wood plate, which in turn is screwed to the kitchen backsplash.
The quick-connects are common air fittings available in auto parts and hardware retailers.
This part of the apparatus is all that is normally visible in the kitchen, which is a good thing, because it is about all my wife will tolerate from her mad-scientist husband in that regard. I enjoy showing it off to guests, but in 20 years of doing this, I don't seem to have convinced anyone else to actually build something like it. |
The gauge on the shutoff panel allows me to monitor the performance of the regulator and to have a rough idea of the gas flow and degree of CO2 saturation in the water. My latest CO2 regulator is actually made for MIG welding (these are the least expensive I've found) and has an orifice restricter to limit flow rates, which requires that I let the bottle pressure "catch up" sometimes when carbonating, as indicated by the gauge. The gauge is connected after the shutoff valve, so it measures the pressure in the bottle and not the regulated supply pressure when the valve is closed. The gauge is also not strictly necessary.
I use a quick-connect air fitting at the output of the shutoff. This allows me to attach various hoses and caps for different bottle sizes. It also allows me to rinse the open hoses if they get a bit of backflow from carbonating a beverage other than plain water.
So far everything has been ordinary parts from a gas supplier and the hardware store, but the final cap fitting to the soft drink bottle is improvised from unusual parts, because there doesn't seem to be any other way to do it.
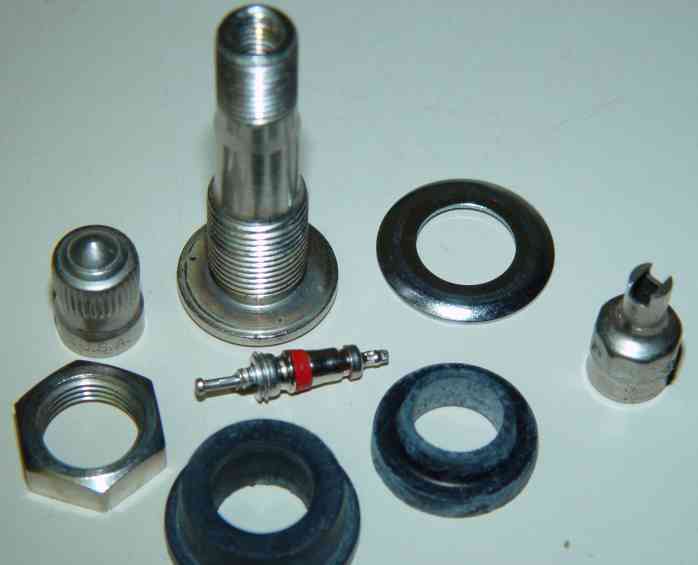
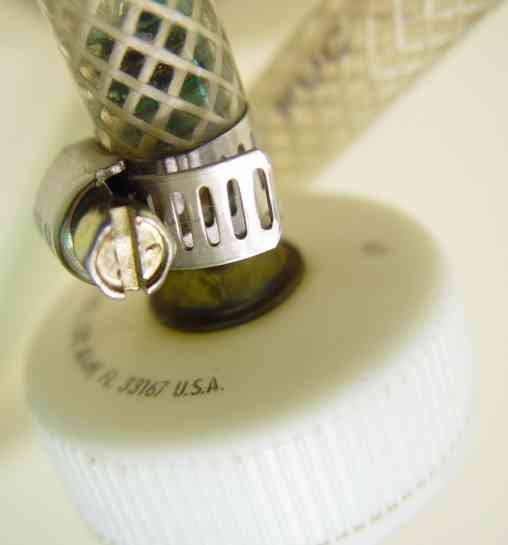
While I've gone through several designs to get the 1/4 inch hose fitted to the plastic soda bottle cap, let me first describe the easiest and best method that doesn't require much fabrication. While you might expect to use the common threaded fittings for tubing available at the hardware store, those use tapered pipe threads, not straight threads; thus you cannot use them with a nut to make a bulkhead fitting. The solution is to use a clamp-in tire valve from the auto parts store. This provides a straight-threaded, stainless steel fitting with the right dimensions and shape to clamp into a hole in a bottle cap, and to insert into the 1/4 inch gas delivery hose.
 |
|
The parts in a clamp-in tire valve kit. This is a Camel brand part number 30-463, sold in many
retail auto parts stores such as Pep Boys Auto & Tire for a few dollars.
Camel makes at least one other size, and other manufacturers make similar items, such as the
Milton 409.
This is the only common source for a bulkhead fitting I've ever discovered; otherwise you have to look
for fittings for laboratory tubing.
I've removed the valve stem (the item in the middle with the red band) using the stem tool on the right,
leaving the fitting fully open for the passage of gas.
Only the valve body, nut, and washer are needed; the screw cap, stem, and rubber washers are discarded.
You might wonder whether you can't just leave the valve stem in place in the valve, and use a tire chuck on the gas supply hose to fill the bottle with pressurized CO2. This does not work because the process requires continuous flow of CO2 into the bottle via an open connection. Carbonating a 2-liter bottle requires flowing in about 8 liters of CO2. Puffing up the bottle from a tire chuck through a stem valve provides only an intermittent flow of CO2 that requires many iterations to inject the proper amount of gas. Holding the chuck continuously against the valve is a difficult manipulation, especially while shaking the bottle, and tends to leak a lot of gas. There are bottle cap adapters incorporating a valved, continuous connection offered in home brewing catalogs. However they can't match the price and quality of this simple tire valve trick. |
 |
|
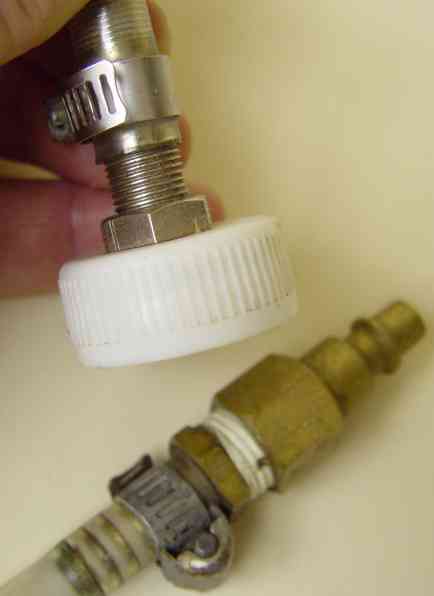
Here is the tire valve body serving as a bulkhead fitting through a bottle cap from a 2-liter plastic
soda bottle.
A hole is first drilled through the center of the plastic cap, the valve inserted and clamped with the
nut, and the hose attached with a hose clamp.
You do not need need a washer for a gas-tight fit, since the bottle cap should have a pliable
plastic gasket inside that will seal under the pressure of the tightened nut.
This gives a tight connection from the gas supply to the interior of the bottle.
The other end of the hose is fitted with the male quick-connect for connection to the shutoff and for easier cleaning. The brewing and soft-drink industry have their own quick-connects for fluid lines, but I prefer the easier-to-find air fittings. Note that the only components that contact the liquid beverage are the bottle, bottle cap, and the stainless steel fitting. Most brass is an alloy that contains a few percent of lead for machinability. Mild carbonic acid (carbonated water) does corrode brass when left in contact for long periods. I don't myself have the slightest concern that one would be exposed to any lead from using brass in this way, but if you like to be certain, then the stainless steel fitting is the thing to have. Commercial soft drink apparatus is all stainless steel and plastic wherever it contacts carbonated beverages; this is important because the slightly-acidic soda is in constant contact with the metal. |
 |
| Here is an earlier bulkhead fitting I designed using a 1/4 x 1 inch brass screw, brass nut, and fiber washer. This cap is for the larger 3-liter bottle. I drilled a 1/16 inch hole axially through the length of the screw for the gas passage. The head of the screw is on the inside of the cap, with the threads protruding outside. I wrapped several turns of teflon tape around the threads to fill them and provide a tight connection to the inside of the flat hose. You have to be careful to keep the screw snug, since the tubing wants to twist off along the threads. This design works, and I've used this specimen for years, but the tire valve is better. But see the section "Other Approaches" at the end of this page for my idea to improve this design. |
I prefer to use the 3-liter bottles because they have a much larger cap and neck which makes the bulkhead fitting easier to mount. The neck of the bottle is also big enough to permit dropping in icemaker ice cubes.
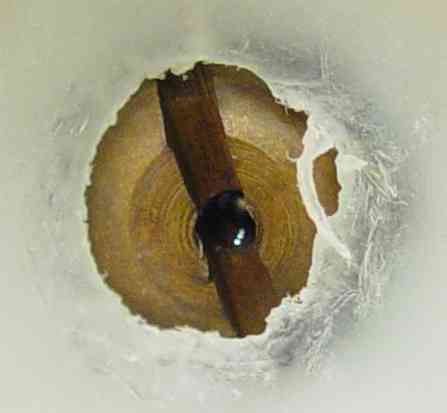 |
| This is the head of the 1/4 x 1-inch screw inside a 3-liter bottle cap. A 1/16-inch hole is drilled through the center axis of the screw. The torn plastic around the screw head is the plastic gasket inside the bottle cap, punctured for the bulkhead fitting, which should be left in place to make a good seal on the neck of the bottle, but which doesn't need to be under the bulkhead fitting (that is, it could be trimmed away from the screw head instead of being ragged here). |
To carbonate a bottle of water, you must pre-chill the water first, because the solubility of CO2 in water is greatly increased by both lowering the temperature (Le Chatelier's principle), and by raising the pressure of the CO2 gas (Henry's law). Lukewarm water or low pressure CO2 gas will saturate with much less carbonation, so that the result is flat. In short, CO2 is easy to dissolve into water, but only up to an amount determined by pressure and temperature. You cannot insert or keep CO2 in solution above the concentrations dictated by pressure and temperature, and if you lower the pressure or raise the temperature, you may have excess CO2 that will effervesce back out of the beverage (which is, after all, the charm of it all).
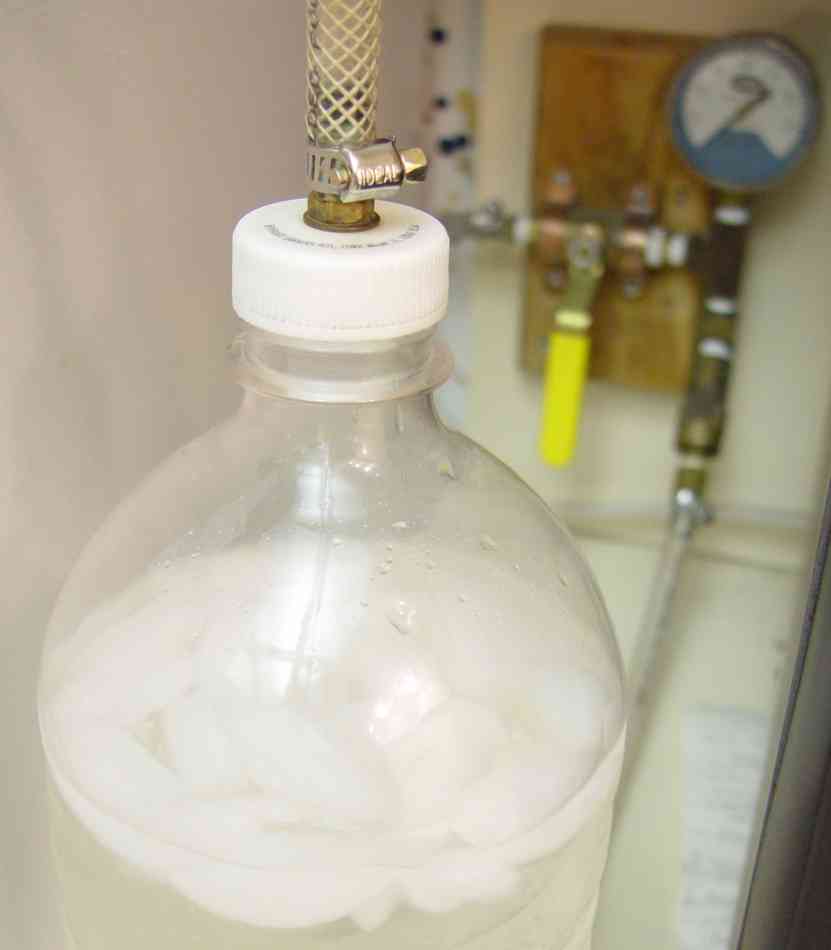
To pre-chill, you can refrigerate the water, or (if you have the 3-liter bottle with the large neck) drop ice cubes in through the neck (as shown in the photo below). I like to chill in the refrigerator and then add a few ounces of ice to bring the water down the rest of the way to 32 deg F. Or, for a trick that works with any size PET bottle, freeze a small portion of water beforehand in the bottle horizontally, whack the frozen bottle on a hard corner to crack the ice, and top off with warm tap water; the amount of water to freeze depends on how warm your tap water is, and how much surplus ice you want to remain in the bottle after carbonation. I use about 1/5 the full volume, and I mark this level with a permanent marker on the side of the bottle for convenience in refilling. Having ice in the bottle while serving also has a "ship in a bottle" effect on guests, since unless they have seen the process, they cannot figure out how you got such big chunks of ice through the small neck of the bottle.
The fill level of the water in the bottle should leave a head space sufficient to allow the water to shake well in the bottle and have a full cross-section of surface. For the 2- and 3-liter soda bottles, this level is about at the bottom of the shoulder, where the side of the bottle starts curving from vertical towards the neck. That leaves a head space of about 1/5 the volume of the bottle (as shown in the photo below). The size of the head space is a compromise: a smaller head space will take much more agitating effort to saturate the water, since there is both less motion and less surface area to interact, while a larger head space will take less effort, but a larger space wastes more vented gas on opening.
Once filled with water to the proper head space level, it is time to apply the cap, purge the air, and charge the CO2. Screw on the bulkhead cap, back the cap off a bit from the tight seal, open the CO2 shutoff slightly to apply slight gas flow, squeeze ("burp") the bottle to shrink the head space while the slow flow of gas purges the air from the hose and the head space, and then tighten the cap to inflate the squeezed bottle and fill the head space with CO2. This purging technique removes all the air from the head space and replaces it with pure pressurized CO2, so you don't have a partial pressure of insoluble air mixed in there. If you don't do this purging, you'll have a lower partial pressure of CO2 applied to the water, and it will take more agitation to get a fully carbonated result.
Once the head space is purged and filled, you open the shutoff completely, so as to provide full flow of CO2. Shake the bottle vigorously for about 20 seconds (depends on the flow rate of CO2 your regulator will deliver, and the kinetics of the dissolution) while the shutoff is fully open. As a bartender once told me, shaking liquids this way is "all in the wrists", not in the arms and torso. It takes a vigorous shake to get the gas and water mixing quickly; less vigorous shaking will work but much more slowly. After shaking sufficiently, fully close the shutoff, and shake a bit more to dissolve ("scour") the remaining head space gas and reduce the pressure to saturation level (about 20 psi) from the higher regulator level (45 psi). Let the contents settle for a few seconds, uncap, and enjoy absolutely supersaturated superfizzy seltzer. Of course you will apply an ordinary cap if you need to store the unemptied bottle for any time.
| "The cost to convert tap water to seltzer is less than $0.04 per 2-liter bottle. A single fill of a 20-lb tank charges over 500 bottles." |
The chief factors determining carbonation of water are the temperature of the water, the partial pressure (strictly speaking, the fugacity) of CO2, the area of interface between water to CO2, and the agitation. These interact over time to cause CO2 to go into or bubble out of solution. Vigorous agitation promotes solution or dissolution because it greatly increases the area of interface and keeps the water in the container well mixed. (Surface tension, nucleation sites, and the partial pressure of the water vapor are small factors, but we will not consider them here.) You can regulate the degree of carbonation by experimenting with the amounts of agitation, by adjusting the regulated pressure up or down, or chilling the water to different temperatures. The degree of carbonation as a proportion of CO2 to water is measured in standard "volumes of CO2" for a given volume of water, where the "volume" of CO2 is understood to be that of the gas at 32 deg F and atmospheric pressure, where CO2 gas has a density of about 2.0 grams/liter. A carbonation chart (see link below) or solubility formula (below) reveals that my method of 20 psi CO2 applied to ice water and agitated to equilibrium yields a carbonation of about 4 volumes CO2 gas per volume of water. (Compare this to Coca Cola's standard of 3.7 volumes for their bottled product.) Since the density of chilled CO2 is about 2 grams/liter, charging 4 volumes requires about 8 grams of CO2 for each liter of water. A 20 lb tank (about 9000 grams of CO2) should theoretically yield 1133 liters of carbonated water. In practice, efficiency is not perfect, with unavoidable losses in the hose and headspace. But at current prices (2003) of $18 per 20-lb tank-fill, the cost convert tap water to seltzer is less than $0.04 per 2-liter bottle. A single fill of a 20-lb tank charges over 500 bottles, which will keep you supplied for 1.5 years if you consume an average of one bottle daily. My experience is consistent with this.
At $1/bottle for store-bought seltzer, the pay-back time on the equipment investment is less than a year. And you will have avoided grabbing, checking out, and hauling home about 1000 lbs of water. The savings will continue indefinitely.
Consider an unopened bottle of carbonated beverage, such as our freshly made seltzer. When you open that bottle, lowering the pressure from 20 psi (or so) to atmospheric pressure, the liquid changes from its quiet equilibrium to being "supersaturated". That is, the amount of dissolved CO2 is much more than the new pressure will retain, and thus the gas spontaneously and rapidly effervesces. You have an immediate and rapid fizz as the supersaturated gas spontaneously comes out of solution.
Warming the carbonated water also acts to disequilibrate, since the CO2 has much lower solubility at higher temperatures. The change from ice to body temperature will change the equilibrium concentration of CO2 from 3 or 4 volumes down to about 1 volume, meaning several volumes of CO2 will effervesce. This is why cold, carbonated beverages fizz on your palate, and why they produce gas in the stomach that leads to burping--once warmed to 98.6 deg F body temperature, very little CO2 will remain in solution for long. For every swallow of beverage, perhaps several swallows of gas will have to come back up! This bubbling and burping from the stomach is a happy thing, because if the gas were to come out of solution and form pockets after the liquid traveled to the small intestine, it would be intensely painful. The stomach and its valves are a marvelous system for de-gassing, de-foaming, propelling, and metering the contents.
You can carbonate any beverage this way, subject to the need to decompress without excess foaming. Plain water will not foam, but soft drinks or punches sweetened with table sugar or corn sweetener may require lower final pressures and/or slow opening, lest you get a volcano of foam. You can premix a bit of mineral salt like sodium bicarbonate or calcium carbonate to make club soda. Carbonated mineral waters such as Perrier (http://www.perrier.com/) contain about 500 ppm of total dissolved solids (TDS), which is to say about 1/2 gram per liter, which is just a pinch, consisting chiefly of calcium and magnesium carbonates. Mineral water constituents include: calcium carbonate, magnesium carbonate, sodium bicarbonate, sodium chloride, sodium citrate, sodium phosphate, and iron sulfate.
Use fruit punch syrup for soda, apple or grape juice, or brand-name syrups from the soft-drink distributor (these are not particularly cheap, despite what you may have heard). Pinching a bit of lemon or lime oil from a fresh rind will make a pleasant, non-caloric flavored seltzer.
You might wonder if PET soda bottles are strong and durable enough to take all this freezing, whacking, squeezing, and pressure cycling over and over again. These bottles are amazingly strong and durable. They must have a working pressure far above the 50 psi I have been using to carbonate; a warm bottle of store-bought soda dropped on the floor will develop far over 100 psi of pressure, and they must be designed to take that kind of situation. I have abused these bottles through hundreds of carbonation cycles without developing so much as a pinhole leak. They do get a bit wrinkly and creased after a while. But of course they are easily replaced with "new" ones. If we could send a few back through time to the ancients, these bottles would be considered precious jewels reserved for the king's use. But we just discard them like so much useless trash. I am not a nutty environmentalist, but I am perplexed by the irony of such exquisitely engineered vessels being used for only 1/1000 of their potential lifetime.
 |
| After purging, applying gas, and shaking, you wait for the bottle to settle for a moment or two. Then it is ready to enjoy! |
|
|
| From tap water to seltzer, in about a minute, at next to no cost. |
Once you have this marvelous carbonation process working, you may want to experiment with making soft drinks. This means making or buying flavored syrups.
You can make your own "simple syrup" by dissolving 2 parts of granulated white sugar in 1 part of boiling water. Measure these parts by volume, such as 2 cups sugar to 1 cup of water. This will give you the maximum concentration of sugar that will not spontaneously crystallize. This plain syrup is the base for making a flavored product for soft drinks by adding flavorings such as vanilla (which is "creme soda") or extracts that might be found at your grocer's.
Syrup is diluted to make a finished soft drink in one of two ways, which the beverage industry calls the "pre-mix" or "post-mix" process. The "pre" and "post" refer to whether the syrup dilution occurs before (pre) or after (post) carbonation. By "pre-mix" is meant that you dilute the syrup with water and then carbonate to make a finished beverage. By "post-mix" is meant that you carbonate plain water to make seltzer, and then add syrup to the seltzer to make a finished beverage.
The precise USP (United States Pharmacopia) recipe for simple syrup is 850 grams of sucrose to 450 ml water, yielding 1 liter (33.8 fl oz) of syrup. One 8-ounce measuring cup of granulated sugar weighs about 200 grams and contains 700 food calories. Since the liter of syrup weighs 1300 grams, the specific gravity should be about 1.30, or perhaps 1.33 with the evaporation of water during boiling. 850 grams of sucrose contains about 2975 calories, so that the syrup contains 44 calories per fluid ounce (89 calories per 30 mL). The British Pharmacopoeia recipe is similar: 2 parts by weight of sugar to 1 part of boiling distilled water, heated until dissolved and subsequently adding boiling distilled water until the weight of the whole is restored to 3 parts.
According to their "Nutrition Facts" labels, commercially bottled soft drinks contain anywhere from 140 to 200 food calories per 12 fluid ounces of beverage. This corresponds to 35 to 50 grams, or about 9 to 13 teaspoons, of table sugar per 12 ounces! That might seem like a lot of sugar, and it is, but this is what makes soft drinks taste good. This equals 14 to 20 sugar cubes, which make quite a sight sitting in an empty 12-ounce bottle. Using our simple syrup would require 3 to 4.5 fluid ounces of syrup topped up to 12 ounces to yield the commercial proportion of sugar. This is quite a bit more than the 1:5 ratio for a soda fountain; it is not clear what accounts for the discrepancy, unless the fountain syrup is calorically more concentrated than the simple syrup (sucrose) recipe by virtue of fructose content. A hydrometer chart gives the specific gravity of a solution of 35 grams sugar in 12 ounces of water as 1.033, or for 50 grams as 1.045. Soft drinks are 10 to 15 percent sugar by weight, or roughly 1 pound per gallon. When my wife taught high school Home Economics, she used to exhibit a 16 oz Coca-Cola bottle on her desk, empty except for the equivalent amount of sugar in the form of 24 (!) sugar cubes. Most of us cannot imagine just eating that much sugar, especially as cubes, yet drinking a soda containing that same sugar seems inconsequential. The amount of sugar in that bottle was quite a disturbing sight!
Commercial soft drinks in the US today are sweetened with "high fructose corn syrup" (HFCS), although up until the 1980s they were formulated exclusively with sucrose syrup. The switch was purely economical, due to the politics of US agriculture making sugars from domestic corn (corn starch is convertible to glucose and fructose by various industrial processes) cheaper than imported sucrose from sugar cane (the US federal government forces a domestic price of sucrose at twice the world market price through import duties). HFCS is a different product than the corn syrup sold in grocery stores, such as Karo brand light corn syrup (See http://www.karosyrup.com), which contains chiefly glucose (also known as dextrose, corn sugar, or grape sugar) and not fructose (desirable for soft drinks since according to the Merck Index fructose is the sweetest of all sugars). The "light" in the Karo product name refers to the color, not the sugar concentration. According to the nutrition facts label, Karo syrup contains 30 grams and 120 food calories (chiefly from glucose) in each 30 mL. Compare this to simple syrup at 25 grams and 89 calories (all from sucrose) for the equal volume. Note that Karo syrup and similar household baking products contain vanilla flavoring and significant amounts of salt, which pretty much spoils their candidacy as a home-made soft drink ingredient.
In the US, you can still buy sucrose-sweetened Coca-Cola during the Passover season as the Kosher-for-Passover product. The orthodox dietary rules of that season prohibit the consumption of certain grain-derived products (kitniyos), such as sugar derived from corn. Coke aficionados prize this seasonal product as a chance to enjoy the beverage in the authentically original form. There is a subtle difference in flavor and mouth-feel between the beverage sweetened with cane sugar versus corn sweetener.
I have also heard that the tradition of serving "two cents plain" (plain soda water with no flavorings) in New York delicatessens arose from kosher considerations. Commercial soft drinks, in the early days of bottling, were not kosher. Today, commercially bottled soft drinks typically bear the OK or OU rabbinical hechsher.
Phosphoric acid is an ingredient of many soft drinks. The acidulous flavor is said to balance the strong sweetness of the rather high sugar content, thereby amplifying the overall sensation, much like citric acid in orange juice or a SweetTart type candy. The phosphoric acid content is said to be 164 mg/L of the beverage, with observed values around 106 mg/L, or about 0.01 percent.
If you study soft drinks or other products made from sugar solutions (such as wine or maple syrup), you'll eventually come upon the food-science term "brix" (pronounced "bricks", like bricks in a wall, named after a 19th century German scientist named Brix). The brix scale is simply the percentage by weight of sucrose in a given mix (such as, grams of sugar per 100 grams of beverage). Sometimes the percentage is referred to as the "degrees of brix". This would be analogous to the "proof" scale for concentration of an alcoholic beverage, or the Baume scale for concentration of an acid.
If you look at the nutrition label on a soft drink bottle or can, you'll see that commercial soft drinks are about 10 to 14 percent sugar by weight. For example, a can of cola might say it contains 35 grams of carbohydrate (all of it being sugar) in 340 ml of beverage. Since one ml is about one gram, this ratio works out to (35 grams)/(340 grams) = 10.3 percent sugar, which is the brix value. If you look at the nutrition labels on the store products, you'll see that Coca-Cola is a bit less sweet than Pepsi, and that a typical orange soda is sweeter than either of those colas. (Assuming we can trust those labels to be true; on occasion they have been famously falsified for other products.) By way of comparison, a teaspoon of sugar (5 grams) in an 8-ounce cup of coffee (227 grams) would have a brix of 5/227 = 2.2 percent. Other typical beverage values are 10 for orange juice, 12 for apple juice, 5 for whole milk, and 11 for chocolate milk.
The brix of a solution can be measured with several types of instruments, which types are based on various principles. A refractometer is the most versatile and costly instrument, using the optical principle of refractive index to indicate the sugar concentration of a tiny drop of a sample. A typical refractometer is a hand-held cylinder containing a prism and magnifier. A hydrometer is a less expensive device that measures the buoyancy, and thus the density, of the solution to indicate the sugar concentration in a larger sample. A typical hydrometer is a closed, hollow glass tube about 12 inches long, weighted at one end with metal shot, and holding a paper scale in the center. The brix scale is based on pure sucrose, but the other beverage sweeteners are negligibly different in terms of the relationship of weight, energy content (food calories), and perception of sweetness (a brix hydrometer might read a few percent high if you used glucose instead of sucrose). See the excellent glossary at starch.dk.
A "brix cup" is a completely different approach to testing sweetness, used only for fountain output. It is simply a plastic cup shaped to receive the streams of soda water and syrup separately, and keep them separate, as they flow out of the dispenser head (thus the instructions to remove the diffuser, which is designed to make the streams mix). These two separated streams then collect in two separate sections of the brix cup, one for syrup and one for soda water. The soda water section of the cup is designed to be 5 times wider in cross-section, so if you have the dispenser adjusted to the proper 5:1 water-to-syrup ratio, the levels in the two sections rise up evenly. If the levels rise unevenly, then you know you have to adjust the restricter screws in the dispenser accordingly to open (or close) the syrup (or soda) flow. The syrup side of a typical brix cup is like a skinny test-tube shape, and the water side is more a small drinking cup size. Usually you start with maximum soda water flow and adjust only the syrup restricter, unless you can't get the brix high enough, in which case you have to restrict the soda water and use maximum syrup flow. It can get a bit messy and will waste a few cups of product.
When it comes to testing my own soft drinks for sweetness, I don't bother with precise brix measurements. I just go by taste. People have their own taste preferences for sweeter or less sweet in fountain drinks. Some people think they don't like watered-down soda, but what they are responding to is melted-ice that makes the product flat; a fully-carbonated but less-sweet mix may be truly preferred. Brix testing is important for product consistency standards, such as when Coca-Cola comes into your restaurant chain and wants to test whether you're watering down their brand-name product (fountain dispensers let you adjust the ratio, so an unscrupulous restaurateur could shave some pennies that way). Brix isn't so critical for home use, where your tastes should govern.
The homebrew beer hobbyists are the cutting edge researchers on improvised carbonation apparatus. In brewing terms, what I'm doing is called "force carbonation", as opposed to the natural carbonation produced in liquids by yeast fermentation. For example, C. D. Pritchard has his "3 liter keg", and John Schnupp has his TapCap. The TapCap is an odd device that somehow gets by with using tapered thread fittings; the end of that page also shows a tire-valve bulkhead cap much like mine. Mr Pritchard advised me by email that to get tapered threads to work, he enlarged the diameter of the tapered inside threads on the nut by using a tap, and shrank the diameter of the outside tapered threads on the pipe by using a die applied backwards, thus adjusting the tapers so as to make for a snug fit of the washer to the bulkhead). But these kegging carbonators are more complicated and difficult to build than my design, since they are designed to remain on the bottle, injecting CO2 gas into the bottle while delivering only liquid beverage out, as is appropriate for kegging. Simply carbonating water and pouring it through the neck does not require quite so much sophistication. Note that brass should not be left in contact with carbonated water, although it is OK for gas fittings.
Lately my hobbyist metal-working skills have advanced to where I am using taps and dies to cut threads in metal, and oxygen and MAPP gas to braze. I have another idea (untried as of yet), which is to improve the bulkhead fitting I earlier improvised from an axially-drilled screw. The improvement idea is to take a short piece of brass rod (say 3/8 inch OD by 1 inch long) which you (1) drill axially (2) thread outside for half its length, and (3) braze the unthreaded end into a tubing fitting made with (or drilled out for) a matching ID. Thus you have constructed a fitting which adapts tubing to untapered outside threads, which in turn can clamp to the cap bulkhead with ordinary nuts and washers. The brazing is optional; you might get by with just solder.
Homebrew suppliers also sell carbonator caps. Here is a photo of the "Carbonater [sic] Valve Coupling" sold by http://www.morebeer.com (and by many other suppliers) for about $12, but this mates to the unusual ball-lock style of quick-connect tubing fittings, which are used extensively in beverage equipment but are not something you'll find at the hardware store. Of course the suppliers of the cap also sell the mating ball-lock fittings, and the total to make up a kit (cap, ball-lock coupler, tubing, clamps, and shipping) will run about $40. This coupling involves Moench's US patent number 5,396,934 (see table below). It appears to be available only in a 2-liter thread size, and not available for 3-liter threads. This device and the ball-lock fittings have the distinct advantage of incorporating small poppet valves, which are devices that shut off the gas flow when the fitting is disconnected. This avoids the need to purge the final length of hose at the start of carbonating a bottle of beverage, but adds complexity and more parts and passages to keep clean. Standard ball-lock connectors have grey or black plastic bodies to indicate gas-in (grey) or beverage-out (black) usage, but the mechanisms are the same.
Between the beverage industry, and quirky inventors, there are zillions of patents involving apparatus and methods for carbonation. Here are links to the text of some of the many patents involving bottle carbonation:
| Some US Patents Related to Bottle Carbonation | ||
| Title (Inventor/Assignee) | Year of Publication | Number, and Google Patents, Delphion, and/or Free Patents Online link |
| Method and apparatus for injecting gas into a bottled fluid (Thomas S Moench, the "Carbonator Cap"). A genuinely useful and sound product, for which it deserves any commercial success that follows. Unclear why this turned into a patent, since many of us had been improvising the same type of device for years and considered it too obvious or minimal. | 1995 | 5,396,934 5,396,934 |
| Carbon dioxide injection interface in carbonation apparatus (Bruce R Robinson, the National Safety Associates, Inc (NSA) tabletop carbonation system). The stroke of original genius to this patent is to take the whole of existing carbonation technology and turn it literally upside down. You fill and cap the bottle, turn it over, and stab the cap onto a gas-dispensing nipple. That's right, you would-be inventors: take any useful, expired patent, and merely invert the apparatus, and you have a new patent! Brilliant! And part of a product porfolio on which you can base a "marketing company". I obtained several of these defunct systems, and tore them down to reveal how they were made and how they worked, which you can read about on my NSA carbonation system page. Much of this is similar to the SodaStream system, described below. | 1990 | 4,976,894 |
| Apparatus for aerating liquids (Guy H Gilbey [UK], aka the SodaStream or Soda-Club home carbonation system sold for
$123 online at http://www.sodaclub.com or
http://www.sodaclubusa.com/,
which is a device having a self-contained CO2 supply and a clamping fixture that holds the bottle, injecting excess CO2 into a dip tube
to carbonate without shaking, at the expense of the excess CO2 being vented through a relief valve).
This same manufacturer has 9 other patents available online.
As of 2004, while the system itself is not unreasonably priced, you can only use CO2 in their
2-pound "Alco2Jet CO2 Carbonator" tanks that are delivered at a cost of over
$12 per pound of CO2, which is 10 to 20 times what a ordinary
tank of CO2 will cost to refill.
And these tiny tanks are only loaned to you, and you have to worry about
returning them lest you be penalized "$15.00 for an additional User License Fee"
(according to their Web site).
In effect, you are using CO2 gas not
just to carbonate, but also as a "motor" to do the agitation for you.
This is a very expensive system to operate, both in principle and in
being hostage to a single overpriced gas supplier.
While this might end up being slightly cheaper than buying bottled seltzer at a grocery store,
it won't be by much, and not until you've run some 100's of bottles through it.
Judging from a Google Groups search of "sodastream" and "sodaclub"
(perform this Google search now),
this system seems to be popular only in Germany.
The European patent deals with a specialized valve on the CO2 tank which appears to be designed
expressly to prevent CO2 refills from standard industry equipment, requiring
you to buy the highly-priced Soda-Club CO2.
Interesting information on adapting this valve to use standard CO2 tanks is at http://soadahclub.vox.com/. The approach suggested is to adapt a standard tank to refill Soda-Club tanks. I would think a simpler adapter and better result would be instead to adapt a standard tank to the Soda-Club carbonation unit, and thereby eliminate the proprietary tanks once and for all. |
1976 | 3,953,550, 3,953,550, European patent 1382899. |
| Pressurizing closure device (Poole) | 1971 | 3,557,986 |
| Pressurizing closure apparatus (Saponara) | 1977 | 4,033,091 |
| Vented beverage closure (Luenser/Ethyl Molded Products Co) | 1988 | 4,747,502 |
| Bottle pump (Johnston) | 1988 | 4,763,802 |
| Pressurizing closure apparatus for a carbonated beverage bottle (Scott) | 1989 | 4,842,151 |
| Portable hand holdable carbonating apparatus (Santoiemmo/United Soda, Inc) | 1989 | 4,867,209 |
| Container pressurizing apparatus (Metzger) | 1990 | 4,899,896 |
| Bottle cap and dispenser (Schmidt) | 1990 | 4,934,543 |
| Compact carbonated beverage making system (Burton) | 1990 | 4,940,212 |
| Home soda dispensing system (Owen/Charlie O Co, Inc) | 1990 | 4,947,739 |
| Deformable beverage containers for preserving carbonation (Doundoulakis). Putting soda in an ancient bota bottle design is original? Does the author not understand that pCO2 is what it is, regardless of the pressure applied to the bottle? Excelled in stupidity only by Lafond's update (see below). | 1991 | 5,025,953 |
| Repressurizer for carbonated drink containers (Ballas) | 1991 | 5,010,928 |
| Beverage container pressurizing system (Chamberlain) | 1994 | 5,282,495 |
| Pump and closure assembly (Patnaude & Kleinke) | 1971 | 3,602,387 |
| Fluid dispenser which has a button actuated regulator valve and a pressure relief port in the button (Grill) | 1995 | 5,443,186 |
| Compressing device for plastic bottles (Lafond). Another stunning bit of physical ignorance: "keep air pressure inside the bottle higher than the pressure of the CO2 in order to keep the CO2 in solution." If this were true, Dalton's law would be repealed, the universe would be entirely different, and life would end. From this childish understanding, the author's conceit yields the invention of a contraption which essentially duplicates your hand burping a bottle. A fine example of how the patent office has no critial ability to detect originality, physical truth, or economic value. | 2007 | 7,290,486 |
| Apparatus for making a carbonated beverage (Santoiemmo, et al.). Essentially the bottle method of carbonation, with a CO2 cartridge instead of a large cylinder like the well-known soda syphons, but with some self-contained anti-freeze for chilling. | 1988 | 4,735,348 |
Reading the texts and diagrams for the gadgets above should convince you that many of these patents are based on:
It is not clear whether such patents could be enforced.
The improvised bottle method lacks a relief valve or other overpressure protection device on the bottle. Given that the supplied pressure always moves through a soft vinyl hose, this should not be a problem, as the hose is a kind of integral overpressure protection.
John Palmer's How to Brew (http://www.howtobrew.com) is a good online reference to the homebrew hobby, which has a lot of overlap with the general subject of carbonation. Mike Uchima's brewing glossary (Web page) will help you figure out all the mysterious homebrewing terms.
The trade publication PET Planet (http://www.petpla.net/) deals with the PET bottle industry.
In the summer of 2002 I bought a number of items to upgrade my apparatus to a continuous, automatic system for carbonation. I wanted the luxury of having seltzer on tap rather than having to fill and shake single-bottle batches. Indeed, I got so lucky finding new equipment for sale cheap, that I experimented with three different systems: (1) a commercial countertop soda fountain, (2) a commercial bar gun, and (3) a used Flomatic fountain dispenser head removed from a soda fountain. All of these work with (4) a commercial McCanns carbonator. The fountain contains its own chiller, while the bar gun and dispenser head use (5) a cold plate and ice bin for chilling. I happened to already have (6) a Frigidaire ice machine (this is an undercounter unit that only makes ice, not to be confused with an ice maker in the freezer side of a refrigerator) that maintains a bin of "wet" ice for use with the cold plate. And with all this invested, of course I had to try making real fountain soft drinks, not just seltzer, so I had to acquire (7) six pneumatic FloJet syrup pumps, and (8) 2.5 and 5-gallon boxes of soft drink syrup from the local distributor. With all the fittings and hoses to connect this stuff, my little project had grown to an involved and invested hobby.
The McCanns carbonator unit is common to all these approaches, so let me describe that first. It works on a somewhat different principle than my bottle method. It merges warm tap water and higher-pressure CO2 into a continuous flow of warm carbonated water. The unit consists of an Proconn electric water pump, a stainless steel pressure vessel with electronic water level control, and associated connections and check valves. The bottom half of the pressure vessel contains water; the top half is initially purged of air and thereafter contains only CO2 gas. You set the CO2 regulator to supply about 100 psi, which maintains the same pressure in the vessel. The pump boosts the tap water pressure from the utility supply (typically about 60 psi) to something higher that will inject water past a check valve and into the 100 psi vessel. An electronic level control monitors the amount of water in the vessel and turns on the pump to maintain the water level as soda is withdrawn. The soda output is removed from the bottom of the vessel via a dip tube. Connections are through 1/4 inch and 3/8 inch stainless flare fittings welded into the sides of the pressure vessel, and a brass flare fitting on the pump inlet. An overpressure relief valve on the tank ensures that if the CO2 pressure became dangerously high (such as from a stuck-open CO2 regulator) that the tank would not catastrophically explode.
The large area of interface between the gas and liquid in the pressure vessel, and the high pressure of CO2, result in rapid dissolution of CO2 into the water, even at room temperature. The equilibrium of this solution, given the high pressure of CO2, is above the target 4 volumes of CO2 despite the room temperature operation. In the improvised bottle method, we use chilling and agitation to rapidly carbonate; in the carbonator machine we use high pressure and a larger area.
To maintain the carbonation at the ultimate delivery pressure, you must lower the temperature of the liquid after it flows from the carbonator vessel but before dispensing it to atmospheric pressure. Chilling is absolutely critical to dispensing carbonated beverages. Dispensing at room temperature results in an instantaneous loss of nearly all the carbonation ("warm soda is flat soda") due to the agitation of passing through the valve. Thus one uses a "flash" chiller to lower the temperature of the flowing seltzer just before it reaches the dispenser valve.
Carbonators are inherently more efficient in their use of CO2 than the bottle or keg methods. All of the CO2 consumed is delivered in the beverage without waste. The headspace of the carbonator vessel is purged of air when the system is started, and never is opened to the atmosphere to spoil that purge or to waste the headspace gas. Filling is more or less a continuous replacement of the draw, so that CO2 is not wasted into an emptying bottle or keg.
McCanns makes several models of carbonators, but the most common seems to be the "fast-flow" model with a 2-gallon stainless pressure vessel and a capacity that can keep up with a big 6-flavor fountain. Their smaller models have (you guessed it) slower flow rates but ought to be fine for home rates of use. There are also other carbonator manufacturers like Selmix, Lancer, Cornelius, FHPC, and Servend, but McCanns seems by far to be the most popular.
Being connected to the public water supply, to be legal, the carbonator pump must incorporate a backflow preventer. Watch out for older and used models, which may be obsolete in not having this feature.
The countertop fountain contains its own chiller, which looks like the compressor and condenser coil from an ordinary refrigerator. When the chiller runs, heat is exhausted out to the top of the whole unit by a fan that blows over the condenser coil, like a refrigerator. Unlike a refrigerator, however, instead of cooling air, the evaporator coil is a spiral of bare tubing immersed in a tank that you have filled with some 10 gallons of ordinary water. This coil chills to below freezing temperature, freezing some of the water in the tank, resulting in a "bank" of ice forming on the coil. Thus you not only have a big supply of ice-cold water, but a reserve of some 40 pounds of ice (the "ice bank") that will keep that water ice cold. A control device senses when the ice bank is fully built up or not, and turns the compressor on and off accordingly. A paddle runs constantly to circulate the water around the tank and maintain an even ice-cold temperature.
Now this water in the chiller tank is not for consumption. It is just a heat-transfer medium that stays in the chiller tank, separate from the dispensed product. Through this chiller tank then pass stainless steel tubes that carry the seltzer and soft-drink syrups to the dispenser heads on the front of the fountain. Thus the dispensed product is chilled to 40 deg F or colder as it passes through the tubes. The ice bank is a reserve that lets you chill a lot of drinks in a short amount of time.
This kind of fountain is suitable for restaurants because it can dispense a high volume of drinks and keep up with a varying rate of demand. While it is luxurious for home use, it does generate a bit of blower noise, it takes up some space, and uses electric power. In a warm room the chiller runs a duty cycle of about 5 minutes on for every 25 minutes. The paddle stirrer runs constantly but does not make much noise or use much power. I estimate an average usage of about 100 watts. While one can turn the unit on and off manually, since it takes about 5 hours of constant running to first build the ice bank, you can't turn it on and expect to dispense drinks right away. However, I haven't timed how long the ice bank lasts if the unit is shut off; for home use, it might be feasible to set an outlet timer to run the unit to build an ice bank just once at the beginning of a day's usage.
With the bar gun apparatus, chilling is accomplished by running the soda supply through a heat exchanger consisting of a "cold plate" immersed in ice. A cold plate consists of about 10 ft of stainless tubing embedded in a shallow block of aluminum. This accomplishes a rapid, continuous heat transfer from the liquid to the ice ("flash cooling") as long as a constant supply of ice is maintained in contact with the aluminum block.
There are also commercial fountains that use a cold plate at the bottom of an ice dispenser, instead of a built-in chiller like mine. You can recognize these because they typically have an ice dispenser in the middle of the row of fountain heads. This method has the disadvantage that you need to have a separate ice machine to produce ice, and you must bucket the ice from the ice machine to the fountain. However, this is an advantage for a situation like a wait station in a restaurant, where you want drink service near the dining tables, but you don't want the noise and heat of a refrigeration compressor to bother your customers. It is also more economical for a large restaurant to have one large, efficient ice machine in the back of the kitchen than a lot of separate ice-making devices.
One principle the different chillers all share is a thermodynamic phase change. The efficiency of the system requires a phase change in the refrigeration source, either solid-to-liquid (ice on a cold plate) or liquid-to-gas (refrigerant on a chiller plate).
This phase-change substance must be in intimate thermal contact with the cold plate to effect rapid heat transfer. If you simply refrigerate the cold plate (in air or in a chilled water bath), then the thermal mass of the system immediately warms as the warm beverage flows through; the temperature quickly rises above the necessary chill for proper dispensing. Thus, as much as we would like to believe it possible, it just does not work to park a cold plate (or bare tubing, for that matter) in a refrigerator and expect it to chill a flow of beverage. You must have a pile of drained, wet ice completely covering the cold plate. The pressure of the pile against the cold plate, and the draining of the melted ice, is critical.
The chiller will ideally reduce the liquid to an ice-cold temperature, but it must not actually freeze the liquid. Ice in a melting state maintains by nature a proper temperature that will chill but not freeze the flow of water in the cold plate. Refrigerated units use the combination of banked ice and circulating water to maintain the near-freezing (but never freezing) temperature of the product.
You can't "beat the system", thermodynamically speaking, for flash chilling flowing beverages. You must provide an active, continuously wasting supply of phase-changing stuff (melting ice, or boiling Freon). Chilled air or water are too "dilute" and unregulated as sources of chill. Something has to run and consume power all the time (or at least on some continual duty cycle), whether the system is delivering beverages or just idling. Moreover, you can't use the freezer or refrigerator compartments of your household refrigerator; the freezer is too cold and will freeze your lines solid, and the cool air of the refrigerator is not a phase-change heat sink. You can put bottles in the refrigerator to chill them, but then you have lost the advantages of an on-tap continuous-process carbonation system.
Fountain dispensers differ from bar guns in several respects. A bar gun is very compact, especially if you already have the ice machine anyway, which makes it appropriate for home use. A fountain is larger since it has separate dispensers for each flavor, but in turn this lets you dispense much faster, such as is appropriate for a busy restaurant. The slower dispensing rate of a bar gun is fine for home use. The drip holster for a bar gun should be mounted next to a sink, whereas the fountain has a built-in drip tray and drain. With one nozzle for all flavors, a bar gun can slightly cross-mix flavors unless you rinse and shake into the sink when changing flavors (there is a water-only button for this purpose). The unchilled length of hose on a bar gun would tend to warm the product a bit more than a fountain dispenser, and thus slightly reduce the carbonation level of the dispensed product, although proper levels can be maintained by a compensating adjustment of the CO2 supply pressure. You may or may not want to have the big advertising stickers on the sides of a fountain unit in your home; a bar gun is unobtrusive.
Finally, a bar gun or a fountain each have their "Wow, that's cool" effect on guests, but a bar gun is more associated with bars serving alcohol, versus a fountain being associated with soft drinks in a restaurant or convenience store. Bar guns don't typically have brand-name soft drink labels on the buttons, and the proprietor can dispense cheaper generic flavors into alcoholic drinks where the taste isn't really critical. I'm not familiar with this angle of the saloon business, but I suspect that either the big soft-drink manufacturers or state alcohol laws don't allow you to dispense from fountain heads displaying soft drink labels into cups that contain alcohol.
To make the jump from serving just seltzer to serving a menu including soft drinks, I added several syrup pumps and boxes of syrups. The FloJet pumps I use work on low pressure (about 30 psi) CO2 from a downstream regulator. The gas operates a pair of pistons which alternate filling with syrup or gas, and thus no electric power is required. This is an improvement over the older method of kegging the syrup, since you can pump out of a disposable cardboard box instead of having to return the empty steel kegs to the syrup distributor. The kegs didn't need a separate pump though, since you pressurized them directly with CO2.
Using the CO2 as an energy source to run the syrup pumps might seem crazy, but the amount consumed is negligible. The volume is about equal to the syrup dispensed and the pressure is only about 1/3 that of the carbonation. Since the syrup volume is 1/5 of the water, and the water itself has about 4 volumes of CO2, the pumps are only using a proportion of about 1/20 extra CO2.
I am happy to have a local fountain service that has accommodated my need for parts and syrup. They sell a line of unbranded soft drink syrups that is quite good.
Some years back in another state, I used to buy Coca-Cola's brands of syrup in gallon jugs from the local small-town distributor. I would use this with my bottle-method of carbonation to make a chilled pre-mix product. More recently I talked to the local Coca-Cola sales representative, seeking to buy their brand-name products. He said that they do not even sell syrup in such small quantities here in Palm Beach County, Florida. That seems reasonable, and I'm probably the only guy in the county who ever asked, because he wanted to know how I even had a fountain at home to begin with. He suggested I call the restaurant supplier, Sysco, who distributes to small restaurant users, and who also has a will-call counter. But I haven't yet figured out if Sysco has any desire to bother with the occasional household order for soft drink syrup. He also suggested I find a friend in the restaurant business to see I they could "retail" an occasional box to me; I suppose at some price they should be willing at a mom-and-pop bistro, right? Maybe I'll inquire about that someday.
You can buy so many things on the Web now, and sure enough there are Web-based sellers for small quantities of brand-name soft drink syrups. But I find this is more of a novelty price that a regular supply, and the shipping is prohibitive.
Adding up the costs of fountain soft drinks shows that, unlike plain seltzer, they are not really a bargain for the home user. Single 5-gallon boxes of syrup sell locally for $38 for generic brands and $60 for name-brands (plus sales tax). These in turn yield 30 gallons of delivered product. This works out to about 70 cents for generics or $1.12 for brand name per 2-liters, which is about what the grocery store sales prices are for bottled products. We have seen that the CO2 to carbonate adds only a few cents more in cost. On the other hand, you have much less water to haul, no bottles to recycle or dispose, and you never have half-empty bottles going flat in the fridge. On the other hand, you have extra power costs, investment in equipment and the space it uses, the risk of plumbing leaks and messy spills, and the risk that you'll be drinking more soft drinks than may be healthy.
Now if you're a restaurant or convenience store, especially a chain with national-account pricing from the big brand names, then I'm sure your price for syrup is much better. But until I'm dispensing 100s or 1000s of drinks a day, I don't expect to be entitled to any such break.
Stainless fittings must be used throughout the carbonated side of the plumbing, since brass or copper are leached by continuous contact with carbonated water. This applies to the dispenser valves as well, which must be constructed of plastic and stainless parts. Acquiring these stainless fittings (flare and hose barb) can be a problem, since they seem to be used commercially only for soda fountain applications, and are not available from hardware stores or homebrewing suppliers. The best source has been the fountain repair shop of the local soft drink distributor; they have been surprisingly kind and helpful with my quirky hobbyist efforts.
A soda dispenser head is much more sophisticated than a simple water faucet. It must be constructed to control the relatively high liquid pressure (100 psi) while not subjecting the liquid to physical forces that would tend to nucleate the dissolved CO2 (passing through narrow orifices or rapid change of cross-sectional flow rate). Modern dispenser valves consist of a specially articulated type of O-ring known as a "banjo", spring- or solenoid-actuated levers to actuate the banjo pressure against a stop, and a specially designed set of passages and diffusers to reduce the energy of the high-pressure flowing soda to a gravity fall. The design also attempts to minimize the thermal mass and conductivity of the containment path, so as to avoid rewarming the chilled product. To all this sophistication is added a second circuit for syrup metering and dispensing, which is not a concern for simple seltzer delivery.
Antique chrome lever-style fountain dispensers used a large leather washer between disks to control the flow; many of these are constructed of leaded brass and thus should not be used for carbonated products. The typical neck of these dispensers has a significant dead space of unheated tubing that will tend to reintroduce ambient heat to the dispensed flow. Beer faucets are similarly mismatched to the pressure, temperature, and corrosion requirements of soda dispensing.
One disadvantage to having soda on tap is the need for an extra chiller in the house. The cold plate method requires a melting ice supply. The plate cannot simply be placed in the refrigerator, since without contact with ice, the chilled plate will only chill a few ounces of water before warming, the specific heat of the mass of the aluminum block being so much less than the heat of fusion absorbed by a relatively small amount of ice. Nor can the plate simply be placed in a freezer, because the liquid would just freeze solid in the tubing. In a household setting, the ice supply for a cold plate would have to come either from burying the plate in an expensive separate ice machine appliance (not an ice maker in the refrigerator, but one that works using a reflow chill-plate), or by transferring refrigerator ice to a cold plate container (impracticably laborious and intermittent). Perhaps one could afford a fountain dispenser with its own refrigerated chiller, which would be the most efficient, but even then you are constantly maintaining an extra refrigerated volume while dispensing happens only occasionally. In commercial applications, this overhead is compensated by the volume of delivery, but household use may be so infrequent as to make it very uneconomical. Compare this extra overhead to the bottle method, which can use ordinary refrigerator space that you already maintain for household needs.
For economical home use, the best solution to the chiller overhead would seem to be in altering the commercial design by refrigerating the pressure vessel. This should be possible by separating the pressure vessel from the rest of the carbonation unit and installing the vessel in the household refrigerator. The unit could then be operated at lower CO2 pressures. This would require adapting the liquid and gas plumbing on the unit, and the electrical controls, to make them longer and to pass them through the walls of the refrigerator. It may be that the kinetics of the dissolution at lower pressure and temperature do not favor this type of alteration. The reservoir will also be warmed by each volume dispensed, as that volume is replaced by tap water. As in many thermodynamic-kinetic processes, the deck may just be stacked against you, and you must pay the overhead to get a proper result.
As an alternative to the McCanns carbonator approach, I also have obtained for experimentation a modified 5-gallon Cornelius keg which was designed to carbonate water in a refrigerated space at 30 psi or less. Cornelius, a leading manufacturer of commercial soda fountain equipment, made this apparatus for a rather elaborate residential soda fountain which I understand to be discontinued. This keg is the usual stainless steel keg body ("Corny" keg) with a modified lid. (These kegs were universally used for post-mix fountain syrups before the introduction of bag-in-box ("BIB") technology now used for commercial fountains, which made the kegs obsolete for fountains, although they are widely used now for the homebrewing hobby, where a glut of surplus kegs is available very cheaply.) The modified lid contains a water-in fitting with float valve (something like a miniature all-stainless ballcock) which maintains the water level in the keg using only tap water pressure. The head space is maintained with a 30 psi CO2 supply through a gas-in fitting with check valve on the keg body. The soda-out connection is also on the keg body, and is fitted with a dip tube to take soda from the bottom of the keg. The chief problem with this design is that a huge keg just about requires its own refrigerator. No doubt the large reserve volume is needed to maintain a buffer of chilled soda that will not be too much displaced by warm water introduced from dispensing.
A soda fountain (carbonator, refrigerated chiller, dispenser, syrup pumps) is a costly set of equipment, priced at many thousands of dollars new. I assembled a working setup for much less by purchasing the carbonator on eBay, where you can find them new for $150 to $200. I found a used cold plate and dispenser for $40 from the local fountain service shop. I also acquired a nearly new 6-flavor Cornelius countertop fountain unit (Venture model) inexpensively from a restaurant that underwent a remodeling.
Zahm and Nagel Company, Inc, makes interesting devices for CO2 quality control in the food and beverage industry. They publish a chart of solubility of volumes of CO2 gas dissolved in water for given pressures and temperatures (PDF file) and a similar chart for beer (PDF file). According to the British Soft Drinks Soft Drinks Association (see their fascinating Web page), one such volume is equal to about 2 grams CO2 per liter of water.
Autofrost publishes a chart of saturation pressure-temperature relationships for various refrigerants, one of which happens to be CO2, which amounts to a solubility chart (PDF file).
Carbonating large volumes of water such as at a commercial bottling plant is achieved by other apparatus such as this pinpoint carbonator made by Wittemann (WittCold Systems, Inc).
The Coca-Cola Web site (http://www.coca-cola.com) has a "virtual plant tour" of the modern commercial bottling process (Flash movie). This reveals several facts of interest to the carbonation hobbyist: Unlike fountain Coca-Cola, bottled Coca-Cola is first pre-mixed before being carbonated. The uncarbonated pre-mix is made from Coke syrup and water. The Coke syrup is mixed at the plant from simple syrup plus flavoring concentrate. The simple syrup is made at the plant from sugar and water. Once carbonated, the finished drink is filled into bottles by the counter-pressure method, ensuring "smooth flow of liquid, with little to no foaming" [and therefore no loss of carbonation].
The Cube-Cola project in the UK seeks to develop an "open source" formula and process for homemade cola flavoring. This seems to follow the Open Cola project [Wikipedia article].
See kegman.net for information and ordering of parts for soda fountains. Also beveragefactory.com and www.chicompany.net. See http://www.athomesoda.com for complete home soda fountains from about $1500.
Northern Brewer (a hobby supplier) has an interesting 7-page paper (PDF file, HTML version) on using kegs to store and carbonate beer, much of which is similar to my bottle system.
Lancer Corporation is a major manufacturer of fountain equipment, and has online ordering of fittings at http://www.lancercorp.com. They also provide an excellent technical document on post-mix fountains [Powerpoint presentation].
Sean Sizemore (800-252-2543) operates a North Carolina beverage fountain distributorship, and offers to sell parts, valves, carbonators, dispensers, tubing, etc., to hobbyists.
Here is a science fair project idea that uses the tire-valve bulkhead cap as the homemade apparatus. You will also need an ordinary tire gage and a thermometer. You can do a few demonstrations on the grade-school level, or use this to demonstrate more advanced high-school physics.
The basic scientific principle is the relationship of pressure and temperature in a sealed bottle of carbonated beverage to the degree of carbonation. After measuring the pressure and temperature inside the bottle, you look up the carbonation level on a carbonation chart, and announce, to the amazement of your family and friends, "this soda has 3.8 volumes of CO2 carbonation, and is way fizzy." Or, "this soda has no more than 1.5 volumes of CO2, and is flat, flat, flat, ptooie, bleah."
To construct the pressure-reading apparatus, make a bulkhead cap fitting with the tire valve, such as is described above, except don't remove the valve stem. This specially-fitted cap will seal the soda bottle, while allowing you to measure the pressure inside the sealed bottle by applying an ordinary tire gage. Take various store-bought 2-liter soda products, chill well, remove the original cap, replace quickly with the tire-valve cap (burping the air out while sealing), shake well, and measure the resulting headspace pressure with a tire gage. Be careful when pushing the tire gage onto the tire valve that you do not leak pressure from the headspace, which would reduce the true sample pressure; this requires a careful and skillful technique. Repeat the pressure measurement for various samples, perhaps of a few different brands. Make sure all are at the same temperature.
The pressure reading tells you how much carbonation is in the beverage. Find the degree of carbonation (in "volumes") for a given pressure using the Zahm-Nagel chart above. Fresh soda should have about 3 or 4 volumes of carbonation.
You can experiment with samples to see how the level of carbonation is affected:
Try opening a warm bottle of soda, letting it sit quietly for a few minutes, and then capping and measuring the pressure; you will quantify the general principle that:
Warm soda is flat soda.
Another interesting demonstration is to seal a large balloon over the threaded neck of a freshly-opened bottle of soda. Warm the bottle in a water bath to about body temperature. Shake the bottle and see how much gas is evolved into the balloon; observe how much gas you must burp up when you drink a carbonated beverage. Measure the balloon size and estimate its volume using geometry (hint: have an assistant squish the oval balloon approximately into a sphere while you measure the diameter). A 2-liter bottle of soda should have about 6 to 8 liters of CO2 gas dissolved in it, most of which will evolve into the balloon. You can then use the balloon as a CO2 fire extinguisher on a candle. Or use the gas to purge a jar containing live insects, and see whether bugs can live on CO2 instead of air, heheheh.
The range of your instrumentation (namely, the tire gage and thermometer) determines what sample conditions you can read. Chilled soda should be less than 30 psi, so an automobile tire gage should be sufficient. Warm soda can produce pressures of about 100 psi, so you'll need a tire gage that reads higher than an inexpensive automobile type, such as is made for truck tires or racing bike tires.
The thermometer should read from freezing to body temperatures. It will be easiest to work with if it is a simple glass stem type that you can insert directly into the bottle. The ultimate improvised instrumentation would be to take an inexpensive thermocouple-probe type outdoor digital thermometer and fit the wire through the cap so the probe dangles inside the sealed sample bottle.
Advanced topics which you can demonstrate with this project are:
Commercial carbonation testers work exactly like the improvised tire-gage testing. Such a tester is simply a hard plastic jar with a tight-sealing screw-on lid. An accurate thermometer and pressure gage are threaded into the lid, to measure the temperature and pressure of the sample. To measure the carbonation of a sample beverage, you first fill the jar with the sample, quickly close and seal the lid, shake, and read the pressure and temperature. A printed chart on the side of the jar tells the carbonation for various pressure-temperature combinations.
Properly installing and maintaining a soda fountain in a restaurant requires carbonation testing. This is how a technician checks that a soda fountain is delivering a properly fizzy product. This is important to the brand-name soft drink makers, who want to make sure you have a properly delivered product from the on-site carbonation apparatus.
Let me know if you get to the International Science and Engineering Fair with this stuff. I was there myself as a lad, four times from 1969 to 1973, but I was just building computers in those days.
To fully understand the carbonation process requires some scientific background involving gas laws and kinetics. Without these principles, you cannot understand or predict how various systems are going to behave. With these principles, you can design your own systems and calculate their performance. This is the difference between being a hobbyist, who just learns to do a few fun things from others, versus being an engineer, who can have the nobler satisfaction of creating wondrous and innovative designs that lesser minds can only copy.
The "partial pressure" of CO2 (pCO2) is fundamental to understanding carbonation:
| The Fundamental Principle of Carbonation (Henry's Law as applied by Kinch) |
| At any given temperature, the equilibrium carbonation (CO2 saturation) of a given beverage depends only on the pCO2 of its headspace |
Direct consequences of this fundamental principle:
Nothing short of a scientific understanding of physics can lead to the fundamental principle of carbonation. Science in the 18th through 20th centuries determined the properties of how gases and liquids in general behave under various conditions. These properties are listed in the following table of physical principles and laws:
| Gas Laws Relevant to Carbonation | ||
| Gas Law | Relationship Governed | Mathematical Expression |
| Le Chatelier's principle | Relates dynamic equilibrium of dissolved gas in water to temperature of the water | K = f(T) |
| Henry's Law | Relates solubility of a gas in a liquid (water) to partial pressure of that gas | C = P/K |
| Boyle's Law | Relates variations in gas pressure to variations in gas volume at constant temperature | V2 = V1 * (P1/P2) |
| Charles' Law | Relates variations in gas volume to variations in gas temperature at constant pressure | V2 = V1 * (T2/T1) |
| Combined Gas Law | Relates variations in gas pressure, temperature, and volume (A combination of Boyle's and Charles' laws) | V2 = V1 * (P1/P2) * (T2/T1) |
| Dalton's Law | Relates total pressure of an unreacting (inert) mix of gases to the partial pressures. Each gas in a mixture contributes its pressure independently of the other gases present. The total pressure is thus simply the sum of all partial pressures. | P(total) = P1 + P2 + ... + Pn |
| Bernoulli's Law | Relates kinetic and potential energy of gases in flow. The energy of a volume of gas is the sum of its kinetic energy (from motion) and its potential energy (from pressure). When gas flows, energy is conserved and the sum of kinetic and potential energy is constant, even though the two may be exchanged. Omits consideration of viscosity and gravity. | pV + mv2/2 = Constant |
| Pascal's Law | Relates the pressure of an unflowing gas to the region of its containment. The pressure of a volume of static gas is the same everywhere and in all directions. Changes in pressure are transmitted throughout the volume. | P(z1) = P(z2) for all z |
| Cole's Law | Relates vinegar and mayonnaise in a cabbage salad (gotcha!) | S = C + V + M |
Le Chatelier's principle actually states a more general idea: that a stress applied to an equilibrated system will move the system to a new equilibrium that minimizes the effect of the stress. To apply this general principle to the solubility of CO2 in water, we observe that concentrating CO2 in water generates a small amount of heat. Thus, chilling the solution moves the equilibrium to a higher concentration. A lower temperature in an equilibrated system favors the formation of heat. For most gases, solubility decreases as temperature increases.
Henry's gas law relates the equilibrium solubility of CO2 gas in water to the partial pressure of that CO2. This law gives us a formula to compute the solubility for a given gauge pressure, if we know the Henry's law constant for the applicable temperature. Since Henry's constants are published only for certain standard temperatures, we would also like to have another formula based on Le Chatelier which gives the Henry's law constant as a function of temperature. By using these two formulas together, we can compute the solubility for any given temperature and pressure, and dispense with the need for a Zahm-Nagel type of solubility chart (at least for carbonating plain water).
Most of our analysis of carbonation has to do with getting the CO2 into solution by applying a partial pressure of CO2 (pCO2) and (usually) chilling temperatures. When a bottle is opened, or beverage flows through a dispenser, or is poured into a glass or swallowed, then the pCO2 has been lowered and perhaps the temperature has been raised. In these cases CO2 will leave solution, either invisibly through the surface interface, or in spontaneous bubbling (fizzing, effervescing), because the equilibrium conditions have changed. It is this effervescence, after all, that is the chief aesthetic purpose underlying our sensual enjoyment of carbonation (along with the carbonic acid tartness).
When you pour an open cup of carbonated beverage, even if the beverage is chilled upon dispensing, poured gently, and kept cold in the cup with ice, the surface of the liquid is exposed to the ordinary atmosphere. The impinging pCO2 is thus practically zero, and therefore the equilibrium volume of CO2 in solution is likewise zero. In short, the drink will eventually go flat, although not instantly. The rate of diffusion of CO2 out of the beverage into the atmosphere depends on the instantaneous degree of carbonation; highly carbonated liquids effervesce in the atmosphere; while lightly carbonated liquids outgas slowly and invisibly.
If you were to apply a flexible barrier over that surface which was impermeable to CO2 gas, then the pCO2 at the surface is effectively 1 atm, and you retain a carbonation level up to 1.71 volumes. At higher starting levels bubbles will form and rise to the top. Note that the persistent foam head on root beer or malt beverages is just such a barrier, at least temporarily.
The same process governs the loss of carbonation of a bottled beverage which is uncapped, partly dispensed, recapped, and so on. Each uncapping releases the equilibrium pCO2 in the headspace, which was determined by the initial filling. As beverage is poured out, air replaces the CO2 gas in the headspace. If quickly recapped, the pCO2 in the headspace may be about zero, but the CO2 in solution in the remaining beverage will remain at about the initial level. The bottle is now out of equilibrium, because the liquid is carbonated by the pCO2 of the headspace above it is zero. CO2 gas will leave solution and pass into the headspace, mixing with the air, until a new equilibrium of lower solution concentration and higher headspace pCO2 is reached. This new equilibrium will be determined by the Henry's Law characteristic (solution concentration versus pCO2) governing the liquid on one hand, versus the Dalton's Law characteristic (pTotal = pCO2 + 1 atm) governing the headspace on the other hand, and the relative volumes of the liquid and headspace.
When a bottle of carbonated beverage is unopened, or not much of the beverage has been dispensed, the ratio of liquid-to-headspace volume remains very high. Even if the pCO2 is released and replace by air via uncapping, the liquid can refill the headspace with pCO2 to maintain equilibrium without losing much carbonation. After repeated uncapping cycles, however, and especially as the ratio of liquid-to-headspace volume inverts unfavorably, the equilibrium dissolution to restore pCO2 to the headspace increasingly depletes the carbonation level. The game is favorable with a full or mostly-full bottle, but quickly lost when the bottle is about one-half or one-third full.
Note that if we can dispense a carbonated beverage from a bottle without uncapping, then we gain a significant advantage because the CO2 volume lost from the headspace is merely the volume of liquid dispensed, not a repeated replacement of the entire headspace. Furthermore, if the headspace is purged with pure CO2 during the bottling process, the headspace pCO2 is not reduced by air as is the case with uncapping. This efficiency is the principle behind "soda syphon" type dispensers and kegging. The headspace(s) of the system are kept filled with pure CO2 instead of air, and the only CO2 that exits the system is that which is dissolved in the beverage, not from the headspace.
One source on the Web which formulates the Le Chatelier principle specifically for CO2 in water is a 4-page unattributed geochemistry paper summarizing "Carbon dioxide transfer across the interface" from the Utrecht University in the Netherlands (PDF file). While this paper is concerned with characterizing and quantifying how atmospheric CO2 moves in and out of lakes and oceans, the physical principles are directly applicable to carbonation of beverages. The paper gives the following empirical formula for the Henry's law constant K in mol/liter-atm for CO2 in water as a function of temperature T in degrees Kelvin (I have converted their mathematical formula to a C code fragment):
  double a0 = -5.7470126E2;
  double a1 = 2.154152E4;
  double a2 = -1.47759E-4;
  double a3 = 8.9892E1;
  double T, lnK, K;
  T = ... /* degrees Kelvin */;
  lnK = a0 + a1/T + a2*T*T + a3*log(T);
  K = exp(lnK); /* mole/liter-atm */
This formula yields a value of the Henry's law constant for any desired temperature. In contrast to the gas laws, which are all simply proportions or sums, this formula is very complex, involving logarithms and exponentials, reflecting the complexity of the underlying kinetics which determine the dynamic equilibrium of such a solution. Note: in the C programming language math library, "log(T)" is the natural logarithm.
The result output by the formula is stated in units of mol/liter-atm, which is fine for the laboratory, but we want to know it in standard volumes of CO2. The relevant conversion factors are:
  1 atm = 14.7 psi
  0.0442 mol/liter-atm = 1 volume CO2 / atm
  0.6550 mol/liter-atm = 1 volume CO2 / psia
For example, at 32 deg F = 273.15 deg Kelvin, the Henry's law constant from the formula above is K = 0.0768 mol/liter-atm, or dividing by 0.6550, we get K = 0.117 volumes of CO2 per psia. At atmospheric pressure of 0 psig = 14.7 psia, we thus find the solubility of CO2 to be 0.117 * 14.7 = 1.72 volumes. This agrees closely with the Zahm-Nagel chart value of 1.71. At 20 psig = 34.7 psia, we have 0.117 * 34.7 = 4.06 volumes. Note that pressures input to the formula must be expressed as absolute values (psia), not gauge readings (psig), so you must convert gauge pressures to absolute by adding the atmospheric pressure of 14.7 psia. Likewise you must convert temperature values in Celsius or Fahrenheit degrees to absolute temperatures of degrees Kelvin.
Consider solubility at two other temperatures of interest: room temperature solubility is 0.76 volumes, and body temperature solubility is 0.56 volumes. Soda that has gone mostly "flat" by sitting out at room temperature still has 3/4 of its volume of CO2 dissolved in it. Likewise a beverage warmed in your stomach will retain up to about 1/2 its volume of dissolved CO2. It will, however, outgas upwards of 3.7 - 0.56 = 3 volumes if you drink it cold and fully carbonated. That's a lot of burping! I don't know enough biochemistry to predict whether gastric juices or other factors play a role in getting that last 0.56 volumes to leave solution, or whether it just continues on to become intestinal gas after the water is absorbed later in the process.
Thermodynamic and transport properties of CO2, including the Mollier chart and phase diagrams, are published by ChemicaLogic.
Carbonation in History: Carbonated water, known scientifically as carbonic acid, was known to ancient alchemists as a weak acid, and the gas carbon dioxide known as its constituent. These substances were known by pre-scientific names, including: gas Sylvestre, gas of Van Helmont, Spiritus Sylvestris, gas of Dr Black, aerial acid, atmospheric acid, Mephitic acid, cretaceous acid, acid of charcoal, fixed air (Priestley's term in the 1700s), Hale's solid air, acidulated air, and gaseous waters. See the page on ancient chemical nomenclature at Guita's Classical Chymistry, which lists an attempt by the best chemical experts in 1787 to rationalize the knowledge of the era.
 Priestley's pioneering paper of 1772, Impregnating Water with Fixed Air
(full text, 330 KB PDF file), subtitled
"In order to communicate to it the peculiar Spirit and Virtues of Pyrmont
Water, And other Mineral Waters of a fimilar [sic] Nature", was published at
London. The dedication to John Earl of Sandwich, First Lord
Commissioner of the [British] Admiralty, suggests that Priestley was
employed as what we would today call a "Navy defense contractor", the goal
being "proposals for improving the water used at sea, by impregnating
it with fixed air". In short, they were looking for a practical way to
supply soda to sailors ("I have drawn up the following easy [!] directions
for making it"), hoping this would improve sanitation and palatability, the
better to fight with.
Given that Priestley had at best atmospheric pressure gas to work with, and
no refrigeration, his results must have been relatively poor by today's standards
of fizziness.
Priestley's pioneering paper of 1772, Impregnating Water with Fixed Air
(full text, 330 KB PDF file), subtitled
"In order to communicate to it the peculiar Spirit and Virtues of Pyrmont
Water, And other Mineral Waters of a fimilar [sic] Nature", was published at
London. The dedication to John Earl of Sandwich, First Lord
Commissioner of the [British] Admiralty, suggests that Priestley was
employed as what we would today call a "Navy defense contractor", the goal
being "proposals for improving the water used at sea, by impregnating
it with fixed air". In short, they were looking for a practical way to
supply soda to sailors ("I have drawn up the following easy [!] directions
for making it"), hoping this would improve sanitation and palatability, the
better to fight with.
Given that Priestley had at best atmospheric pressure gas to work with, and
no refrigeration, his results must have been relatively poor by today's standards
of fizziness.
Priestley was also an pioneering advocate of what we would today call "open source". He states, "If this discovery (though it doth not deserve that name) be of any use to my countrymen, and to mankind at large, I shall have my reward. For this purpose I have made the communication as early as I conveniently could, since the latest improvements that I have made in the process; and I cannot help expressing my wishes, that all persons, who discover any thing that promises to be generally useful, would adopt the same method".
See also the Priestley Society's Web pages.
Etymology: The word "seltzer" is said to derive from the springs at the German village Nieder-Selters.
Is it possible to carbonate beverages with dry chemicals, like an Alka-Seltzer tablet minus the aspirin? No, this is a poor source of CO2 and yields excessive sodium if used in a beverage. Other than the aspirin, Alka Seltzer is simply a mix of dried sodium bicarbonate (baking soda, sodium hydrogen carbonate) and citric acid (hydrogen citrate), proportioned about 2:1 by weight (1.9 grams of bicarbonate to 1 gram of citric acid in the standard formula for Alka-Seltzer) and pressed into a dry tablet. While it may be fun to watch, it is a poor way to carbonate a beverage: 1.9 grams of bicarbonate yields about 1 gram of CO2 with a whopping half a gram of sodium. To properly carbonate a liter of seltzer takes 8 grams of CO2, so you would also be adding over 4 grams of sodium, equal to about 1.75 teaspoons of table salt! Yuk! The same problem spoils things like "Fizzies" drink tablets (http://www.fizzies.com/), which only weakly carbonate when dosed by the recommended usage.
The ASTM (1988) Standard Specification for Dimensions and Tolerances for Plastics Bottles, D2911-82 supposedly standardizes the mechanics of the PET soda bottle caps.
The CGA (Compressed Gas Association) pamphlet V-1, "Standard for Compressed Gas Cylinder Valve Outlet and Inlet Connections", contains the standards for fittings such as the CGA-320 fitting used for CO2 tanks. CO2 tanks for paintball markers use a fitting standardized as ASTM F1750-05, "Specification for Paintball Marker Threaded-Propellant Source Interface", which is similar to, but definitely not, CGA-320.
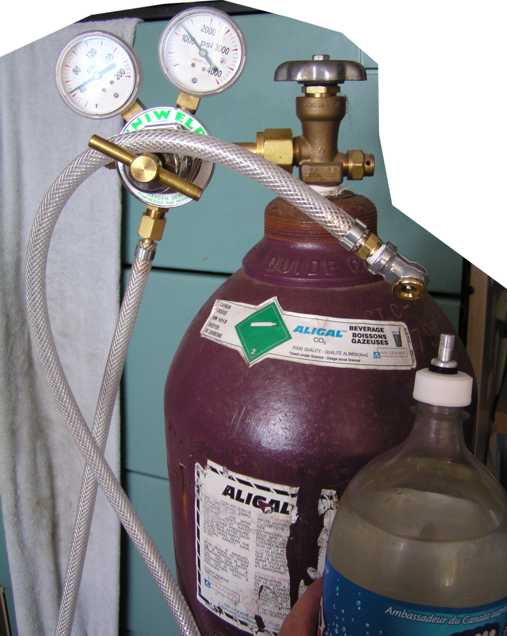 Here is a photograph of a system sent to me by a reader of this page.
He's using a tire chuck and Schrader valve cap for the bottle method.
Here is a photograph of a system sent to me by a reader of this page.
He's using a tire chuck and Schrader valve cap for the bottle method.
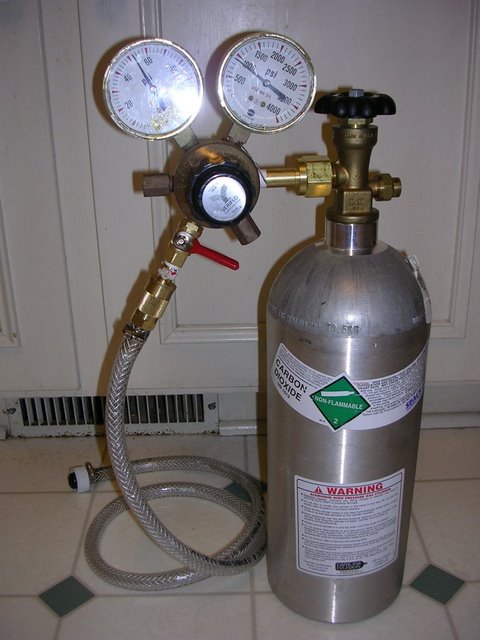 Here is a photograph of a another system sent to me by Andrew Owen,
who says, "Thanks to your excellent instructions, I was able to make my own carbonating
device."
Andrew used a rubber tire valve as a bulkhead fitting to the bottle cap, and
quick-connect air fittings for the hose connection.
I would suggest reversing the order of the quick-connect fittings: female on
the regulator, and male on the hose.
Plain vinyl tubing, instead of the braided hose, will provide some overpressure protection,
since it will burst at a lower pressure than PET bottles, and without much hazard, should
the regulator fail open.
Here is a photograph of a another system sent to me by Andrew Owen,
who says, "Thanks to your excellent instructions, I was able to make my own carbonating
device."
Andrew used a rubber tire valve as a bulkhead fitting to the bottle cap, and
quick-connect air fittings for the hose connection.
I would suggest reversing the order of the quick-connect fittings: female on
the regulator, and male on the hose.
Plain vinyl tubing, instead of the braided hose, will provide some overpressure protection,
since it will burst at a lower pressure than PET bottles, and without much hazard, should
the regulator fail open.
Andrews also says his family "has really enjoyed having an 'endless' supply of sparkling water. Plus, I really like how much more energy and resource efficient it is compared to having new bottles of water filled at a factory, placed on a truck, shipped to a store where I purchase them, load them into the car, drive them home, unload them from the car, and store them."
See additional photos here.
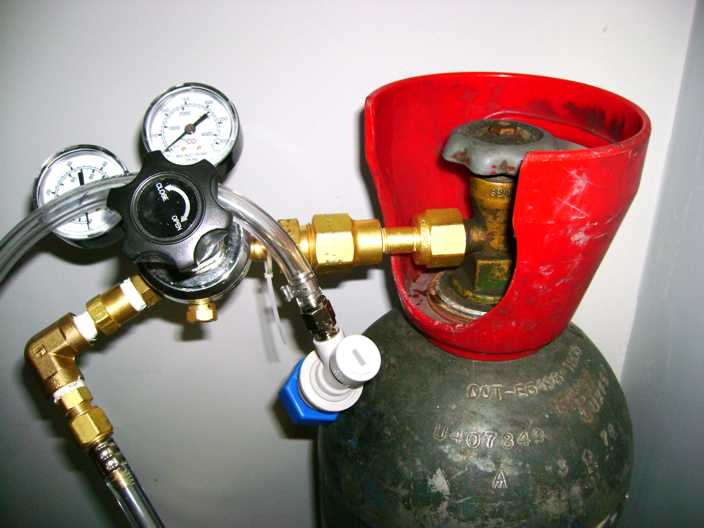 This photo was sent to me by Alastair, who says that he assembled his carbonating system from
"A carbonating cap along with a tube from Northern Brewer which I think roughly cost me $25;
An empty CO2 tank from eBay which cost me $35 bucks;
Additional fittings to make the regulator fit both sides from a welding supply store $15;
Exchanged my CO2 tank for a full one $20 from a welding supply store.
So my grand total is $90 less than the amount that a new Soda Club is
selling for."
He's using the ready-made carbonator cap. The non-reinforced vinyl beverage tubing is a good
idea, because it provides overpressure relief protection if the regulator should fail open,
bursting before the more hazardous bottle bursts. The tubing also came fitted with stainless
flare connections and Oetiker clamps, so there's no brass possibly in contact with the soda.
The regulator adapter fittings were necessary because he's re-using an welding regulator made for argon gas;
while this works, regulators for CO2 normally come with the correct fittings in and out.
This photo was sent to me by Alastair, who says that he assembled his carbonating system from
"A carbonating cap along with a tube from Northern Brewer which I think roughly cost me $25;
An empty CO2 tank from eBay which cost me $35 bucks;
Additional fittings to make the regulator fit both sides from a welding supply store $15;
Exchanged my CO2 tank for a full one $20 from a welding supply store.
So my grand total is $90 less than the amount that a new Soda Club is
selling for."
He's using the ready-made carbonator cap. The non-reinforced vinyl beverage tubing is a good
idea, because it provides overpressure relief protection if the regulator should fail open,
bursting before the more hazardous bottle bursts. The tubing also came fitted with stainless
flare connections and Oetiker clamps, so there's no brass possibly in contact with the soda.
The regulator adapter fittings were necessary because he's re-using an welding regulator made for argon gas;
while this works, regulators for CO2 normally come with the correct fittings in and out.
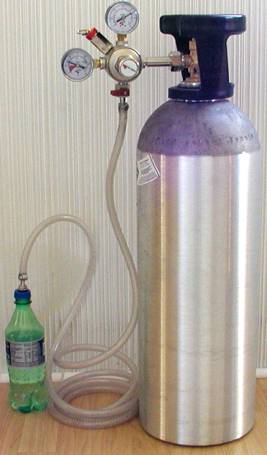 Rich Williamson made this rig out of new parts purchased at micromatic.com.
He says he used a "20 lb aluminum CO2 tank for $105, regulator for $49, hose for $5 (Home Depot), hose clamps for $2.50 and tire
valve for $5 (Pep Boys auto), $13.50 to fill the tank (Valley Ice)."
Rich Williamson made this rig out of new parts purchased at micromatic.com.
He says he used a "20 lb aluminum CO2 tank for $105, regulator for $49, hose for $5 (Home Depot), hose clamps for $2.50 and tire
valve for $5 (Pep Boys auto), $13.50 to fill the tank (Valley Ice)."
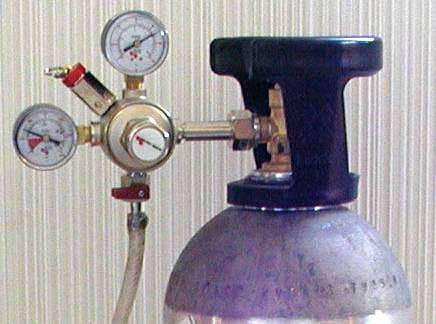 This close-up shows the regulator and gages. Note that the regulator incorporates an overpressure relief
valve, which is an important safety feature on the downstream side of the regulator if you are using
reinforced hose.
This close-up shows the regulator and gages. Note that the regulator incorporates an overpressure relief
valve, which is an important safety feature on the downstream side of the regulator if you are using
reinforced hose.
 Mike Pusateri built his bottle carbonator from a new 10 lb CO2 tank ($68), 2-gage regulator with overpressure relief ($40),
a tire valve stem, and $6 worth of tubing and clamps from a hardware store.
At 8 grams/liter for 4-volume carbonation, this $120 investment should carbonate about 500 liters of seltzer before needing
a CO2 refill. The initial fill with thus cost about 24 cents/liter, so the system more than pays for itself in the first few hundred
uses. Refills at $10 will yield an ongoing cost of about 2 cents/liter!
Mike Pusateri built his bottle carbonator from a new 10 lb CO2 tank ($68), 2-gage regulator with overpressure relief ($40),
a tire valve stem, and $6 worth of tubing and clamps from a hardware store.
At 8 grams/liter for 4-volume carbonation, this $120 investment should carbonate about 500 liters of seltzer before needing
a CO2 refill. The initial fill with thus cost about 24 cents/liter, so the system more than pays for itself in the first few hundred
uses. Refills at $10 will yield an ongoing cost of about 2 cents/liter!
Mike is fortunate to live near Beverage Control, Inc. in Atlanta, Georgia USA, which is
a supplier of soda fountains and related equipment to not just big clients but "anyone who serves carbonated drinks".
And of course, Atlanta is the birthplace and current corporate home of the most famous carbonated beverage of all, Coca-Cola.
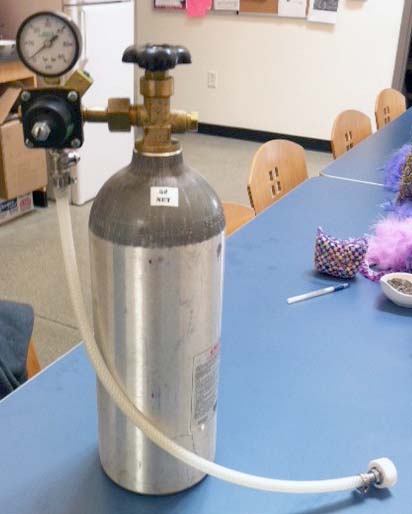 This setup was built by Jenny Ingram from items on eBay.
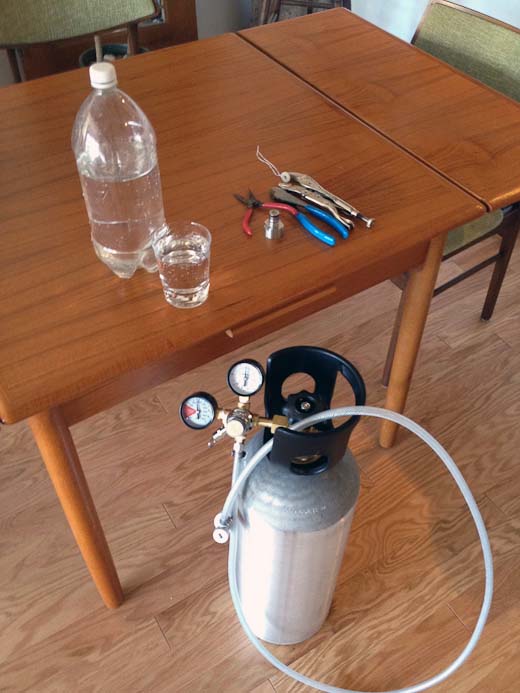 Luke Cyca assembled this carbonation system in the conventional method described above.
He describes it on a Web page here,
including a video demonstration.
Luke Cyca assembled this carbonation system in the conventional method described above.
He describes it on a Web page here,
including a video demonstration.
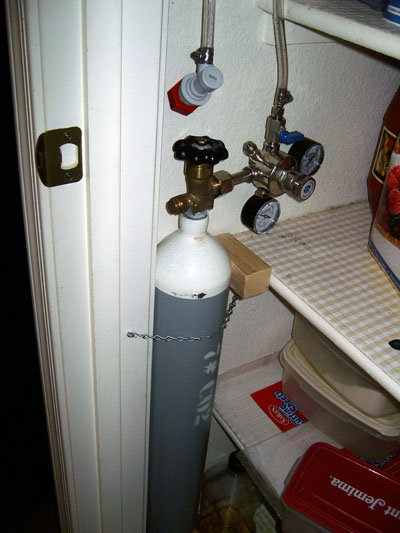 Haim Sandel cleverly installed his CO2 system in a closet for easy access and service.
The tall cylinder is properly restrained by the chain.
Any liquid inadvertently backflowing into the hose tends to run into the regulator with this
orientation, so it would be better to mirror the setup so that the hose fitting exits the
regulator in a downwards direction.
Haim Sandel cleverly installed his CO2 system in a closet for easy access and service.
The tall cylinder is properly restrained by the chain.
Any liquid inadvertently backflowing into the hose tends to run into the regulator with this
orientation, so it would be better to mirror the setup so that the hose fitting exits the
regulator in a downwards direction.
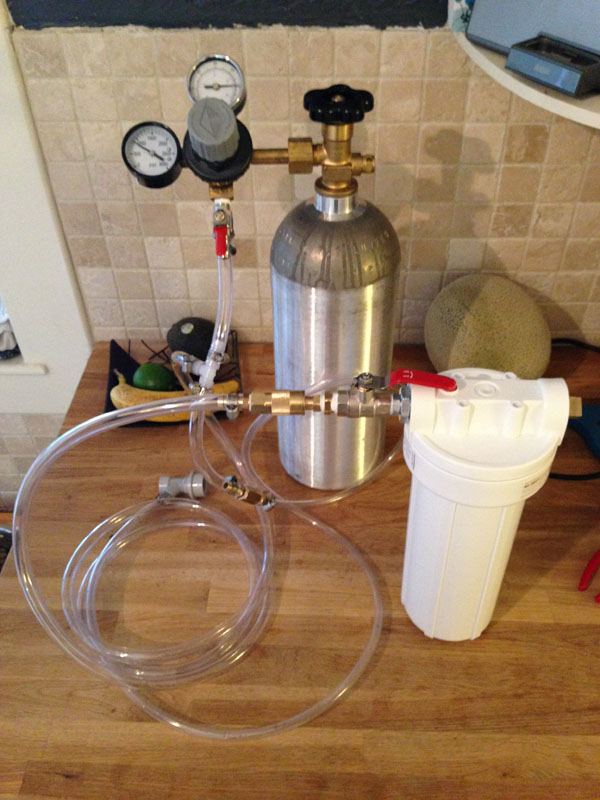 Brendan Morse built this enhanced system that also provides a CO2 pressure canister for
carbonating fresh fruit such as grapes, pineapple, strawberries, cantelope, etc.
A tee in the low-pressure hose feeds a ball-lock fitting for a carbonator cap, as
well as a quick-connect to the canister.
The canister is a filter housing for water filtration, a plumbing item readily available from
hardware stores, which is also typically rated for 100 psi of pressure.
This canister should be made of polyethylene, polycarbonate, or fiberglass, and not PVC or other brittle
plastic, to avoid the hazard of sharp pieces should there be a failure under pressure.
Brendan Morse built this enhanced system that also provides a CO2 pressure canister for
carbonating fresh fruit such as grapes, pineapple, strawberries, cantelope, etc.
A tee in the low-pressure hose feeds a ball-lock fitting for a carbonator cap, as
well as a quick-connect to the canister.
The canister is a filter housing for water filtration, a plumbing item readily available from
hardware stores, which is also typically rated for 100 psi of pressure.
This canister should be made of polyethylene, polycarbonate, or fiberglass, and not PVC or other brittle
plastic, to avoid the hazard of sharp pieces should there be a failure under pressure.
Properly carbonating fruit requires holding the items under CO2 pressure while chilling in an ice bath for some hours, to allow the CO2 to diffuse and dissolve all the way into the center. Purging the canister with CO2 gas to replace the air while applying the closure is also critical. The CO2 partial pressure after purging will then approximate the gage pressure.
You can experiment with carbonating fruit if you have only the PET bottle apparatus.
Simply choose or cut fruit pieces that fit through the neck of the bottle.
It may require cutting the (disposable) bottle open to retrieve the finished product.
Several people have written their own Web pages describing their carbonation experience: Jesse Gray at http://foo.net/~jmgray/carbonation/, and Alastair Ong at http://www.kk.org/cooltools/archives/001818.php.
Terriss Consolidated Industries, Inc manufactures process components and testing apparatus for the soft-drink industry.
Galco's Old World Grocery in Los Angeles retails many small and unusual brands of soda.
Phil Schy at American Soda Fountain, Inc. in Chicago (http://americansodafountain.com/) knows a lot about vintage soda fountain maintenance.
See the collector page at bottlebooks.com about the history and technology of siphon bottles.
At morebeer.com you'll find a whopping 6-liter "Tap-a-Draft" PET bottle, with caps and various other accessories, to carbonate beverages in larger batches than ordinary 2-liter or 3-liter soda bottles. This works best if you improvise your own CO2 cap fitting as with the bottle technique above, but using the larger cap (that is, larger than the standard 2-liter soda bottle cap) that fits this larger bottle. The larger cap is the standard 3-liter soda bottle size, but sadly, soda in 3-liter bottles doesn't seem to be sold in retail grocery stores any more, so this is my only known source of these items currently. They also sell a screw-on beer tap which incorporates a CO2 cartridge receptacle, but for carbonating seltzer or soft drinks, this would be expensive to operate and the restricted dispenser valve would spoil much of the carbonation.
Another useful item at morebeer.com is the Kent shut-off quick-disconnect. This is a ready-made soda bottle cap with a poppet valve and quick-connect gas fitting. This is less expensive than the commercial Carbonator Cap, and with a set of caps you can leave the caps on the bottles for storage after carbonating, without having to vent and switch on a plain cap.
CO2 cartridge systems: ISI continues to produce the classic Soda Siphon design using bulb-type CO2 cartridges. This is the bottle technique but using a permanent metal or glass vessel instead of a plastic bottle, with a CO2 injection port on the dispenser. The Soda Siphon provides a dispenser valve which the improvised bottle technique does not. The Soda Sparkle (also branded as Cuisinart in the USA) is another recent bottle carbonation system also using cartridges. The Soda Sparkle is essentially the PET bottle technique, but using a screw-cap applicator for costly one-use cartridges instead of a more economical bulk supply. The Perlage (Perlini) system provides various gadgetry to inject CO2 from 8-gram or 16-gram cartridges into bottles, which is quite suitable for reclosing partially dispensed bottles of sparkling wine for later reuse, but also can be applied to carbonating seltzer. For any of these various systems, the cartridges retail for upwards of $1 each for 8 grams (that's about $50 per pound!), with each yielding less than 1 liter of fully carbonated beverage, so these may be entertaining gadgets but they are ridiculously expensive to operate, worse even than the extravagant SodaStream.
Copyright 2002, 2003, 2004, 2005, 2006, 2007, 2008, 2009, 2010, 2011, 2012, 2013, 2014 Richard J Kinch
![photo of the "Carbonater [sic] Valve Coupling"](http://www.morebeer.com/product_images/morebeer.com/1/1318.jpg)